Drillhole Planning
When one or more interactive drillhole planning tools are used to create planned holes and hole patterns in Vizex, generated holes are saved to a Planning layer.
The planned holes in an underlying Trace String file can then be converted to a standard Collar file and Survey file and (optionally) associated with a Drillhole Database, when Finish Plan is selected on the Drillhole | Planning tab, in the Planning group.
The saved Trace String file can subsequently be re-loaded as an input to further planning. See: From Trace String File
You can also open an existing file for your Drillhole Plan using the Open Layer | Drillhole | Planning option on the Vizex tab, in the Layer group or create a new plan using New Layer | Drillhole | Planning.
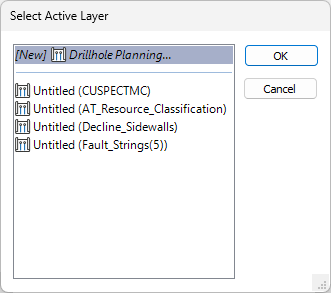
If there is no active Drillhole Planning layer, you will be prompted to select or create one:
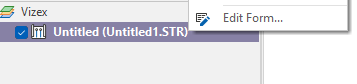
To edit the Drillhole Planning Shape layer, right-click on the layer in the Vizex Layer Display pane and select Edit Form.
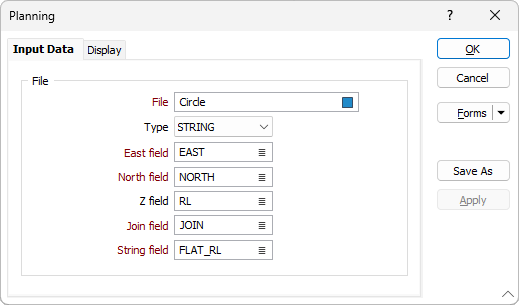
Input Data
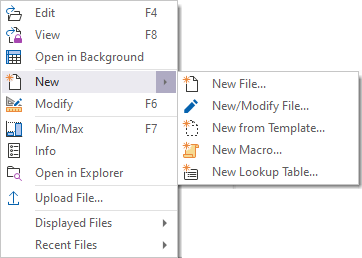
File
Select a file Type and then double-click (F3) to select the input File that contains the trace strings you want to load into the plan. To create a new file, right-click in the file input box and select New File from the right-click menu.
East and North and Z fields
Specify the names of the fields in which Easting, Northing, and Z coordinates are stored in the String file.
Join field
In forms that require polylines as an input, the values in this field define whether the data points in the input file should be joined by a line. If successive records have the same value in this field, a line will join the points. If two-factor topology is required, the values in a String field may also be used to segment the lines.
String field
In most forms, the String field is an optional generic attribute used to store a secondary input such as a code. Traditionally, this field has also been used with the Join field to define whether data points should be joined by a line, or strung, hence the name.
Forms
Click the Forms button to select and open a saved form set, or if a form set has been loaded, save the current form set.
By design, the Forms button is not available for loaded Vizex layers (i.e. when opening the form set properties of a layer in the Vizex Layer Display pane). In Vizex, the Forms button is only available for new forms opened via the Home tab or the Vizex tab, in the Layer group (or by double-clicking on a form type node in the Vizex Layer Types pane).
Save and Save As
Click the Save button to save the changes you have made to the form set. Click Save As to save your changes as a new form set. Save As will default to the first available form set number.
Reset
Click Reset to clear the form of all values and reset the form to its default state.
Reset Tab
For tabbed forms, select Reset Tab to clear the active tab of all values and reset the tab to its default state - without making any changes to other tabs in the dialog.
Undo and Redo
Click Undo (CTRL + Z) to undo recent changes in the form. After an Undo, click Redo (CTRL + Y) to restore the last change that was undone.
Collapse
Collapse (roll-up) the form to preview a chart, or preview the results of an operation in Vizex, or obtain input values from Vizex, the Property Window, the File Editor, or the Plot Editor.