Oriented Structure
![]()
Input Data
Display File
Database
Double-click (F3) to select
Select the Filter check box if you want to apply a filter to the database. Enter a filter number in the adjacent response. Double click (F3) to see a list of existing filters. Right click (F4) to open the dialog box where you can create a new filter.
Event file
Double-click (F3) to select the Event file that will be used as input to the process.
Events denote points down drillholes (or along a trench) where something of interest has happened. For example, you may want to show the point where oxidation stops. A typical Event file is unlike an Assay file in that it does not have From/To intervals. The depth at which an event occurs is recorded in a Depth field.
In addition to Hole (or Trench) ID, Event, and Depth fields, an Event file will usually contain a Symbology field that can be used to display symbols where each event occurs.
If you use either the FROM or the TO interval to define the depth of an event, you can use an Assay file as an Event file.
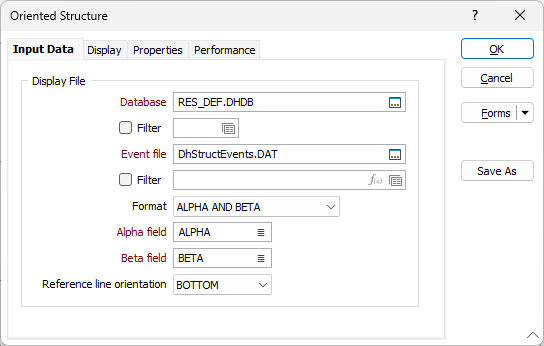
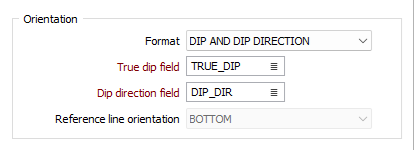
Format
Select the format option to determine how the structure strings will be calculated. You can either use the Alpha and Beta angles in the display file, or you can use the true dip and dip direction values written to the display file using the True Dip & Dip Direction function.
Selecting Alpha and Beta is only available for drillhole databases and will be slower, since the true dip and dip direction will need to be calculated for each event in the display file.
True dip and Dip direction fields
If you selected True dip and Dip direction as the input format, specify the fields containing True Dip and Dip Direction values.
Alpha and Beta fields
If you selected Alpha and Beta as the input format, specify the field containing the Alpha angle or core bedding angle. This is a measurement of the dip of the planar surface relative to the core axis.
Also specify the field containing the Beta angle. This is the clockwise angle, measured from the orientation (reference) line to the bottom point of the planar surface on the core. See: Oriented Core
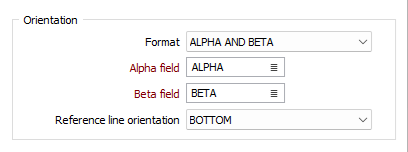
Reference line orientation
If you selected Alpha and Beta as the input format, specify whether the Orientation line (the reference for the Beta Angle measurement) is marked along the top or bottom of the hole by selecting an option from the drop-down list.
Forms
Click the Forms button to select and open a saved form set, or if a form set has been loaded, save the current form set.
By design, the Forms button is not available for loaded Vizex layers (i.e. when opening the form set properties of a layer in the Vizex Layer Display pane). In Vizex, the Forms button is only available for new forms opened via the Home tab or the Vizex tab, in the Layer group (or by double-clicking on a form type node in the Vizex Layer Types pane).
Save and Save As
Click the Save button to save the changes you have made to the form set. Click Save As to save your changes as a new form set. Save As will default to the first available form set number.
Reset
Click Reset to clear the form of all values and reset the form to its default state.
Reset Tab
For tabbed forms, select Reset Tab to clear the active tab of all values and reset the tab to its default state - without making any changes to other tabs in the dialog.
Undo and Redo
Click Undo (CTRL + Z) to undo recent changes in the form. After an Undo, click Redo (CTRL + Y) to restore the last change that was undone.
Collapse
Collapse (roll-up) the form to preview a chart, or preview the results of an operation in Vizex, or obtain input values from Vizex, the Property Window, the File Editor, or the Plot Editor.