Vizex
If Vizex is not already open, on the Vizex tab, in the Windows group, click New Vizex Instance.
![]()
On the Home tab or the Vizex tab, in the Layer group:
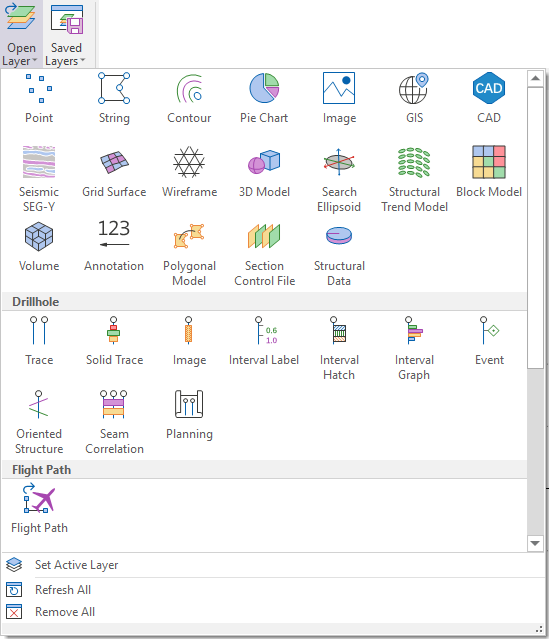
Select the type of layer you want to display.
Alternatively, double-click on a layer type when the Vizex Layer Types pane is open.
To load one or more layers, you can also do one of the following:
Load a saved view
On the Vizex tab, in the Layer group, select Saved Layers | Load Vizex Layers to load a previously saved view:
![]()
Alternatively, click the plus sign (+) next to the Saved Views node of the Vizex Layer Types pane to expand the list of saved form sets. Double-click on a Saved View to load it in the Vizex Layer Types pane.
In the same group, you can also select Saved Layers Manager to manage the form set folders and the layer groups that are currently available for selection as saved views in Vizex. See: Saved Layers
![]()
Load a saved session
On the Vizex tab, in the Layer group, select Saved Layers | Load Vizex Session, to load a previously saved session.
![]()
A session combines the functionality we associate with saving a view with the functionality we associate with saving a workspace. See: Save and Load a Vizex Session
Loading saved display limits in Vizex
When the Vizex display is active, you can switch between the display limits which have been saved as form sets. These are available for selection in the Section Window.
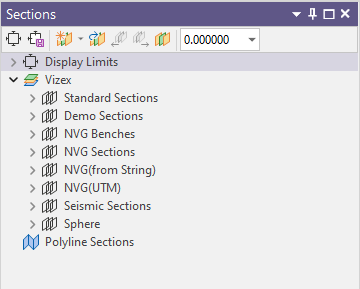
Load a saved form set
To Load a form set, click on the Plus sign (+) next to a Form Set Type to expand the list of saved form sets. You can then double-click on a Form Set to load it.
A wide variety of layer types can be loaded from the Display Layers menu on the Vizex tab, in the Layer group.
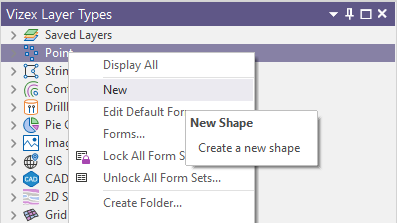
Create a layer
In the Vizex Layer Types pane , double-click on a layer type and enter new attributes in the displayed form. Alternatively, for layers that support creating new shapes, you can right click on the layer node of the Vizex Layer Types tree and select New. For example, in the Points layer:
When you load a layer type form set, it is added as a display layer in the Vizex Layer Display pane. You can turn the display of objects on and off using the selection check boxes next to each object.
You can modify the order in which your objects or layers are displayed by dragging and dropping them in the Vizex Layer Display pane. This will change the drawing order of the objects in the active display.
The extent of the first object you display will set the initial extent of the display. If you have previously set the display extent using the Display Limits menu option, that extent will be overwritten.
To zoom to the full extent of all display objects, click View All onthe Vizex tab, in the Viewpoint group .
![]()
See also Depth Testing
Save as a view
When one or more Vizex instances are active, the form sets you have loaded can themselves be saved as a form set. This higher level form set defines a Saved View of your data.
To save the active Vizex instances and form set settings as a Saved View, select Save Layers | Save Vizex Layers on the Vizex tab, in the Layer group.
![]()
Note: You can also set an Auto Load Last View setting via the backstage menu, on the General tab of .the Project Options | Vizex form.
Drag and Drop Files
You can load spatial data in Vizex by dragging and dropping files from Windows Explorer, the Project Explorer, or from an email attachment. See: Drag and Drop.
Open or Manage Files
| Action | Shortcut |
|---|---|
| Open a file | File | Open (CTRL + O) |
| Create a new file | File | New (CTRL + N) |
| Open the File Explorer | File | Explore Working Folder (CTRL + E) |
| Open the Wireframe Manager | Wireframe | Manage | Wireframes (CTRL + W) |
| Open the Script Editor | Script | Python | Open Script Editor (CTRL + F11) |
| Open the Online Help | Help | Contents (F1) |
Hotkeys
'Hotkeys' are single-press keyboard shortcuts that allow you to quickly switch from one editing or viewing mode to another. The following hotkeys and command shortcuts are provided in Vizex:
| Key | Does | Action |
|---|---|---|
| A | Invoke | Arc/Curve Properties |
| B | Toggle | Between mode |
| SHIFT + B | Toggle | Cycles through Between options |
| C | Action | Close String |
| D | Invoke | Move/Copy String (Duplicate) |
| E | Action | Extend String |
| F | Invoke | Insert Points (Equally Spaced) Fill |
| G | Invoke | String Gradient |
| H | Invoke | Bearing/Distance (Heading) |
| I | Toggle | Insert Points mode |
| SHIFT + I | Toggle | Cycles through Insert options |
| J | Action | Join Strings |
| K | Toggle | Select Triangles |
| L | Action | Switch to looking East (Left) |
| SHIFT + L | Action | Switch to looking North |
| M | Toggle | Measure mode |
| N | Action | New String* |
| Begin digitising a new string. If a Pit Design layer is the active layer, 'N' begins digitising a new CONTOUR rather than a new string | ||
|
*N will also complete the current editing of an object and start editing a new object of the same type. If you are digitising a CREST in Pit Design, for example, pressing N will finish the existing crest and start a new crest. If you are digitising a POLYGON, pressing N will finish the existing polygon and start a new polygon. |
||
| O | Action | Reverse (Opposite) String Direction |
| P | Toggle | Perspective mode |
| Q | Invoke | Validate Wireframe (F2) |
| R | Action | Switch to looking West (Right) |
| SHIFT + R | Action | Switch to looking South |
| S | Toggle | Snap mode |
| SHIFT + S | Toggle | Cycle through snapping options |
| T | Action | Switch to Plan (Top) |
| SHIFT + T | Action | Switch to looking Up |
| U, V or W | Constrain |
Rotation around U, V or W Viewing axis U, V, W are only active during rotation (including middle mouse rotation). |
| X, Y or Z | Constrain |
Rotation around X, Y or Z axis X, Y, Z are only active during rotation (including middle mouse rotation). |
| ESC | Toggle | Reverts to the Select tool from most cursor states or Cancels when a dialog is open |
| PGUP/ PGDN | Action | Previous/Next Section in clipped display |
| SHIFT + PGUP/ PGDN | Action | Previous/Next Section in the current Section Control File |
| HOME | Action | Align the view with the current section plane |
| F1 | Invoke | Micromine online Help |
| F2 | Action | Validate Wireframe |
| F4 | Invoke | Open the file from the active layer in the File Editor |
| F6 | Invoke | Open the file browser to select a file to be modified |
| F7 | Invoke | If a digitiser is connected, toggle between Digitiser and Mouse mode |
| CTRL + N | Invoke | File | New |
| CTRL + O | Invoke | File | Open (Edit) |
| CTRL + E | Invoke | File | Explore Working Folder |
| CTRL + W | Invoke | Wireframe | Manage | Wireframes |
| CTRL + Z | Action | Undo |
| CTRL + Y | Action | Redo |
| CTRL + SPACE | Action | In any open form, clears the current response and moves to the next response |
|
Qualifiers:
|
Georeferencing
Hotkeys and command shortcuts are also available in the Georeference window:
| Key | Action | Key | Action |
|---|---|---|---|
| X | Put Point | CTRL + X | Cut selected rows |
| S | Select tool | CTRL + C | Copy selected rows |
| M | Move tool | CTRL + V | Paste rows to current position1 |
| P | Pan tool | CTRL + R | Add rows at end of grid1 |
| Z | Zoom tool | CTRL + I | Insert rows to current position1 |
| Y | Redo | CTRL + ' | Copy cell above and paste to current cell |
| G | Show Guides | CTRL + L | Zoom to Selection |
| O | View All | CTRL + S | Save |
| CTRL + Z | Undo |
1 when a row or rows have been cut or copied to the clipboard.
Hotkeys are used directly inside Vizex based on the key press / character event. These are not part of the keyboard shortcuts and are not customisable.
For an extensive list of the available shortcuts, see Keyboard Shortcuts.