Image
![]()
Input Data
On the Input Data tab of the Image form, navigate to the location of the input file you want to load.
File
Specify the name and path of the input file. A wide variety of Raster formats can be opened in Vizex. To navigate to the location of the file, press F3 or click the Browse (...) button to the right of the File input box. You can preview an image by right-clicking (F4) in the File prompt.
Press CTRL + V to Paste the contents of the clipboard and create an image file on-the-fly.
Images and grids both fall under the category of raster data. Because of their similarity to images, many grid formats can also be displayed as images, which is useful if you want a grid to act as a simple background without using its 3D information. Additionally, file formats such as TIF can represent either image (such as satellite imagery) or grid data (such as elevations).
To make use of a grid’s 3D information in Vizex, load it using Display Layers | Grid Surface instead of as an image.
Multi Band
If you have selected a multi band image, click the Multi Band button to control the allocation of spectral bands to display colours. A common geological application of Landsat™ satellite imagery, for example, is to allocate the red, green, and blue display colours to spectral bands 7, 4, and 1.
The Multi Band button will only be enabled if the input file you have selected contains multiple bands. See: Display a multi band image
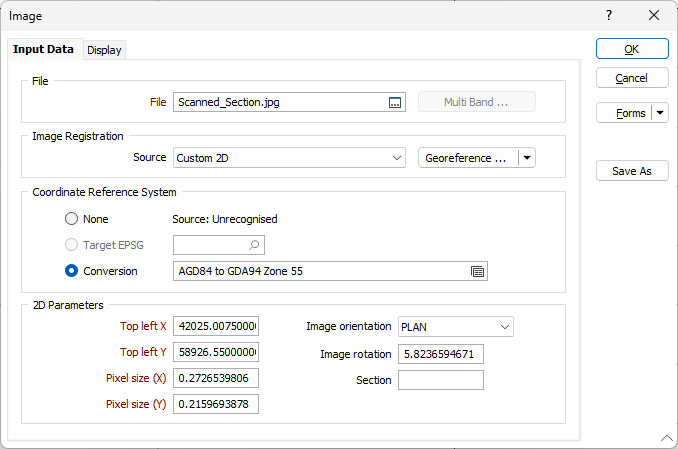
Image Registration
Source
Image registration source file options will depend on the type of the image file you have selected. Note:
GIS headers cannot support a 3D orientation and the images will be projected into a plan view instead. If the original 3D image is steeply inclined this can make the GIS version look heavily distorted. Nevertheless, it is a true representation of the 3D geometry.
Note that the Custom 2D Source option cannot be used to drape an image over a wireframe and should only be used when you want to register an image by defining the coordinates of the top left pixel and the pixel size.
In the case of a 2D image, a MapInfo TAB file and an Arcview World file are written to the folder containing the image file. There are two exceptions however:
- World or TAB files won't be generated when the image is in 3D, and when the image is rotated by more than a pixel or two.
- In the case of a 3D image, a Georeference file (*.GRF) is created. These georeference files are generated automatically when you generate a screenshot of the current view in Vizex, or when you select the Plot as image option when generating a plot file. GRF Georeference files have no issues with rotation.
Register Image
Options on the Register Image menu allow you to either:
- Select Georeference as the image registration source to georeference the image to real-world map coordinates. See: Image Georeference
- Select Fence as the image registration source to drape the image onto multiple, adjacent vertical planes to match real-world data. See: Fence Image Registration
Any image georeferenced in the application should use the GRF Source option.
Coordinate Reference System
None
If you do not want to convert between coordinate systems as you load the image, select None.
Target EPSG
This option is only enabled if the Input file contains recognisable information about the coordinate system that it was registered in. The EPSG number and name of the source coordinate system are provided if they are recognised.
If the Target EPSG option is selected, then the
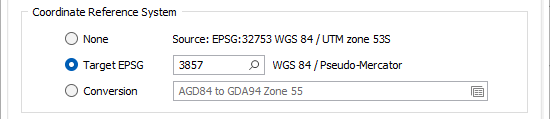
Conversion
Select the Conversion option to select or create a new coordinate conversion form set to convert between coordinate systems. See: Coordinate System Conversion
Note that client-side image coordinate conversion is also supported when you setup a WMS or WMTS image (on the File tab, in the Image group).
2D Parameters
If the input file you are loading is not georeferenced, you can enter image georeferencing parameters (if they are known).
If a georeference file is detected, or internal georeferencing information is detected in the file, that information is displayed in the 2D Parameters group. The X and Y reference coordinates for the Top left corner of the image, and the X and Y pixel sizes (in grid units) are displayed.
In the application, the X and Y reference coordinates always refer to the top-left corner of the image. However, ArcView World File and Esri HDR files reference the centre of the top-left pixel, so the reference coordinates will appear to differ from the contents of the files. This is not an error, but simply represents an on-the-fly conversion from one georeferencing system to another.
If an overriding header is not available, you can easily create your own World File to provide the necessary information.
Top left X and Y
Enter Easting (X) and Northing (Y) reference coordinates to locate the top left corner of the image. When you load a georeference file, theTop Left X and Y reference coordinates will be overwritten.
Pixel size X and Y
Enter the X and Y dimensions of each image pixel (in grid units). This enables you to relate the scale of the raster image to the display grid. When you load a georeference file, the pixel size parameters will be overwritten.
Orientation, Rotation and Section
Specify the orientation of the image (PLAN, LOOKING NORTH, or LOOKING WEST).
Optionally, specify the rotation of the image, and nominate a section value to correctly position the image in three-dimensional space.
To convert an image file to JPEG2000 format, use the Compress function on the File tab, in the Image group.
Forms
Click the Forms button to select and open a saved form set, or if a form set has been loaded, save the current form set.
By design, the Forms button is not available for loaded Vizex layers (i.e. when opening the form set properties of a layer in the Vizex Layer Display pane). In Vizex, the Forms button is only available for new forms opened via the Home tab or the Vizex tab, in the Layer group (or by double-clicking on a form type node in the Vizex Layer Types pane).
Save and Save As
Click the Save button to save the changes you have made to the form set. Click Save As to save your changes as a new form set. Save As will default to the first available form set number.
Reset
Click Reset to clear the form of all values and reset the form to its default state.
Reset Tab
For tabbed forms, select Reset Tab to clear the active tab of all values and reset the tab to its default state - without making any changes to other tabs in the dialog.
Undo and Redo
Click Undo (CTRL + Z) to undo recent changes in the form. After an Undo, click Redo (CTRL + Y) to restore the last change that was undone.
Collapse
Collapse (roll-up) the form to preview a chart, or preview the results of an operation in Vizex, or obtain input values from Vizex, the Property Window, the File Editor, or the Plot Editor.