Seam Correlation
![]()
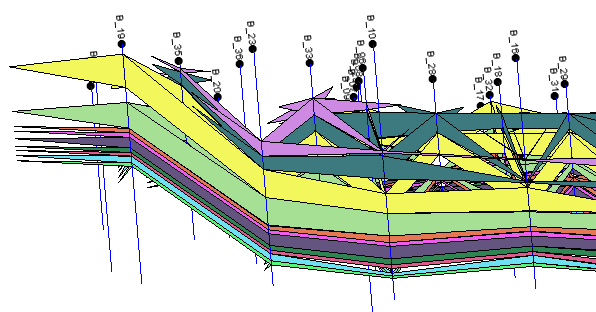
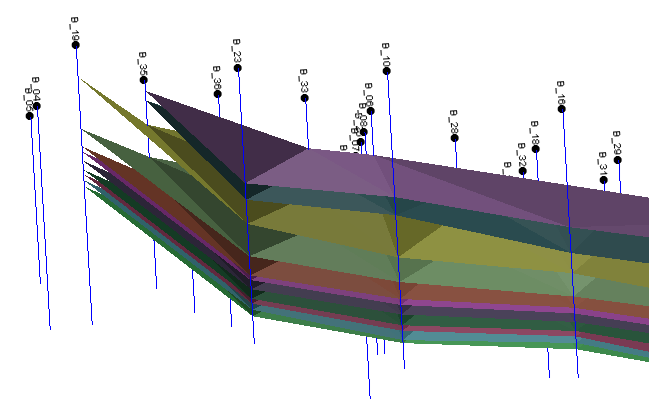
As well as providing a validation tool, seam correlation can guide you in areas of uncertainty. Filters can be applied both to the holes (DHDB) and to the (Interval file) seams being displayed.
The process reads through the Interval file, once per item in the colour set, getting the relevant top and bottom points of each hole. If more than one interval matches the colour for a hole, the process will get the top point of the shallowest interval and the bottom point of the deepest matching interval. For each item in the colour set, the top and bottom of each interval are joined to make a fence representing the seam thickness.
Input Data
Specify the following parameters on the Input Data tab of the Seam Correlation form:
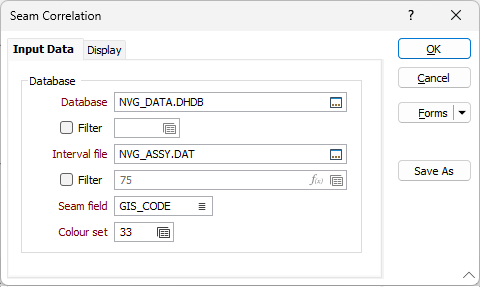
Drillhole Database
Enter the name of a drillhole database or double-click to select from a list of drillhole databases in the current project. Alternatively, you can right click and choose the Select option from the right-click menu. You can also Edit the properties of an existing database or create a New database.
Select the Filter check box if you want to apply a filter to the database. Enter a filter number in the adjacent response. Double click (F3) to see a list of existing filters. Right click (F4) to open the dialog box where you can create a new filter.
You can use the drillhole database filter to define the order in which the network is generated. For example, if the filter is on the HOLE field and the operator is "=" then the order of the holes within the filter will be the order of the holes along the network.
Interval file
Double-click (F3) to select the Interval file that will be used as input to the process.
Seam field
Double-click (F3) to select the name of the field that contains the values used to identify each seam.
Colour set
Double click (F3) to select a colour set. Right click (F4) to edit the colour set. The colour set is used with the Seam field. Each value in the colour set is a layer in the correlation diagram.
Correlation lines:
Surfaces:
Forms
Click the Forms button to select and open a saved form set, or if a form set has been loaded, save the current form set.
By design, the Forms button is not available for loaded Vizex layers (i.e. when opening the form set properties of a layer in the Vizex Layer Display pane). In Vizex, the Forms button is only available for new forms opened via the Home tab or the Vizex tab, in the Layer group (or by double-clicking on a form type node in the Vizex Layer Types pane).
Save and Save As
Click the Save button to save the changes you have made to the form set. Click Save As to save your changes as a new form set. Save As will default to the first available form set number.
Reset
Click Reset to clear the form of all values and reset the form to its default state.
Reset Tab
For tabbed forms, select Reset Tab to clear the active tab of all values and reset the tab to its default state - without making any changes to other tabs in the dialog.
Undo and Redo
Click Undo (CTRL + Z) to undo recent changes in the form. After an Undo, click Redo (CTRL + Y) to restore the last change that was undone.
Collapse
Collapse (roll-up) the form to preview a chart, or preview the results of an operation in Vizex, or obtain input values from Vizex, the Property Window, the File Editor, or the Plot Editor.