Input Data
![]()
A new Wireframe layer can be created using the New Layer tool on the Vizex tab, in the Layer group.
Alternatively, you can right click the layer node in the Vizex Layer Type tree and select New.
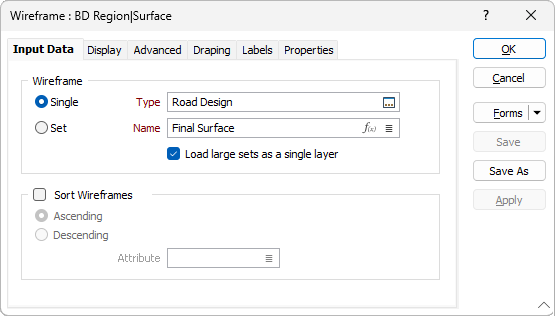
Single or Set
To process a single wireframe, select the Single option, select the Type of the wireframe, and then the Name of a wireframe of that type.
To process multiple wireframes, expressions, wildcards and partial names may be used in the Name field to select multiple wireframes as an adhoc wireframe set. A right-click Preview option will perform a check of an expression before using that expression to generate an updated list of wireframes. Alternatively, you can click the Expression icon ![]() and use the Expression Editor to create, modify and validate the expression. When a name or wildcard is entered in the Name field, and the Expression button is selected, the name/wildcard will automatically be converted to a valid expression when opened in the editor.
and use the Expression Editor to create, modify and validate the expression. When a name or wildcard is entered in the Name field, and the Expression button is selected, the name/wildcard will automatically be converted to a valid expression when opened in the editor.
To process the wireframes in a predefined wireframe set, select the Set option.
It is recommended that you Validate wireframes prior to using them in any process.
Load large sets as a single layer
Select this check box to load large wireframe sets as a single layer. This will improve loading time. Note however, that editing is disabled when wireframes are loaded in this mode.
Sort Wireframe Set
Select this check box to sort the wireframes in a predefined Set or sort the wireframes in an "adhoc" wireframe set (created on-the-fly by specifying an expression in the Name field when the Single option is selected).
The sort can be defined in Ascending or Descending order based on the values of a chosen sort attribute and will determine the order in which the wireframes in the set are loaded in Vizex.
Using an Expression
Using an expression to define a wireframe set gives you greater flexibility to choose individual or groups of wireframes:
The main difference between expressions and wildcards is that an expression must always evaluate to a true or false answer, whereas wildcards attempt to match the attribute value by replacing some characters with wildcards.
Here are some wildcard/expression comparisons to help familiarise yourself with expression-generated wireframe sets:
| Wildcard: |
|---|
| Select by: Name; Identifier: * |
| Expression: |
|---|
| {TRUE} |
| (literally, always true no matter what) |
Select a single wireframe from a type
| Wildcard: |
|---|
| Select by: Name; Identifier: Name_of_Wireframe |
| Expression: |
|---|
| ([Name]="Name_of_Wireframe") |
| (brackets added for clarity) |
Select wireframes beginning with a prefix
For example, UndergroundDrives, UndergroundPlanned, UndergroundVents
| Wildcard: |
|---|
| Select by: Name; Identifier: Underground* |
| (or even Under*) |
| Expression: |
|---|
| MATCH([Name], "Underground*") |
Select specific wireframes from a type
| Wildcard: |
|---|
| Select by: Name; Identifier: Name_1 |
| Select by: Name; Identifier: Name_2 |
| Select by: Name; Identifier: Name_3 |
| Expression: |
|---|
| IN([Name], "Name_1", "Name_2", "Name_3") |
Select wireframes within a range of (standard) attribute values
For example, volume or surface area.
| Wildcard: |
|---|
| No equivalent. |
| Expression: |
|---|
| (([SurfaceArea]>= 4300) & ([SurfaceArea] <= 78000)) |
Select wireframes within a range of (user) attribute values
User wireframe attributes work a little differently from standard attributes. User attributes are always text, whereas standard attributes have the correct type (for instance, Volume and Surface Area are numbers, and Name is text). When carrying out any kind of numerical comparison involving a user attribute you must always convert the text to a number. The simplest way to do this (for now) is to make the first term in the expression a number, which might require swapping the field, logical comparison, and value, like this:
100 <= [MyAttributeField]
Putting a number at the beginning of the expression forces the application to convert the result to a number. Just remember, you need to reverse the logical comparison whenever you swap the number and field. So, repeating the standard attribute example with user attributes would look like this:
| Wildcard: |
|---|
| No equivalent. |
| Expression: |
|---|
| ((4300 <= [MySurfaceArea]) & ([MySurfaceArea] <= 78000)) |
These examples should give you an idea of how to set up an expression-based wireframe set, which can involve any combination of wireframe types and standard or user attributes. Wireframe types (tridb files) in the application already include a large number of standard attributes, and many wireframe-oriented processes will add yet more attributes to a wireframe. And, of course you can always add your own, either by hand via Wireframe | Manage | Attributes, or by using tools like Wireframe | Attribute Assign.
Forms
Click the Forms button to select and open a saved form set, or if a form set has been loaded, save the current form set.
By design, the Forms button is not available for loaded Vizex layers (i.e. when opening the form set properties of a layer in the Vizex Layer Display pane). In Vizex, the Forms button is only available for new forms opened via the Home tab or the Vizex tab, in the Layer group (or by double-clicking on a form type node in the Vizex Layer Types pane).
Save and Save As
Click the Save button to save the changes you have made to the form set. Click Save As to save your changes as a new form set. Save As will default to the first available form set number.
Reset
Click Reset to clear the form of all values and reset the form to its default state.
Reset Tab
For tabbed forms, select Reset Tab to clear the active tab of all values and reset the tab to its default state - without making any changes to other tabs in the dialog.
Undo and Redo
Click Undo (CTRL + Z) to undo recent changes in the form. After an Undo, click Redo (CTRL + Y) to restore the last change that was undone.
Collapse
Collapse (roll-up) the form to preview a chart, or preview the results of an operation in Vizex, or obtain input values from Vizex, the Property Window, the File Editor, or the Plot Editor.