Tools
You can use the buttons and tools on the Flight Path toolbar to insert, modify, or delete viewpoints, play the flight path, or move through the flight path viewpoint by viewpoint. You can also rotate the viewing direction of a viewpoint while keeping the camera location constant.
Layer
Click Open | New to create a flight path (fly-through sequence) in Vizex by recording a series of viewpoints.
![]()
Click Open Layer | Flight Path to open a flight path (fly-through sequence).
![]()
Click Options to control the behaviour and the appearance of the flight path and set segment and point label options.
![]()
Play
Click Play to play the current Flight Path.
When you play the flight path, Vizex will move the current camera position between each viewpoint and interpolate between each viewpoint to give a smooth animation of the displayed object.
![]()
Click the Stop button to stop the playback of the current flight path. The current viewpoint (see below) will be the viewpoint which was current when the button was pressed.
![]()
Click Go to First Viewpoint to move to the first viewpoint in the current flight path.
![]()
Click Go to Last Viewpoint to move to the last viewpoint in the current flight path.
![]()
Click Go to Previous Viewpoint to move to the previous viewpoint in the current flight path.
![]()
Click Go to Next Viewpoint to move to the next viewpoint in the current flight path.
![]()
Repeat Playback
Click Repeat Playback to toggle Repeat Playback mode on and off.
If Repeat Playback is enabled, when you click the PLAY button (on the Vizex | Flight Path tab, in the Play group) the flight path is played repeatedly until you click the STOP button.
If Repeat Playback is not enabled, when you click the PLAY button, the flight path is run ONCE ONLY, from the current viewpoint to the end viewpoint.
![]()
Click Create Movie to save a Vizex Flight Path (.VFLY) file as a movie file.
![]()
View
-
Click Perspective Mode to toggle between Perspective mode and Orthogonal camera mode (this will change the Projection setting on the 3D tab of the Display Limits form).
![]()
-
Click Rotate View Direction to rotate the viewing direction while keeping the camera location constant. To restrict the rotation to the X,Y,Z axis or the camera U,V,W axis, hold down the respective key.
![]()
Viewpoint
The Current Viewpoint box indicates the number of the current viewpoint within the flight path. Enter another number and press ENTER, or drag the Flight Path Slider to move to another viewpoint.
The Flight Path Slider indicates the current viewpoint's position within the flight path. Drag the slider to rapidly move to another position.
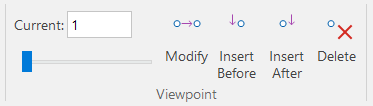
- click Modify Current Viewpoint to modify the current viewpoint.
![]()
- click Insert Viewpoint Before to insert the current view position before the viewpoint indicated on the Flight Path Slider.
![]()
- click Insert Viewpoint After to insert the current view position after the viewpoint indicated on the Flight Path Slider.
![]()
- click Delete Current Viewpoint to delete the current viewpoint.
![]()
String Editing
As you edit a flight path, the following String Editing tools are made available on the Flight Path ribbon:
-
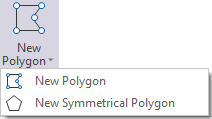
Click New Polygon to begin digitising a new closed string in the display. As an alternative, press the 'N' hot key to start a new polygon or string.
To finish the string, either double-click as you digitise the last point or press Escape (Esc). The new string will be auto-closed when you have finished.
To create a symmetrical polygon, use the drop-down menu:
-
Click New String to begin digitising a new string in the display. As an alternative, press the 'N' hot key to start a new string or polygon. The length, azimuth, inclination and gradient % of the string is shown on the status bar as a reference.
To finish the string, either double-click as you digitise the last point or press Escape (Esc). This tool will be disabled when the display is in String Clipping mode.

-
Click the Extend String tool to append points to one end of a string. Points are appended to the last point on the string. Alternatively, right-click on the end point you want to append to and select Extend from the Vizex right-click menu. As you drag and move the appended point, a new string segment is displayed (rubber-banded).
![]()
-
Click the Gradient tool to set the gradient (and Gradient Units) for a selected string or segment.
![]()
-
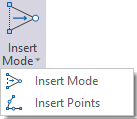
Click Insert Points to insert multiple points along a selected string or segment (when you right-click on the segment of a string and Insert Mode is active).
![]()
Click Insert Mode to toggle Insert Mode on and off.
-
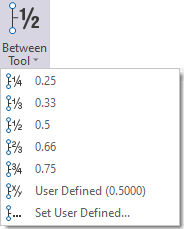
Click Between Tool to toggle the current Between Mode on and off. Alternatively, you can toggle Between mode on and off using the B shortcut key. To cycle through the Between modes on the drop-down menu, use the SHIFT + B key.
![]()
-
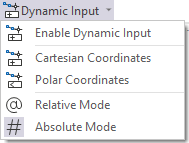
Click Dynamic Input to toggle Dynamic Input mode on or off when digitising strings or points. You can use the menu to switch between Cartesian Coordinates and Polar Coordinates input modes or select Relative mode to enter coordinates relative to the previous point. You can also press F12 to quickly toggle Dynamic Input on and off.
-
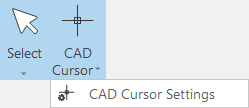
Click CAD Cursor to toggle the CAD Cursor display on or off. Note that the CAD cursor is only visible when an appropriate (Select Tool, Measure Tool, etc.) mouse mode is being used.
![]()
To change the display settings of the cursor, use the drop-down menu:
Pin
Click the Pin icon to display the ribbon even when it is out-of-context (in other words, the Vizex layer or the editor or function it relates to loses focus or is closed). The ribbon will be displayed until you either click the icon again to unpin it, or Close it.

Close
Toggle the Pin button to close the ribbon. The ribbon is displayed automatically when it is in-context (in other words, the Vizex layer it relates to is opened as the active layer, or the editor or function it relates to is opened.
