Point Cloud
![]()
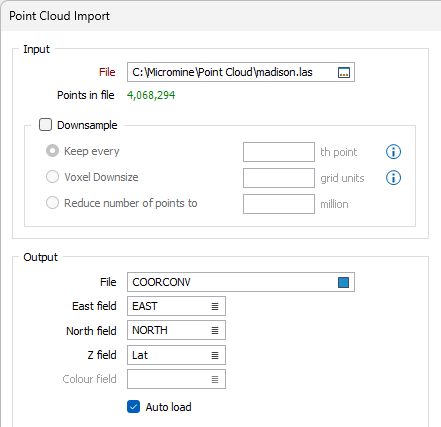
Input
Double-click, or click on the Select icon, to navigate to the location of the PLY, LAS/LAZ, or Leica Cyclone point cloud files you want to import.
You can limit the file selection using an All Point Cloud file types filter. Choosing the All Files Explorer filter will allow PDAL-compatible files, such as JPEG and TIFF files, to be selected.
The Points in File count from the selected file is displayed under the File field.
The points count, Min/Max Bounds, Attribute count and (where available) Horizontal and Vertical datum codes are also available if you hover on the Input file field.
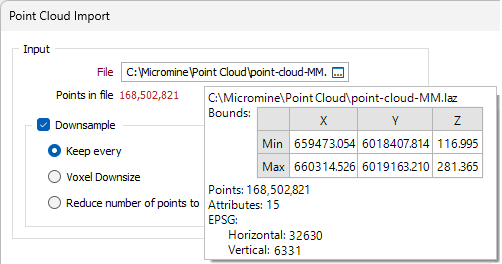
The Points in file count display will change according to the number of points in the total. Additionally, a context-sensitive tooltip will be available for the following ranges of total point count:
-
0 - 20M - The point count will be Green and the tooltip will read "For a small number of input points downsampling is not required.".
-
20M - 100M - The point count will be Orange and the tooltip will read "For a larger number of input points downsampling is recommended. For weaker hardware prefer memory optimised downsampling methods (as indicated).".
-
100M+ - The point count will be Red and the tooltip will read "This number of points may not be able to be displayed in Vizex. To prevent this from happening downsample using the options below. Prefer memory optimised downsampling methods (as indicated).".
Downsample
Point cloud data often comprises millions to billions of 3D points. Select the Downsample option to simplify a dense point cloud so that processing is more efficient and interpretation clearer.
To downsample the point cloud data, choose from one of the following options:
Keep Every
Select this option to downsample the point cloud by keeping every <n>th point, where <n> is the number you enter.
Voxel Downsize
Select this option to use the first point found inside a voxel as the output point and filter out all other points in the voxel.
Reduce the number of points to
Select this option to reduce the number of points by expressing a filter value of <n> million points.
All downsampling options will speed up processing, but Keep Every Nth Point and Voxel Downsize are recommended for very large inputs. See: Point Cloud
Output
File
Enter, or double-click (or click on the Select icon) to select, the name of the Output file. This will typically be a .DAT file containing assay point data.
If you don't enter a value, the name and location of the output file will be auto-filled. If the path created for Autofill has the same extension as the input file path, _MM is appended to the output file name.
East, North, and Z fields
Specify the names of the point coordinate fields in the Output file.
Classification field
(Optional) If you specify a field name, point classifications (as per the LAS specification) will be written to the Output file as 3-width character values. To write all dimensions to the Output file, see: Import all attributes (below).
Intensity field
(Optional) If you specify a field name, PDAL intensity dimensions will be written to this field. To write all dimensions to the Output file, see: Import all attributes (below).
Colour field
When a Colour field is specified, the import process will combine Red, Green and Blue colour values and write a single value to that field. If the input colour is a 16-bit colour, it will be downsampled to an 8-bit colour.
If a Colour field is unspecified and the Import additional fields check box is selected, the colour will be imported as values in three separate R, G, B fields. These colours could be 8-bit or 16-bit, depending on the input file.
(Optional) If you specify a field name, PDAL RGB colour dimensions will be written to the Output file. To write all dimensions to the Output file, see: Import all attributes (below).
Auto load
Select this option to open the imported points as a Point layer in Vizex.
Coordinate Transform
Modern geospatial data are defined in numerous coordinate systems from around the world, which can complicate the process of combining them into a single view. A typical example involves converting government data (in latitude/longitude coordinates) to the working coordinate system of your project; another is converting historic data on an old geodetic datum to a modern geocentric datum.
None
If you do not want to convert between coordinate systems as you import your point cloud , select None. The source coordinate system will be displayed.
If you want to convert the coordinates, there are currently two conversion options:
Target EPSG
This option is only enabled if the Input file contains recognisable information about the coordinate system that it was registered in. The EPSG number and name of the source coordinate system are provided if they are recognised.
If the Target EPSG option is selected, then the
Conversion
To apply a coordinate system conversion to the coordinates, click the Form Set button (F4) to select a Coordinate System Conversion form set. Right-click to create a New formset.
![]()
Attributes
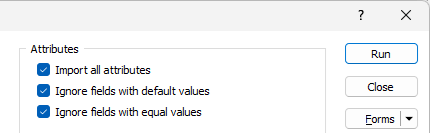
Import all attributes
Select this check box to write all PDAL dimension data to the Output file. The check boxes in the Import column of the Attributes grid will be disabled, however you can still use the grid to map imported attributes to fields in the Output file.
Note: If the Intensity field, Classification field, or Colour field is left blank in the Output group of the form, PDAL Intensity, Classification, or Colour (Red, Green, Blue) dimensions will still be written to the Output file if the Import all attributes check box is selected.
To select which attributes to import, clear the Import all attributes check box. Note that the dimensions that can be written to the Output file will depend on the input reader used to create the input data.
Note The grid is disabled if the file has no attributes, or if a preview of the file is unavailable from PDAL.
Ignore fields with default values
Select this option to ignore fields which contain default values only. Note that this option does not apply when you are appending to the records in an existing file.
Ignore fields with equal values
Select this option to ignore fields which contain the same values. This will ignore the import of attributes with a single value, which may not be the default (which can be ignored using Ignore fields with default values).
Attributes Grid
The Attributes grid displays the PDAL dimension names and the corresponding mapped field for the import. When a PLY, LAS/LAZ or e57 Point Cloud file is selected for import, the existing attributes will be automatically loaded into the Attributes grid. The grid is disabled if the file has no attributes.
Import
When the Import all attributes check box is not selected, use the check boxes in this column to select which attributes to import.
Attribute
The PDAL dimension names of the attributes in the Input file are shown in this column. To view a PDAL dimension description for an attribute, hover the mouse over the attribute name.

Each imported attribute may be mapped to a field in the Output file:
Field
For those attributes selected for import, click on the List icon to select a field that can be mapped to each attribute.
