Test Drive Road
![]()
The Test Drive Road tool utilises the Flight Path functionality of Micromine Origin & Beyond to enable you to "drive" up or down a ramp. Seeing the road from the driver view in 3D can help to visualise the design and make adjustments accordingly.
If not already selected, you will be prompted to select a road to test drive:
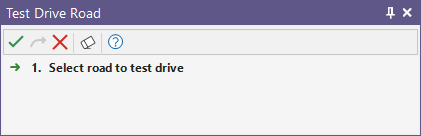
Select a segment(s) to test drive and click Accept Selection.
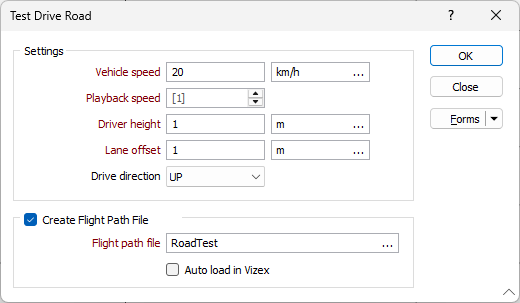
Set the following parameters in the Test Drive Road form:
Settings
The Settings parameters determine the speed of the vehicle and the view details for the test drive.
Vehicle speed
Enter the speed at which the vehicle for the test drive should be driving. Leave the field to accept the default speed of 15kmph.
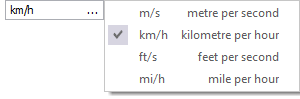
You can change the unit of measurement using the ellipsis:
Playback speed
The playback speed of the test drive animation can be controlled by entering a value in the Playback speed field. Use the spinner controls to set the speed higher or lower, or enter the value directly. A value of 1 is the default and will play the animation at normal speed. Negative and partial values are not supported.
Driver height
Enter the height offset of for the view to provide a more accurate representation of the driver's point of view. This value is defaulted at 2 metres.
You can change the units of measure for the Driver height using the ellipsis.
Lane offset
Enter an offset for the lane / centreline (left or right) to simulate driving in lanes on the road. The default value is 0, which means the view will be down the centre of the road.
You can change the units of measure for the Lane offset using the ellipsis.
Drive direction
Select whether to simulate the test drive Up or Down the selected road.
Create Flight Path File
Select the option to enable the road test drive to be saved to a flight path file. Saving the test drive as a flight path file allows you to make changes using the flight path layer Tools at a later time.
Flight path file
If you have enabled Create Flight Path File, select the location and filename for the Flight path file you want to save.
Auto load in Vizex
Select the option to automatically load the flight path in Vizex on creation.
OK
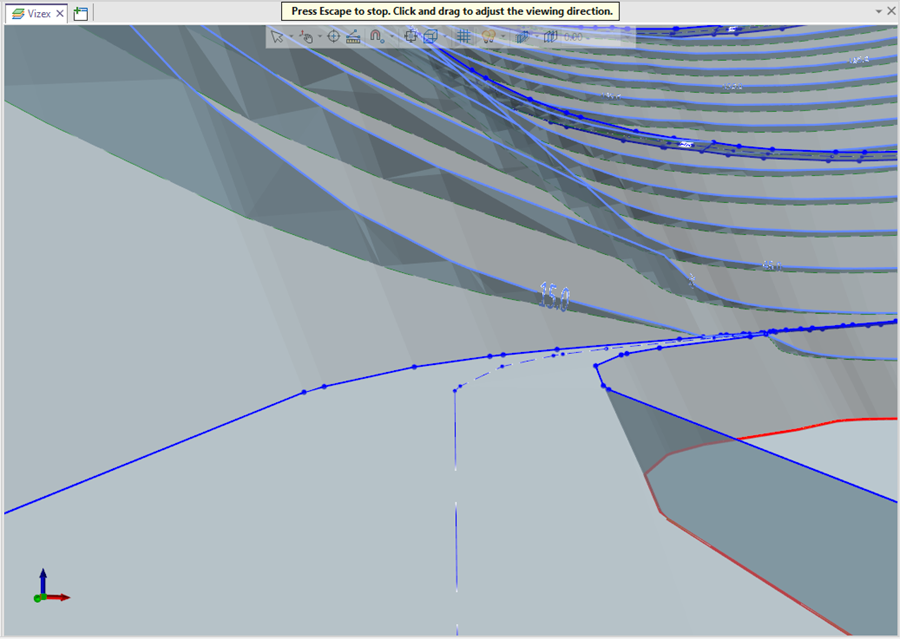
When you click OK, the test drive will begin and continue to the end of the selected road. If requested, the flight path file will be saved to the specified location. You can click and drag to adjust the viewing direction. If you press ESC, the test drive will stop and be cancelled.
Forms
Click the Forms button to select and open a saved form set, or if a form set has been loaded, save the current form set.
By design, the Forms button is not available for loaded Vizex layers (i.e. when opening the form set properties of a layer in the Vizex Layer Display pane). In Vizex, the Forms button is only available for new forms opened via the Home tab or the Vizex tab, in the Layer group (or by double-clicking on a form type node in the Vizex Layer Types pane).
Save and Save As
Click the Save button to save the changes you have made to the form set. Click Save As to save your changes as a new form set. Save As will default to the first available form set number.
Reset
Click Reset to clear the form of all values and reset the form to its default state.
Reset Tab
For tabbed forms, select Reset Tab to clear the active tab of all values and reset the tab to its default state - without making any changes to other tabs in the dialog.
Undo and Redo
Click Undo (CTRL + Z) to undo recent changes in the form. After an Undo, click Redo (CTRL + Y) to restore the last change that was undone.
Collapse
Collapse (roll-up) the form to preview a chart, or preview the results of an operation in Vizex, or obtain input values from Vizex, the Property Window, the File Editor, or the Plot Editor.