Tools
Tools applicable to open pit design are available on the Mining > Pit Design (Dynamic) ribbon:
On the Mining | Pit Design (Dynamic) tab, in the Layer group:
-
Click New to create a new Pit design using a dynamic engine that allows unlimited pre/post-processing.
![]()
-
Click Open to display an existing Dynamic Pit design.
![]()
-
Click Edit Form to open the form for the selected layer.
![]()
On the Mining | Pit Design (Dynamic) tab, in the Setup group
-
Click Setup to configure the default mode and parameters for the pit design.
![]()
-
Click Bench List to display the Bench List defaults and list of Benches in the pit design.
![]()
On the Mining | Pit Design (Dynamic) tab, in the Constraint group:
-
Click New Base to add a new base polygon from which to build the pit design.
![]()
-
Click New Base | Add Base to add an existing polygon as a base from which to build the pit design.
![]()
-
Click New Flat Area to create a new flat area (external) constraint polygon.
![]()
-
Click New Flat Area | Add Flat Area to use a selected polygon to define the flat area.
![]()
-
Click New Pillar to digitise a polygon to define a pillar (internal) constraint.
![]()
-
Click New Pillar | Add Pillar to add a selected polygon to define an internal pillar.
![]()
-
Click Constraint List to open, manage and edit a list of all of the constraints in the design..

On the Mining | Pit Design (Dynamic) tab, in the Variable Constraint group:
-
Click Variable Constraints to enable and configure variable constraints for your pit design using a block model and wireframes.
![]()
-
: Click Polygon Zone to interactively add a polygon or polyline constraint to your pit design.

-
: Click Polyline to interactively select part of the bench to create a polyline constraint in your pit design.

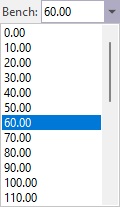
On the Mining | Pit Design (Dynamic) tab, in the Active Bench group:
-
Set the active bench by selecting it from the Bench drop down.
-
Click the Enable Clipping button to toggle Clipping mode for the pit design. The size of the clipping window is configured using Display Limits.
![]()
-
Click the Hide Inactive Constraints button to hide constraints located at benches other than the selected Active Bench.

On the Mining | Pit Design (Dynamic) tab, in the Editing group:
-
Click Replace With Curve to replace a portion of a line with a an adjustable bezier curve.
![]()
-
Select Replace With Curve | Replace String to replace a portion of a line by digitising its replacement.
![]()
-
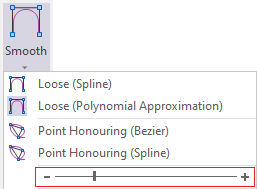
Select Smooth | Loose (Spline) to smooth a selected string (or segments) by fitting a spline curve.
-
Select Smooth | Loose (Polynomial Approximation) to smooth a selected string (or segments) by approximating a polynomial to it.
![]()

-
Select Smooth | Point Honouring (Bezier) to smooth a selected string (or segments) by fitting a bezier curve to each segment.
![]()
-
Select Smooth | Point Honouring (Spline) to smooth a selected string (or segments) by fitting a spline curve that keeps the position of the existing points.
![]()
-
Use the Smooth String Adjustment Control slider control to apply the degree of smoothing intensity for Loose smoothing, or control point density for point honouring smoothing.
-
Click Smooth | Smooth String to add points to create a smoother looking string.
![]()
-
On the Mining | Pit Design (Dynamic) tab, in the Editing group:, click More…
 for additional string editing options:
On the Mining | Pit Design tab, in the Ramp group
-
Click the Road List button to view and edit roads in the current pit design.
![]()
-
Click Add Road to start a new road in the current pit design.
![]()
-
Click Edit Road to edit the selected road or its segment.
![]()
-
Click the Remove Road button to remove the selected road or slot ramp from the pit design.
![]()
-
Click the Remove Road | Remove Flat Section option to remove the selected road flat section or switchback.
![]()
-
Click the Remove Road | Insert Road Stop option to stop the road at the selected segment.
![]()
-
Click Add Flat Section to generate horizontal parts of a road for a specified distance, including the option of having flat road sections between benches.
![]()
- Click Add Flat Switchback to automatically switch the direction of the current road from clockwise to anti-clockwise (or vice versa).
![]()
- Click Add Flat Switchback | Add Double Switchback to add a double switchback to a selected road segment in the pit design.
![]()
-
Click Add Inclined Switchback to add an inclined switchback to a selected road segment in the pit design.
![]()
-
Click Add Slot Ramp to add a slot ramp road to a selected road segment in the pit design.
![]()
-
Click Edit Slot Ramp to edit existing slot ramp roads by modifying the slot ramp guide settings.
![]()
-
Click Test Drive Road to select a road in the design to be displayed in a 3D "drive" view.
![]()
On the Mining | Pit Design tab, in the Generate group
-
Click Update Design to manually update the pit design with any changes to the individual components of the design.

-
Select Auto Update to enable automatic updates to the pit design based on any changes to the individual components.
-
Click the Show Pit Shell button to display the pit shell as a shadow object.

-
Click the Generate Pit Shell button to generate a pit shell from the Pit Design active layer.

On the Mining | Pit Design tab, in the Export group
-
Click the Export Road Network button to export the centrelines of the Pit Design roads.
![]()
-
Click the Export Pit Strings button to export the whole Pit Design (Dynamic) as a Pit Design (Manual) .PIT file or String (.STR) file.
![]()
Pin
Click the Pin icon to display the ribbon even when it is out-of-context (in other words, the Vizex layer or the editor or function it relates to loses focus or is closed). The ribbon will be displayed until you either click the icon again to unpin it, or Close it.

Close
Toggle the Pin button to close the ribbon. The ribbon is displayed automatically when it is in-context (in other words, the Vizex layer it relates to is opened as the active layer, or the editor or function it relates to is opened.
