Lab Data
![]()
The Merge Lab Data function can:
- Merge or append data from lab files into files in the program.
- Automatically create a target file in the program with the contents of the lab file.
- Work with both comma delimited and column delimited files.
- Accommodate lab files with up to 130 fields. Assays marked as falling below the detection limits can be replaced with a standard code or, if the detection limit is in the lab file, with the detection limit.
- Replace laboratory codes with ones that are standard in your company.
Only the Sample field is used as the matching key. This is the difference between this and other merge functions
You can also:
- Define how the function will deal with laboratory codes and when samples results are below the detection limit.
- Overwrite values already in the target file.
- Define values and the field to which they will be written in the target file when the merge for that record is successful.
- Specify a file where unmerged records will be written.
- Use Autofill to match the fields in the lab and target files.
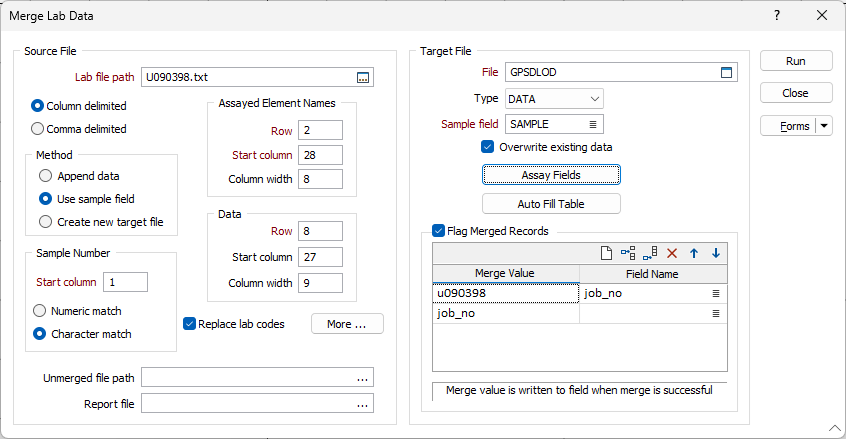
Lab filepath
Double-click (or click on the Select icon) to select the laboratory file containing the sample data you want to merge. Select Comma delimited or Column delimited according to the lab file type. If you need to check its contents, right-click (F4) with the cursor in the Lab filepath response.
Method
Select the method you will use to merge the data. If you select Append data , the program will add the records from the lab file to the end of the target file. If you select Use Sample field , the program will use matching sample numbers in the source and target files to control the merge. If you select Create new target file , the function creates a new file with the same fields as the lab file (See Target file below).
Sample Number
If you have selected Use sample field as the merge method, define how the sample numbers will be matched between the lab and the target file and specify the Start Column.
Assay Element Names and Data
Define where the function will find the Assayed element names and the data values in the lab file, by specifying a Row number, Start Column , and Column Width for each.
Replace lab codes
Select this option when you want to replace the entries made by the Lab, with the codes used by your organisation. Click the More button to open a dialog box where you can specify the codes you want to replace, and their replacement values. Both general codes, and those used to define that an assay fell below the detection limit, can be defined. See: Replace codes in the lab file
Unmerged filepath
Optionally, enter (or double-click to select) the name of a file where any unmerged records from the source file will be written. See: Using an unmerged file
Report file
Enter the name of the Report file where a summary and/or the results of the Merge process will be written. If the file does not exist, it will be created. If the file exists it will be overwritten.
Target file
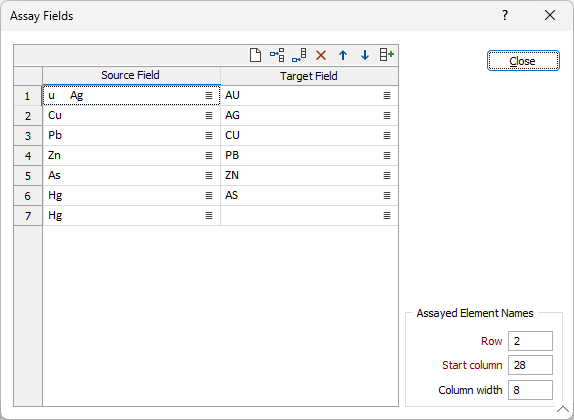
Double-click (or click on the Select icon) to select the name of the Target file. Specify the file type and the name of the Sample field in that file. Click on the Assay fields button to adjust the mapping of the assay fields between the Lab and the Target files.
Alternatively, you can select the Create new target file option as the Method used to merge the data (See above). This allows you to automatically generate a data file with all the fields in the Lab file. This can be useful when you want to import the data for further processing.
Normally, a target file will be created in the office or field before (or soon after) the samples are taken. The sample numbers and the coordinates where the samples were taken are recorded in this file.
Overwrite existing data
When you select this option, the merge process will overwrite existing data in the Target file. If not selected, the merge process will only write new information to the file.
Auto Fill Table
The process will automatically match the fields in the lab file with those in the target file. However, this will not always result in perfect matches. For this reason, you can click on the Auto Fill Table button to change which fields in the target file are matched to those in the lab file (press F3 with the cursor in the Source and Target field input boxes).
Flag Merged Records
Select this option to write user defined values to one or more fields in the Target file, for all records modified by the Merge process.
Enter values in the grid list to identify records where the merge process has been successful. These values will be written to the fields specified in the Field Name column.
Use the buttons on the local toolbar to Manage the rows in the list.
Run
Finally, click Run to run the function.