Insert Seams & Interburden
![]()
It is easiest to breakdown the functionality into two categories:
- For the stratigraphy between the first and last points of observation (seam intersections):
|
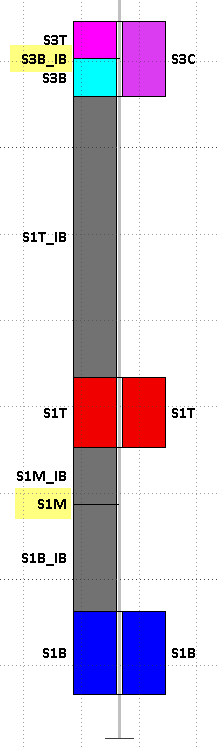
The diagram illustrates the content of the Seam file before (RHS) and after (LHS) running the Insert Interburden function. Highlighted intervals have zero thickness. When consecutive records in the SEAM file match consecutive seams in the Stratigraphy file, an Interburden (parting) record is inserted. The new From and To values reflect the ‘gap’ between the seams. If there is no gap, an interval with zero thickness is inserted. The interburden naming convention is defined on the Insert Missing tab. When consecutive records in the SEAM file are non-consecutive seams in the Stratigraphy file, the missing seam (or seams) are inserted together with the necessary interburden records. The new seam(s) will have zero thickness. The total interburden thickness will equal the interval between the two logged seams. The individual interburden thickness can either be divided evenly or be modelled based on the relative interburden thicknesses in surrounding holes. |
|
- For stratigraphy within the hole, but before the first, or after the last, point of observation.
- The first (last) seam in the stratigraphy sequence is reached.
- The resultant interval would be at least partially above the collar, or below the end of hole.
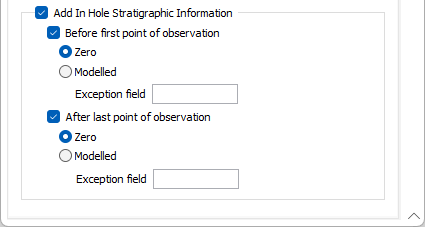
Records are inserted until either:
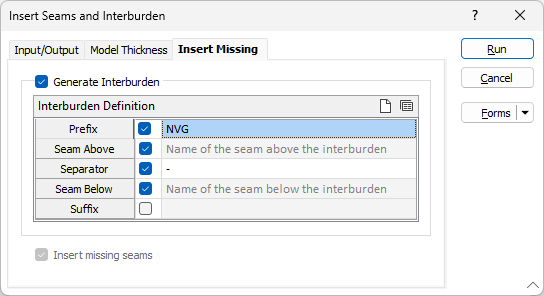
On the Insert Missing tab you can choose to generate interburden or insert missing seams:
|
As an example, consider the situation where there are 2 seams A and B (A above B). B is consistent across the area of interest, but A is “washed out” in one region. Holes in this washout area only intersect Seam B. To create a Seam Block Model, the standard process is:
The result, however, would not correctly reflect the regions where Seam A has been washed out. To model the A seam thickness properly we need to insert zero thickness records in holes that do not intersect the A seam. Using this function and selecting ‘Add In Hole Stratigraphic Information - Before First Point of Observation’ will ensure that the modelling honours the washout. If the washout was in Seam B rather than Seam A, then the selection would be ‘After last point of observation’. |
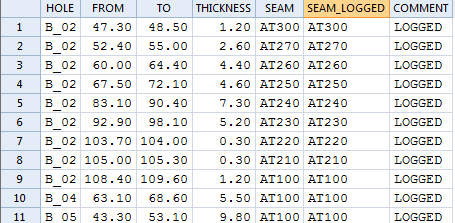
The following screenshots show a Seam file before and after being processed:
Before:
After:
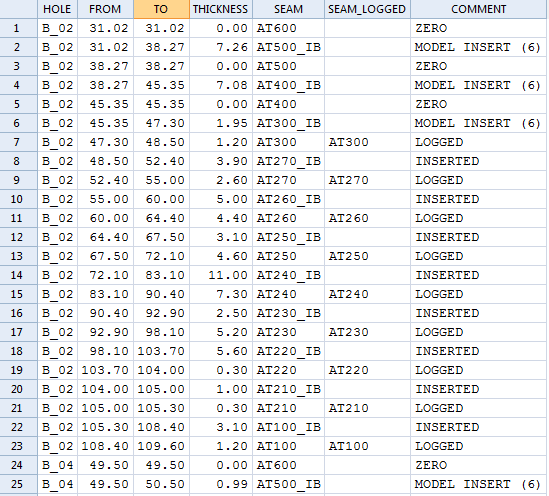
The SEAM_LOGGED field indicates which of the records are original. The COMMENT field indicates how the newly inserted records were derived. The bracketed number indicates how many holes were used in the modelling process.
This function only inserts intervals within the hole (so between the collar and end of hole – the Extrapolate Reference Seam will add intervals beyond the hole extents). So if a seam is defined in the stratigraphy, but not intersected (logged) there is a strong inference that the seam has been pinched out at this location, so a zero thickness is appropriate. There are other possibilities, particularly above the first point of observation.
However it is also worth noting that there is often little to be gained by modelling seam thicknesses before the first point of observation (or after the last point of observation) if the Reference seam is intersected by the hole in question. The Grid Modelling process models seam thickness in any case.
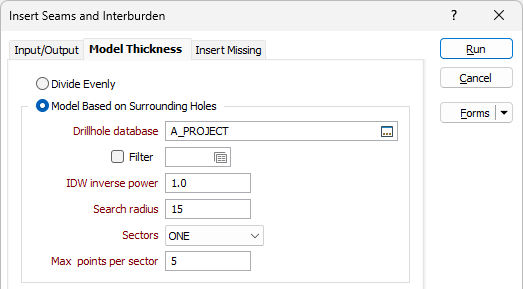
Specify the following inputs in the Insert Seams and Interburden form:
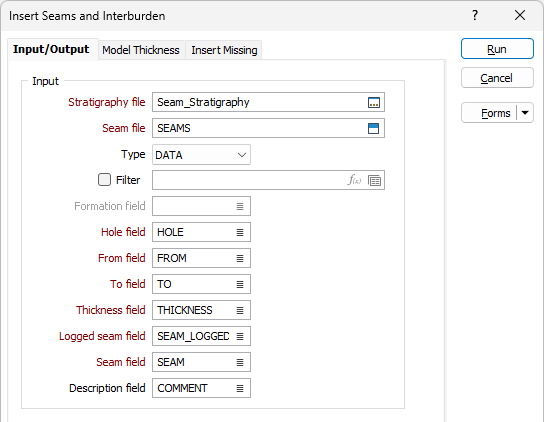
Input
Stratigraphy file
Double-click (F3) to select the name of an input Stratigraphy file. A Stratigraphy file is a compiled file that is used to interpolate and display the stratification of the seams in a Seam file.
You can right-click in the File input box to view the Stratigraphy file and manipulate the stratigraphy sequence.
Seam file
Enter or double-click (F3) to select the name of an input Seam file generated by the Generate Seam File. A Seam file is an Interval file which has additional fields that record the status of all logged and inserted seams. The Seam file is used as an input to various Seam Stratigraphic functions.
Formation field
(Optional) Double-click (F3) to select the name of the field that contains the values that identify each formation. A Formation is a group of seams, modelled independently.
Interburden is only inserted between seams that are in the same formation. The Seam Block Model | Generate Waste Blocks function can later be used to insert interburden blocks between formations.
Hole, From and To fields
Double-click (F3) to select the names of the fields in the Interval file that contain Hole identifiers and From and To intervals.
Thickness field
Double-click (F3) to select the name of the field that contains the Thickness values calculated from the From and To interval values in the Interval file.
Logged seam field
Double-click (F3) to select the name of the field that contains a record of the seams originally logged in the Seam file. The content of the Seam field is duplicated into a field with a “_LOGGED” suffix. The content of the Seam field can be modified by subsequent processes, however the _LOGGED field remains unchanged, to indicate the original seam coding for that interval.
Seam field
Double-click (F3) to select the name of the field that contains the values used to identify each seam.
Description field
(Optional) Double-click (F3) to select the name of a Description field. The Description field will be populated by comments that indicate the derivation of each interval.
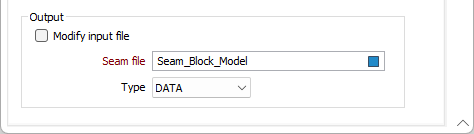
Output
Modify input file
If this option is selected, the results of the process will be written to the Input file. If the Modify input file option is not selected, double-click (F3) to select the name of an Output file.
Forms
Click the Forms button to select and open a saved form set, or if a form set has been loaded, save the current form set.
Run
Finally, click the Run button to begin the process.