Lithology
Use the Lithology tab of the Geology Model form to configure the interval file, included lithologies and background geology control details for the geology model.
If active faults are included in the lithologies of the model, you can also configure the ways in which they intersect or terminate.
Input
Interval File
Double click or click the Select icon to select an Interval file containing lithology information. If required, you can apply a Filter to the file.
Lithology field
Select the field in the file that contains lithology codes.
Note: For the attributes on the tab, you can select an value using the list button or right-click and select Edit Expression to open the Expression Editor and use an expression. Note also the information in Output Field Name Attributes.
Colour Set
Select the colour set to be applied to the lithology. The colour set you select may be also used to populate the Names in the Lithologies grid

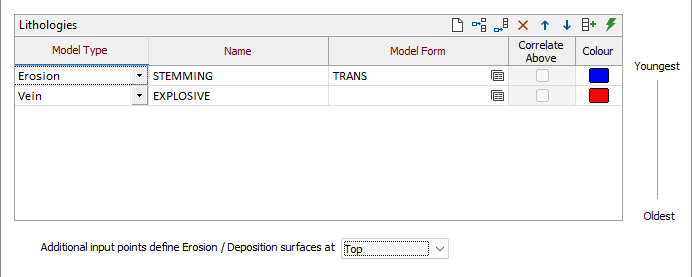
Lithologies
The Lithologies grid on the Lithology tab of the
Additional input points
Additional input points can be used to supplement drillhole data in order to define the location of the surface. The Additional input points... drop down allows you to select whether the input points define the Top or Bottom contacts.
Background Geology Control
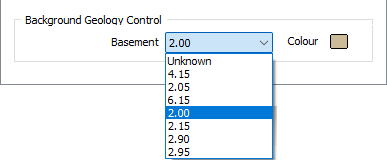
Basement
Select the Basement for the lithology from the drop-down list. The list of available Basement values is populated from the selected Interval file.
If there are any void spaces in your modelled area, a solid will be created and named from the Basement selection.
Colour
Double click the Colour icon and specify a colour for display of the Basement.
Run
Complete the configuration on the remaining tabs and click Run to run the interpolation.
Forms
Click the Forms button to select and open a saved form set, or if a form set has been loaded, save the current form set.
By design, the Forms button is not available for loaded Vizex layers (i.e. when opening the form set properties of a layer in the Vizex Layer Display pane). In Vizex, the Forms button is only available for new forms opened via the Home tab or the Vizex tab, in the Layer group (or by double-clicking on a form type node in the Vizex Layer Types pane).
Save and Save As
Click the Save button to save the changes you have made to the form set. Click Save As to save your changes as a new form set. Save As will default to the first available form set number.
Reset
Click Reset to clear the form of all values and reset the form to its default state.
Reset Tab
For tabbed forms, select Reset Tab to clear the active tab of all values and reset the tab to its default state - without making any changes to other tabs in the dialog.
Undo and Redo
Click Undo (CTRL + Z) to undo recent changes in the form. After an Undo, click Redo (CTRL + Y) to restore the last change that was undone.
Collapse
Collapse (roll-up) the form to preview a chart, or preview the results of an operation in Vizex, or obtain input values from Vizex, the Property Window, the File Editor, or the Plot Editor.