Interval Label
On the Input Data tab of the Interval Label form, select the input data for Interval labels and set the position, size and appearance of the labels.
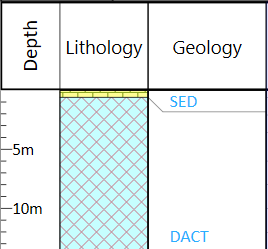
Optional text wrapping and expansion to fit the size of the text, can be applied to the interval label column. The left and right margins are adjusted based on the halo width of the text, plus an additional three-quarter-character width on the aligned side, an additional half-character width on the unaligned side, or an additional half-character width on both sides when the text is centred.
Where there is a leading white space and the text is left-aligned, this is added to the offset. If the text is right-aligned, a trailing white space is used to balance the alignment.
Interval File
Double-click (or click on the Select icon) to select the name of the file that contains the data you want to display. Select the Filter check box if you want to apply a filter to the file.
Enter a Filter Number in the adjacent box. Double click (F3) to see a list of existing filters. Right click (F4) to open the dialog box where you can create a new filter.
A filter can be useful when you want to apply a restriction on a field other than the one being displayed, for example, to show the assays in a particular zone, or show the assays for specific holes.

Labels
Label field
Double-click (F3) or click on the List icon, to specify a field containing the text you want to display.
Colour set
Optionally apply a colour coding based on the values in each Label field. For each label, double click (F3) to select the colour set that will be used to colour the label. The colour set is used to map colours to text strings or numeric ranges and determines the colour for each value in the label field. Right click (F4) to create or edit a colour set.
Default colour
Double click (F3) to select the colour which will be used when a colour set is not defined, or when the value in the label field is not mapped in the colour set.
Decimals
Specify the number of decimal places that will be used when displaying numeric field values.
Horizontal alignment
Specify the horizontal (RIGHT, LEFT, CENTRE) alignment of the text relative to the frame.
Vertical alignment
Specify the vertical (TOP, MIDDLE, BOTTOM) alignment of the text relative to the frame.
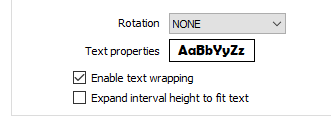
Rotation
Optionally, select a (NONE, LEFT 90, RIGHT 90) option to rotate the text 90° relative to the header or footer frame.
For example, an entry of 0 in this field will position the label parallel to the Y axis of the paper. Any angle between the cardinal points is also acceptable.
Text Properties
Double-click on the Text Properties Preview box to select a font and set text properties.
Enable text wrapping
Select this option to auto-wrap the label text.
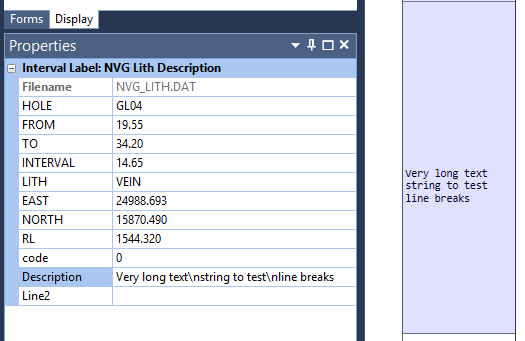
The ‘\n’ new line symbol may also be used to force the text that follows onto a new line.
Expand interval height to fit text
Select this option to expand the height of an interval in a text column to match the font height. This option is only available when the Rotation setting is set to NONE.