Task Attributes
Attributes are data fields that can be assigned to tasks in the schedule. You can add new attributes as required and specify the name, type (numeric or character), units of measurement, default value, validation expression and reporting options for each attribute.
Each task has a set of Core Attributes that are created for it automatically when it is added to the schedule. The attributes assigned to a task are determined by its task type.
![]()
The form lists the attributes that are currently defined for the schedule. When you use the Schedule | Task Types | Manage or Schedule | Task Types | Assign Attributes options to assign attributes to task types, the attributes from which you can select are defined by this list.
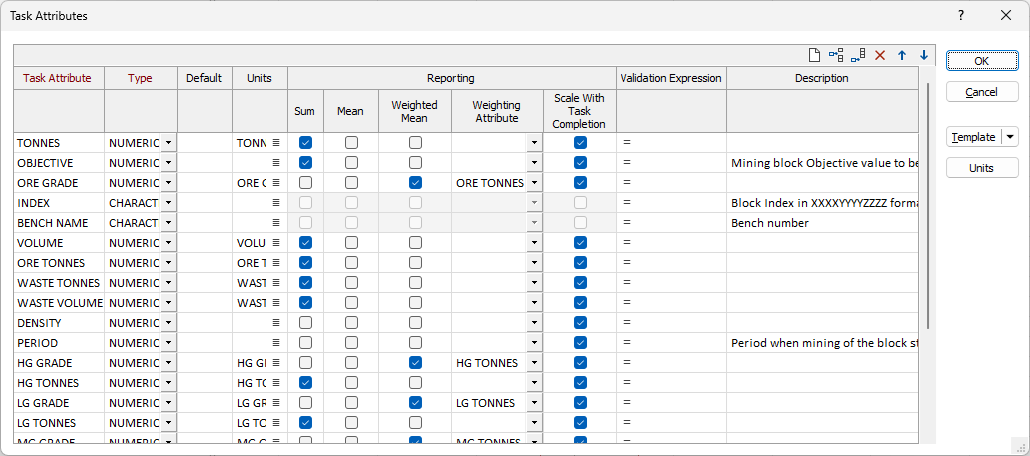
Use the icon buttons on the top right of the grid list to add, delete and clear items in the list.
Task Attribute
Enter the name of the attribute. Upper and lower case and Unicode characters can be included as required.
Type
Select the type (NUMERIC / CHARACTER) of value to be stored by the attribute.
Default
Enter the default value for the attribute.
Units
Select the units to be assigned to the attribute.
Configuring the Units
Click the Units button on the right-hand side of the form to configure the units that can be assigned to attributes of the schedule. See: Units
Reporting
(NUMERIC attributes only.) Specify the reporting options to apply for the attribute when values from multiple tasks are combined. For example, this would occur when multiple task wireframes are selected in Vizex, or when multiple tasks are completed within a single day and the single combined value is to be reported for the day.
These options control what is reported for the attribute in the following use cases:
-
Schedule | Optimise > Output > Report > Summary by Period report
-
Default settings for Schedule | Reports | Real-Time | Show Report
-
Vizex Properties tab when multiple task wireframes are selected
-
Schedule | Reports | Generate > Report > Tasks by Date supports Scale With Task Completion only
Sum
Select this option to report the total of the values of the attribute from each combined task.
Generally speaking, this option should be selected for attributes that contain volumes, masses or amounts of currency.
Mean
Select this option to report the mean of the values of the attribute from each combined task.
Generally speaking, this value should be selected for values that represent constants, such as conversion factors, rates, material properties and physical constants.
Weighted Mean
Select this option to report the weighted mean of the values of the attribute from each combined task.
Generally speaking, this option should be selected for attributes that contain grades or densities.
When selected, the corresponding Weighting Attribute should also be selected:
-
When selecting the Weighting Attribute, it is possible to select [Quantity], in which case the value of the task's quantity attribute is used as the weight.
If a task does not include the nominated Weighting Attribute, a weighting value of zero is used.
Weighting Attribute
When Weighted Mean is selected, select the attribute from which the values should be used to weight the values of the current attribute.
Example: If the current attribute contains the value in the left-hand column in the table below, the attribute in the right-hand column should be selected as the Weighting Attribute.
|
Current Attribute |
Weighting Attribute |
|---|---|
|
Density (t/m3) (volume-referenced) |
Corresponding Volume |
|
Grade (g/t) (mass-referenced) |
Corresponding Mass |
Scale With Task Completion
Select this option to scale the value of the attribute in proportion to the amount of the task that is completed within the reference period.
Example: If the value of the attribute for the task is 100,000t and the duration of the task is 2 days, the value of the attribute reported for the task for the first half-day will be 0.5 / 2 x 100,000t = 25,000t.
Generally speaking, this option should not be selected for values that represent constants, such as conversion factors, rates, material properties and physical constants.
Validation Expression
(Optional.) Enter the expression to be used to validate the current values of the attribute for each task. The expression for each attribute can reference any of the attributes defined for the schedule.
The purpose of this setting is to provide an efficient means for identifying tasks that may have inappropriate attribute values.
If the value of the attribute is acceptable, the expression should return an empty string (“”). Otherwise, it should return a short message that indicates why the value may be of concern.
All non-empty messages are logged, along with the affected task and the name of the attribute, to the Diagnostics report data source, which can be reported using the Schedule | Reports | Generate option. Further details on reporting data sources can be found here.
Example: The following expression checks the value of the Mass attribute for each task. If the value is less than zero (0), the “Mass is negative” message is returned. If the value is positive but less than 1000, the “Mass is very low” message is returned. Otherwise, an empty string is returned to indicate that the current value is acceptable.
if ([Mass] < 0) then
  "Mass is negative"
elif ([Mass] < 1000) then
  "Mass is very low"
else
  ""
endif
Description
Enter a short description of the purpose or content of the attribute.
OK
Click OK to apply the changes to the attributes and make the updated list of attributes available to the schedule.
Template
The Template button is only available for Template Forms. Template Forms inherit saved or previously used values.
Click the Template button to select and open a saved form set template.
Load Template
Click the Load Template button to select and open a saved template to populate the fields of the form.
Save Template
Click the Save Template button to save the details of the current form as a template that can be loaded at a later time.
Manage
Click the Manage button to open the Template Forms manager which can be used to open, save, delete, import and export the template forms for your project.
Undo and Redo
Click Undo (CTRL + Z) to undo recent changes in the form. After an Undo, click Redo (CTRL + Y) to restore the last change that was undone.
Collapse
Collapse (roll-up) the form to preview a chart, or preview the results of an operation in Vizex, or obtain input values from Vizex, the Property Window, the File Editor, or the Plot Editor.