CAD
![]()
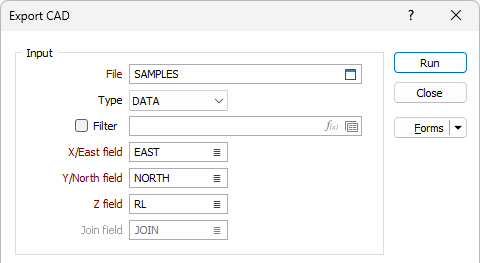
Input File
Select a (DATA, SURVEY, STRING, PIT DESIGN) file type and then enter (or double-click to select) the name of the file containing the data to be exported. If required, define a filter to selectively control which records will be included in the export process.
The input fields you need to specify will depend on the output file type and the output feature type.
X/Y/East/North fields
Double-click to select the fields that contains the coordinates of the data to be exported.
Z field
If you are exporting 3D data, double-click to select the name of the field that contains Z coordinates.
Because the attribute table can only contain one Z value per shape, Z attributes are set to NULL for shapes with multiple Z values, avoiding a mismatch between the geometry and its attributes. Geometries are still exported as 3D shapes. Shapes with constant Z values (such as contours) will have the correct Z attribute.
Join field
Optionally, enter (or double-click to select) the name of the Join fields in the file. The Join field contains values that define whether data points will be joined by a line i.e. strung.
Output
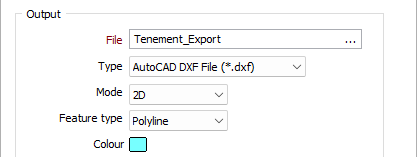
File
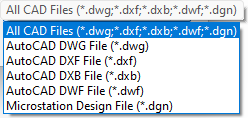
Click the Select icon to navigate to the location of the input file. Select the All Files option to list all compatible files. Alternatively, filter the list of files by choosing a specific file format:
Note: The export process will read the unit system of the CAD file and scale the values to the units for the project in Vizex. This means Imperial projects will convert metric (m) CAD objects to imperial (ft), and vice versa.
Type
You can export a file to the following CAD file formats:
| Format | File Extension |
|---|---|
| AutoCAD | DWG, DXF, DXB, DWF |
| Microstation DGN | DGN |
Mode
Choose whether to export 2D or 3D data.
Feature type
Choose whether to export Point or Polyline data.
Colour
Double-click on the Colour icon to set a default colour for the exported layer.
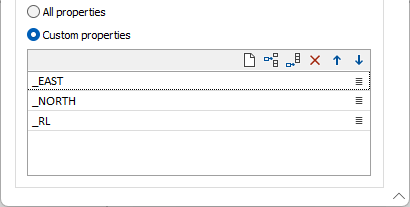
Properties
Select whether to export All Properties for the CAD files, or Custom Properties.
If Custom Properties is selected, you can select the properties to export using the grid. Use the buttons in the toolbar to Manage the rows in the list.
Forms
Click the Forms button to select and open a saved form set, or if a form set has been loaded, save the current form set
Run
Finally, click the Run button to begin the export process.