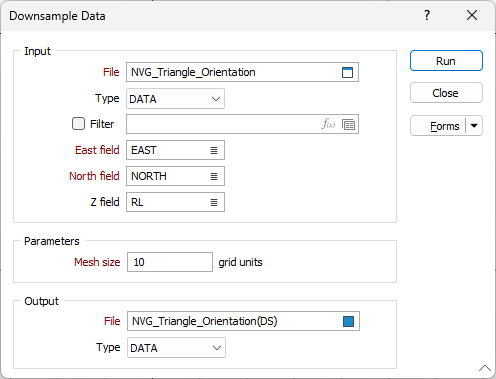
Downsample
![]()
This option is also available on the Design tab, in the Utilities group (Point menu).
The function takes the boundary of the data set in X,Y,Z (min and max) and creates a grid based on the Mesh size. It then retains only one point in each cube -the point that is kept is the one closest to the centre of the cube.
There is a limitation on the dimension of the 3D grid that can be created. Currently, the total number of cells must be under 2.5 million.
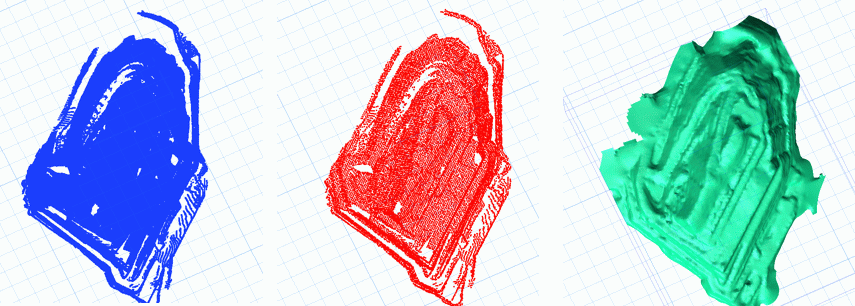
The following ![]() example show Lidar data of a pit (500 000 points), down sampled to a resolution of 10m^3 (17 000 points) and then modelled using the Implicit | Point Cloud algorithm.
example show Lidar data of a pit (500 000 points), down sampled to a resolution of 10m^3 (17 000 points) and then modelled using the Implicit | Point Cloud algorithm.
Input
File
Double click (or click on the Select icon) to select an Input file. Typically, the Type of the Input file will be a DAT file containing Lidar point data.
East, North and Z fields
Specify the names of the fields in which Easting, Northing, and (optionally) Z coordinates are stored in the Input file. These coordinates will be used to determine the extents of the generated grid.
Parameters
Mesh size
The Mesh Size value (in Grid units) will determine the size of the individual triangles created in the model and will have an impact on the time it takes to build the wireframes. The smaller the value the longer it takes. A suitable value will depend on the extents and the density of the data.
Use a smaller value for smaller extents and dense data. Use a higher value for extensive data that is not complex. Typically, start large and later reduce the value to smooth the output.
Although the underlying “mesh” is three dimensional, the easiest way to envisage the effect of this parameter is to consider a square with sides equal to the mesh size length. Draw a diagonal to convert the square into two triangles. These will be indicative of the triangle size in the final wireframe.
Output
File
Enter (double click or click on the Select icon to select) an Output file. Typically, the Type of the Output file will be a DAT point file.
Forms
Click the Forms button to select and open a saved form set, or if a form set has been loaded, save the current form set.
Run
Click Run to run the process.
Note: To better utilise processor resources across multiple applications and tasks, when running computer-intensive operations it may be necessary to reduce the number of cores used by the application.
To modify the number of cores the application can use:
-
Click the Project tab to open the backstage menu.
- Click on the Resources tab of the Options | System | System Options form.