Block Model
![]()
The Block Model Report form accepts the specification of a Cutoff Set or a Colour Set to define the ranges in which the cutoffs will be reported.
When the Report Fields option is selected on the Fields tab of the form, the ranges in the Cutoff Set are applied to the first field that is specified.
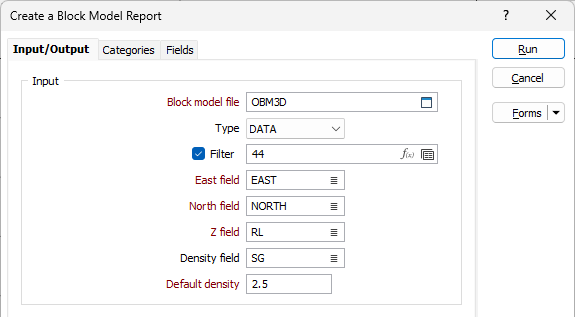
Input
Double-click (or click on the Select icon) to select the name of the block model to be reported. Select the type (DATA / SURVEY / STRING / ODBC LINK / MDB LINK) of the file that contains the block model. The default file type for Block Model data is DATA.
If necessary, you can select or specify, or use an expression to define a filter to be applied to the block model based on the values of the fields within the block model. Entire blocks will be included or excluded from the report based on whether their values satisfy the criteria to pass this filter.
Note that seam block models are not supported here – they should be reported using the Stratigraphic | Seam Block Model | Report option.
East, North and Z fields
In the East, North and Z fields, enter the names of the fields that contain the easting, northing or Z (elevation) coordinates for each block in the block model. in the input file. The function uses these field names to locate the fields containing the block dimensions in the input file.
Density field and Default density
For Metric projects, if there is a Density field in the input file, double-click to select the field that contains the density
If a Density value is missing when a record is processed, the Default Density value will be used in its place. Default Density is a required value.
In Standard reports, the Cumulative Density used in the Volume and Tonnage calculations is added to the output file. This enables the checking of the Density used to calculate the tonnages for different grade ranges.
Note: If your project uses Imperial rather than Metric units, the form will prompt for a Tonnage factor field that contains the tonnage factor
The Default Tonnage factor should be expressed in the units specified on the Reported Values tab for Report tonnage factor > Units.
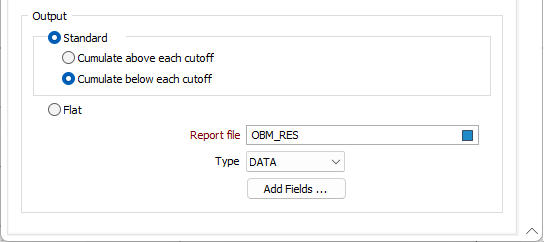
Output
Select a (Standard or Flat) Reporting option and specify an Output file.
Standard
Select this option to write a cumulative total for each material and cutoff range.
-
Cumulate above each cutoff
-
Cumulate below each cutoff
Flat
Select this option to write a report that does not include the cumulative quantities for the cutoffs.
Report File
Select a File Type. If the report is written to a DATA file, the .DAT format allows you to use any of the file processing tools such as Field Arithmetic to manipulate the grade estimate data.
Enter (or double click or click on the Select icon to select) the name of the Output File.
The records are sorted alpha-numerically by Material field, in the top-down order the fields are specified, under the Multi-types group in the Processing Options tab.
Add Fields
Using the Add Fields option you can add up to five fields to the output file.
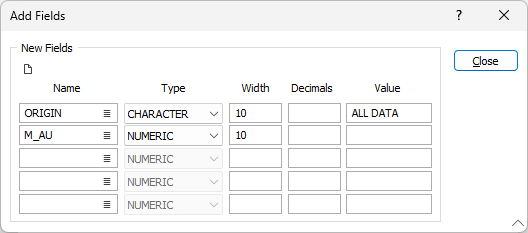
Fields entered in the Add Fields form should be those often populated with values at a later stage in the modelling process using one of the Assign functions.
Forms
Click the Forms button to select and open a saved form set, or if a form set has been loaded, save the current form set.
Run
Finally, click Run to run the function. Estimates will be calculated. For very large files this can take a few moments.