Edit Source Path
A Source Path is the primary set of source scheduling instructions for a particular piece of Equipment and controls which Leaves are worked and in what order, as well as controlling the behaviour of equipment when it is unable to complete those defined instructions. For a conceptual overview, see: Equipment Source Path
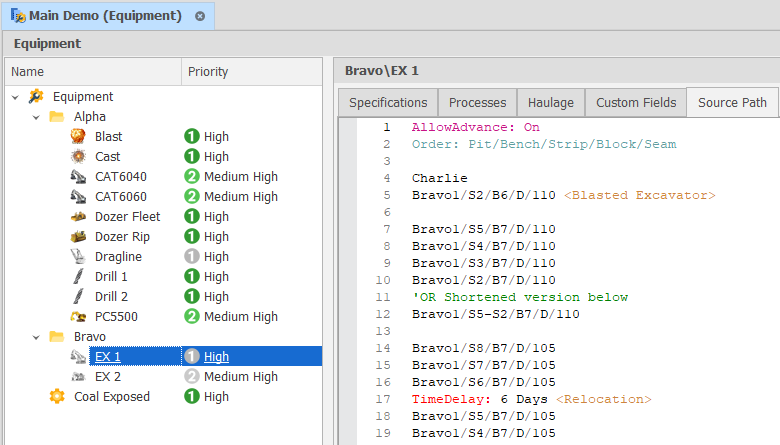
Source Paths are written in the Source Path tab under each piece of Equipment.
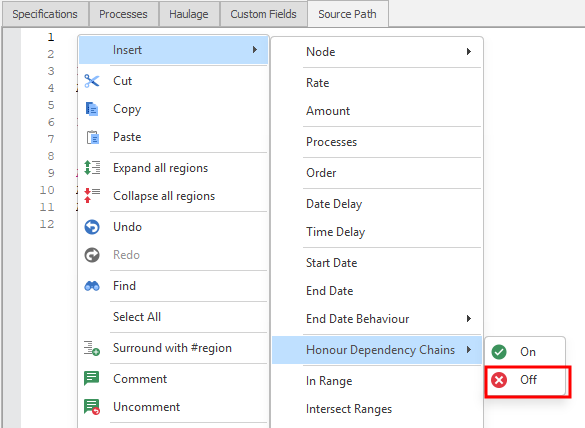
Source paths are both case and white space insensitive and the path can be built up over multiple lines with each line adding more steps to the path. You can quickly Insert several path elements through the right-click menu:
The Basics
The simplest Source Path possible is a single wildcard asterisk (‘*’) character which tells equipment to work logically lowest index to highest (refer to your Source table Setup Levels) and all sub levels are completed before moving to the next index.
*
Paths are built up in a similar structure as ranges with each level of the table separated by slashes (either ‘/’ or ‘\’). For each level, a subset of positions for that level can be generated. These can either be a span of positions between two ends (e.g. ’1-5′), individual positions (e.g. ’1,2,3,4,5′) or a combination of both (’1-2,3,4-5′). To select every position for a level, the asterisk (‘*’) character can be used as a wildcard (or ‘-*’ to include all positions in reverse order). If any level is omitted, it is assumed that all positions of lower levels are included (e.g. ‘A’ is equivalent to ‘A\*\*\*’, although ‘A\’ would create no steps as nothing has been specified for the second level).
Demo\1\*\1-5,7\*\*
The specific solid to be added to the source path can be interactively selected. For more information, see: Equipment Path Using Animation
Processes: <“Processes”>
<Processes> is a comma separated list of what processes will be used. As a individual line Processes: (Source Path Only) limits the processes that will be included in subsequent lines of the path (unless overridden on an individual line). Multiple processes can be included by comma separating them.
Demo\Stage 1\*\1-5,7\*\* <Blasted, Freedig>
OR
 Processes: Blasted, Freedig
 Demo\Stage 1\*\1-5,7\*\*
Default (if not explicit): All Processes
Prefix: “Node Prefix”
<Node Prefix> will be prefixed to all subsequent lines that describe a node or nodes.
 Prefix: Demo\Stage 1\
 *\1-5,7\*\* <Blasted, Freedig>
Default (if not explicit): None
Edit Source Path (Top)
Order: “NodeOrder”
The order defines the order the schedule loops through the levels to generate the individual tasks the equipment should follow. Changing the order can have a significant impact to the path of the equipment.
Node order must have the same names as defined in levels on the table it is defined in and is \ separated. Not all levels have to be used, but no level can be used more than once. This will override the default order set in your Source Table Fields
Processes can be used in node orders. This can be very useful in by-seam mining, in models where both commodity and waste are benched. The order within the Processes is set the same way described above in <Processes>
 Prefix: Demo\Stage 1\
 Order: Pit\Stage\Strip\Block\Seam\Bench
 *\1-5,7\*\* <Waste, Coal>
Default (if not explicit): Levels in default order from zero Index
Order: Strip/Block
S1-S2/B1-B2
Is the same as
S1/B1
S1/B2
S2/B1
S2/B2
Whereas:
Order: Block/Strip
S1-S2/B1-B2
Is the same as
S1/B1
S2/B1
S1/B2
S2/B2
Allow Advance: "On/Off"
If turned ‘On’ or set to ‘True’, allows the schedule to look further down the path to find the first task that is available (or until Allow Advance is set to ‘Off’ or ‘False’). Only has an effect when Dependencies are set. See: Allow Advance
The first step when adding a new piece of equipment, if we want it to work on any available activity, is to ensure that Allow Advance is turned ‘On’:
 AllowAdvance: On
 *
The command above will ensure the equipment works on any task available in any order.
Default (if not explicit): Off
Edit Source Path (Top)
Ignore Constraints: "On/Off"
By default all constraints will be adhered to unless the Ignore Constraints flag is set to On.
Ignore Dependencies: "On/Off"
By default all dependencies will be adhered to unless the Ignore Dependencies flag is set to On.
Honour Dependency Chains: "On/Off"
When a task is completed with an ignored dependency, by default dependency chains are honoured. Like Ignore Dependencies, the Honour Dependency Chains flag can be turned On and Off,
There are three cases: Honour Dependency Chains Off, Honour Dependency Chains On, and Honour Dependency Chains Default.
-
Off - if something is completed with an ignored dependency, subsequent tasks are released.
-
On / Default - if something is completed with an ignored dependency, subsequent tasks are not released until predecessor tasks are completed.
For example, if you have three nodes: Alpha\S2\B1\F\80 → Alpha\S2\B1\F\75 → Alpha\S2\B1\F\70 and you ignore dependencies and complete task 75, the default behaviour will ensure 70 waits on 80 until it is done.
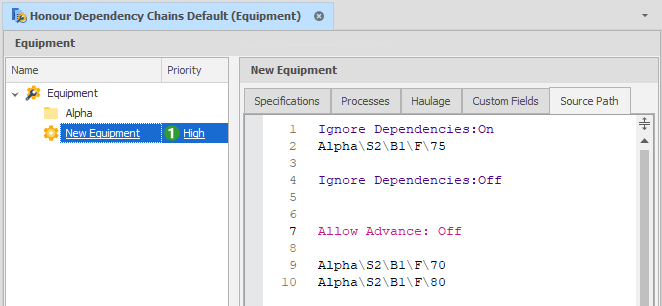
Set Honour Dependency Chains = Off if you want to release all subsequent tasks:
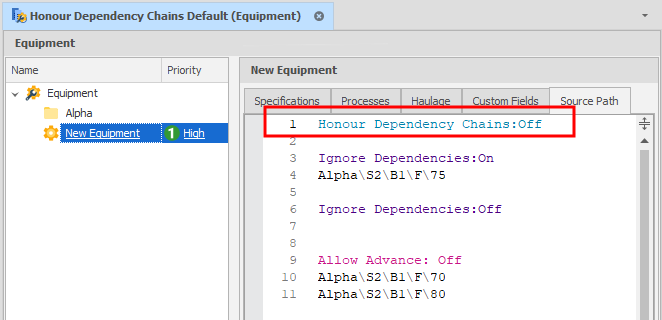
To ensure the default behaviour, explicitly set Honour Dependency Chains = On.

Start Date, End Date/Behaviour
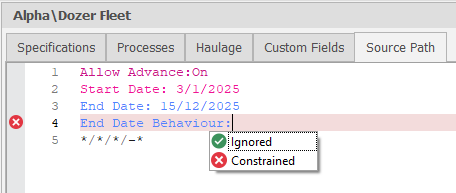
Use these commands to set the Start Date and End Date for a set of tasks. An End Date Behaviour flag can also be set which allows two states:
-
Ignore - the end date is only a suggestion
-
Constraint - the end date is respected in source step selection
Edit Source Path (Top)
Delays
Time delays can be specified using the format ‘Time Delay: TimeDelay TimeUnits <NonProductiveProcess>’ where TimeDelay is a number specifying how long the delay should occur for, TimeUnits is a unit of time that the TimeDelay is measured in and NonProductiveProcess is the name of a non productive process to use for the delay (e.g. ‘Time Delay: 6 hours <Relocation>’). Valid time units are ‘Minutes’, ‘Hours’, ‘Days’ or ‘Weeks’.
Date delays can be specified using the format ‘Date Delay: DelayToDate <NonProductiveProcess>’ where DelayToDate is text that describes the date to delay until (in the format of the user’s region settings) and NonProductiveProcess in the name of a non productive process to use for the delay (e.g. ‘Date Delay: 1/1/2016 <Delayed Start>’)
 Prefix: Demo\Stage 1\
 Order: Pit\Stage\Strip\Block\Seam\Bench
 AllowAdvance: On
 *\1-5,7\*\* <Blasted>
 Date Delay: 1/1/2024 <Maintenance>
 Time Delay: 5 hours <Relocation>
Edit Source Path (Top)
Amount ‘( )’
Allows for only a portion of a task to be scheduled (e.g. ‘A\15 (50%)’ or ‘A\15 (0.5)’). Can also be used with = Modifiers (see below).
 Prefix: Demo\Stage 1\
 Order: Pit\Stage\Strip\Block\Seam\Bench
 AllowAdvance: On
 *\1-5,7\*\* <Blasted> (80%) [50%]
 Date Delay: 1/1/2024 <Maintenance>
 Time Delay: 5 hours <Relocation>
Default (if not explicit): 100%
Rate ‘[ ]‘ (Source Path Only)
Overrides the rate of the equipment by multiplying it by this factor when scheduling these tasks (e.g. ‘A\15 [50%]‘ or ‘A\15 [0.5x]‘). Can also be used with = Modifiers (see below).
 Prefix: Demo\Stage 1\
 Order: Pit\Stage\Strip\Block\Seam\Bench
 AllowAdvance: On
 *\1-5,7\*\* <Blasted>[80%]
 Date Delay: 1/1/2024 <Maintenance>
 Time Delay: 5 hours <Relocation>
Default (if not explicit): 100%
Edit Source Path (Top)
Rate and Equipment Count [#/#]
Similar to Rate but adds a second number to multiply the Equipment Count. Can also be used with = Modifiers.
Modifiers '='
Used for Amounts, Rate and Equipment Count. Changes their effect from a factor/percentage to a hard-coded number. Note: If a Modified Amount is greater than 100% of the available Source Quantity in that leaf, the actual Amount will be 100%.
 Prefix: Demo\Stage 1\
 Order: Pit\Stage\Strip\Block\Seam\Bench
 AllowAdvance: On
 *\1-5,7\*\* <Blasted>[=1000/=2] 'A Modified Rate of 1000/hour, Modified Equipment Count of 2
 Alpha\S1\B1\D\100 (=5000) 'A Modified Amount of 5000 (Source Quantity units)
 Date Delay: 1/1/2024 <Maintenance>
 Time Delay: 5 hours <Relocation>
InRange and NotInRange: Range Name
Allows for only Tasks in (or not in) a Range to be included in instructions to Equipment. Affects subsequent lines in the Path until overridden by another InRange or NotInRange. Can be reset with a Wildcard e.g. InRange: *
 Prefix: Demo\Stage 1\
 Order: Pit\Stage\Strip\Block\Seam\Bench
 AllowAdvance: On
 InRange: Stage 1\Lower
 *\1-5,7\*\* <Blasted>[80%] [50%]
 Date Delay: 1/1/2024 <Maintenance>
 Time Delay: 5 hours <Relocation>
Intersect Ranges/ Union Ranges
The Intersect Ranges command allows two or more specified ranges to be combined in a Boolean AND expression. To pass the filter, nodes must be in ALL specified ranges.
Intersect ranges: <Range1, Range2…RangeN>
The Union Ranges command allows two or more specified ranges to be combined in a Boolean OR expression. To pass the filter, nodes must be in AT LEAST ONE of the specified ranges.
Union ranges: <Range1, Range2…RangeN>
Edit Source Path (Top)
Path Arrays
Path arrays allow for multiple lines to be combined into single line paths. The arrays are specified between {} characters with semi-colons (;) delimiting entries. For example:
A\{1-3;2,4;1}\2-5\{300;280;260}-{290;270;250} [0.9x] ; B\{1-3;2,4;1;5}\2-5\{300;290;280;270} <Coal Mining> ;
C\1\1\408
Gets expanded to:
 A\1-3\2-5\300-290 [0.9x]
 A\2,4\2-5\280-270 [0.9x]
 A\1\2-5\260-250 [0.9x]
 B\1-3\2-5\300 <Coal Mining>
 B\2,4\2-5\290 <Coal Mining>
 B\1\2-5\280 <Coal Mining>
 B\5\2-5\270 <Coal Mining>
 C\1\1\408
The number of items in each array for a path must be the identical. Hovering the mouse over an arrayed line shows the expanded version of it.
Arrays can be used in the Node Paths themselves, but also to in-line <Processes>, (Percentages) and [Rates]. Since arrays are used more frequently in dependencies, a more comprehensive description is covered in the Dependencies Dependencies topic.
Demo\2\*\-*\*\{1:@0..@-1#2} <{2:Waste; Coal}> ({2:50%;100%}) [{2:0.9x;0.8x}]
Edit Source Path (Top)
