Offset
![]()
-
Select the design elements you want to offset in an X-Y direction.
-
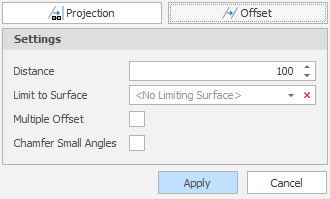
Enter, or use the increment controls to specify, an offset distance.
The direction of the offset will depend on the point order and direction of the shape that is being offset. You can change the direction of the offset by entering a negative or positive offset value.
-
(Optional) To limit the offset to a surface, use the drop-down to select the surface. The surface you select does not need to be loaded in the Design Window. (You can click the Delete icon to clear the surface selection.)

-
(Optional) Select the Multiple Offset check box to repeat the Offset operation. Increase the Count value to repeat the action multiple times.

-
(Optional) Select the Chamfer Small Angles check box to bevel acute angles.

-
Click Apply to apply the offset:
Projection
Select Projection as the mode of operation:

-
Select the design elements you want to project.
-
Select a Projection Type:
Offset Offset design elements by a specified distance in the X or Y direction. Relative Project design elements relative to their current level, by a specified distance and at the specified angle. To Level Project design elements to the specified level and at the specified angle, projecting up or down to that level as necessary. Down To Level Project design elements down to the specified level and at the specified angle. Anything below the specified level will remain unchanged. Up To Level Project design elements up to the specified level and at the specified angle. Anything above the specified level will remain unchanged. Register Adjust the Z values of design elements so that they follow the topography of a selected surface. 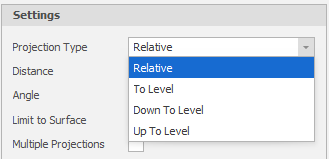
-
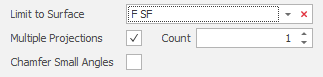
(Optional) To limit the projection to a surface, use the drop-down to select the surface. The surface you select does not need to be loaded in the Design Window. (You can click the Delete icon to clear the surface selection.)
-
(Optional) Select the Multiple Projections check box to repeat the projection. Increase the Count value to replicate the action multiple times.
-
(Optional) Select the Chamfer Small Angles check box to bevel acute angles.
-
Click Apply to apply the projection:
