Create Road
![]()
A road connects access points between pits, dumps and stockpiles.
Create Road Design Action
-
Click the Edit Existing Road button if you want to edit a road you have previously created and saved. The road must already be loaded in the display.
You will be prompted to select the road you want to edit:

-
When you click to select the road, the saved settings of the road are loaded and previewed in the display:
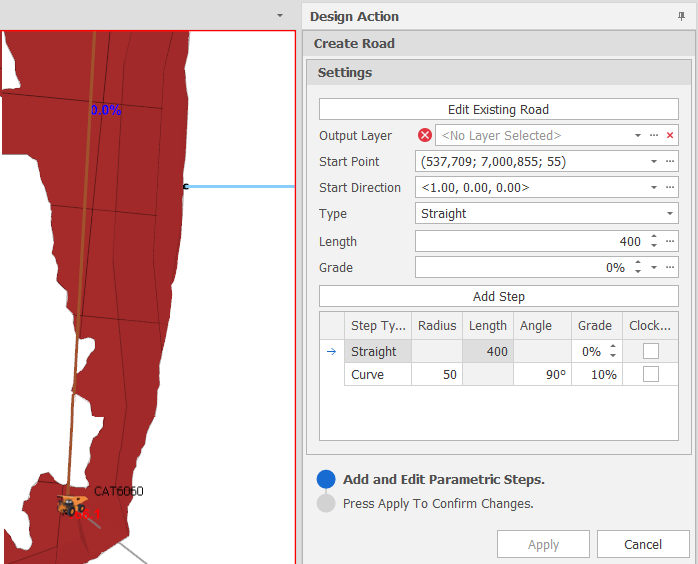
You can continue to Add and Edit Parametric Steps (see below).
You can add and edit the parametric steps of an existing road or add and edit parametric steps to create a road from scratch.
If you are editing an existing road (see above) the saved settings of the road are loaded and previewed in the display. If you are creating a road from scratch, segment settings previously specified in the current session (if any) are loaded and previewed in the display.
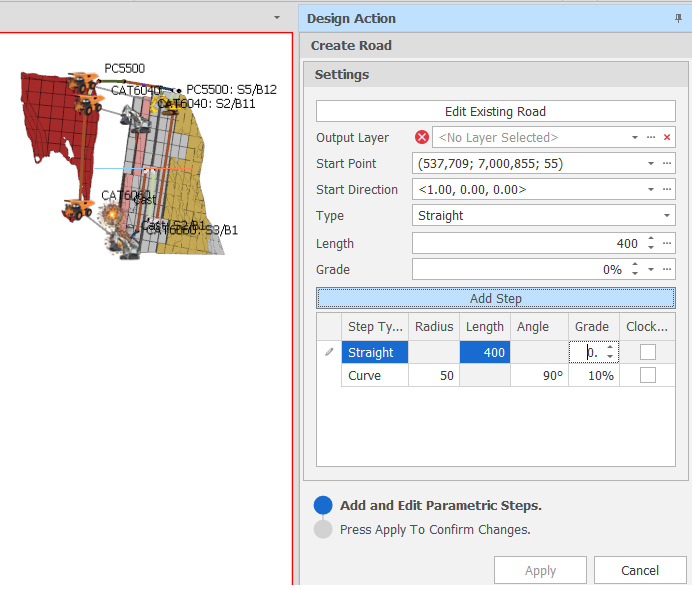
To create or edit a road, specify the following Settings:
Output Layer
If you are creating a layer from scratch, use the drop-down to select an Output Layer. The segments you add to the display will be written to this layer.
Tip: You can right-click on a folder in the Layer Selection pane to Add a new layer.
Start Point
Click the ellipsis to digitise a Start Point in the Design Window. An initial segment is projected in the direction of the default Start Direction (see below).
Alternatively, use the drop-down to enter the coordinates of a known point (or adjust the coordinates of the point you have digitised).
Start Direction
Click the ellipsis to set the Bearing and the Slope of the initial segment by digitising a point.
Alternatively, use the drop-down to select a Bearing and a Slope that defines the vector.
Type
Click the drop-down to set the (Straight line or Curve) segment type. The Settings you need to specify will differ, depending on Type:
Radius
The radius of the circle the curve is moving around.
Angle
The angle of the circle to add (90° adds a quarter of a circle for example, 180° adds a half circle). See Add Quarter and Add Half below.
Grade
Click the ellipsis to set the Line Grade or Z angle between the end points of the segment by digitising a point in the Design Window.
Alternatively, enter (or use the drop-down to select) a Grade percent value.
Clockwise
Select this check box if the curve moves clockwise around the specified circle (i.e. turns left or right). Movement is counter clockwise when the check box is not selected.
Add Quarter
Click the Add Quarter button to add a quarter circle (Angle = 90° but otherwise based on the curve properties you have specified).
Add Half
Click the Add Half button to add a half circle (Angle = 180° but otherwise based on the curve properties you have specified).
Add Step
Click Add Step to add a segment based on the Curve settings you have specified. Clicking Add Step after clicking Add Quarter or Add Half, will repeat the Add Quarter or Add Half step.
Length
Click the ellipsis to set the length of the segment by digitising a point in the Design Window.
Alternatively, enter (or use the drop-down to select) a Length value.
Grade
Click the ellipsis to set the Line Grade or Z angle between the end points of the segment by digitising a point in the Design Window.
Alternatively, enter (or use the drop-down to select) a Grade percent value.
Add Step
Click Add Step to add a segment based on the Straight line settings you have specified.
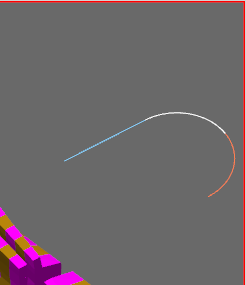
Preview Colours
The following colours are applied to the Straight line and Curves in the display, both prior to and after adding them as steps:
|
Colour |
Usage |
|---|---|
|
White |
The last added step. |
|
Orange |
The current step that will be added if Add Step is clicked. |
|
Blue |
The step selected in the Steps grid (defaults to the first step when an existing layer is loaded). |
Preview Colours
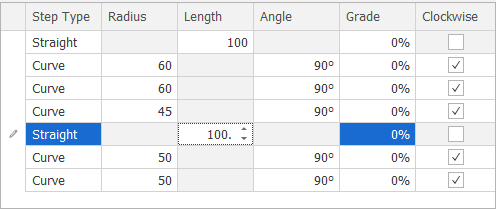
Modify Steps
In the Steps grid, modify the parameters of a step by selecting a grid row. The Straight line segment or Curve you have selected is highlighted in the Design Window. Any changes you make to the settings of the Straight line segment or Curve are immediately reflected in the design.
Apply
Finally. click Apply to save the Steps and the Settings you have specified.