No Data at Depth Zero
![]()
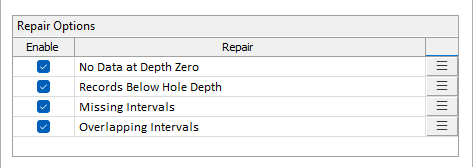
In the Drillhole Database Repair form, enable the No Data at Depth Zero option in the Repair Options grid:
The drill hole validation error "Missing survey at depth = 0" is a non-critical error, meaning that holes with this error will still be displayed and the error can be ignored. Exploration holes do not always conduct surveys at the 0 depth and this information is quite easily missed in the collar file. The repair process can be run to ensure the error is not displayed.
The No Data at Depth Zero process will automatically fix the error by creating a survey record at zero depth that inherits the orientation from the first record. The repair process will:
-
Populate Orientation (azimuth & dip) from the collar file if available and,
-
Use the orientation of the first survey recorded for the hole
To configure the repair process,
-
Click the More button.
-
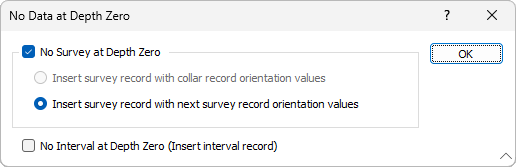
Select the No Survey at Depth Zero option to enable the repair process.
-
Use the Repair Options to select:
-
Insert survey record with collar record orientation values to use the collar orientation values (if any) for the inserted survey record, or
-
Insert survey record with next survey record orientation values to use the orientation values from the next survey record for the inserted survey.
Note: If the collar file orientation values do not exist, the collar record option will be disabled.
-
Select the No Interval at Depth Zero option to indicate that the interval record should also be inserted if it is missing.
-
Click OK to return to the Drillhole Database Repair form.
-
Use the Output options to select whether to overwrite the input database to be repaired, or enter the name of a database to write the new data to.
-
Select the Flag Field option to enter a Flag Field and Flag value for the repair data to be written.
-
Use the Report File option and select a file to write the report to (or leave the Auto default) if required.
Forms
Click the Forms button to select and open a saved form set, or if a form set has been loaded, save the current form set.
Run
Finally, click Run to begin the process.