Import Data
![]()
Import Collar
Select the Import Collar option to enable the import of a collar file to the blasthole database.

Collar File
Double-click (or click on the Select icon) to select the name of the Collar File. Optionally apply a filter to restrict the validation process to a subset of the records in the file.
The Collar file contains the location, in Northing, Easting, and Z coordinates of each collar. If there are no surveys, the holes are vertical. Collar files sometimes contain additional information such as Prospect and Drill Date. The Collar file also contains the hole name, total depth and, optionally, the inclination and azimuth of the hole at the collar.
Block field
Double-click to select the name of the field that defines the blast block that each hole belongs to. If more than one block is defined in the Collar file, select the Block Name you want to work with. You can right-click in the Collar file box (or click and press F8) to view the contents of the file.
A block is a group of holes you want to blast in sequence as part of a blast pattern. The selection of a block allows you to manage and, if necessary, vary the design process for each block.
Hole ID 1
Double-click to select the name of the field that contains an identifier for each hole.
Easting, Northing and Z fields
Double-click to select the names of the fields that define the coordinates of the collars in the Collar file.
Depth field
Double-click to select the name of the field that contains the total depth of each hole.
Azimuth and Inclination
Azimuth and Inclination values may also be stored in the Collar file where the direction is defined by a single survey. Where the Collar file does not include azimuth and inclination information and a Survey file is not used, the holes are assumed to be vertical.
Blasthole Attributes
Attributes that define the row numbering, hole diameter, sub-drill depth, the sequence and order in which the holes will be fired and the blasthole type are optional, but essential if you want to maintain blast charge metadata and show the sequence in which the blastholes will be fired. These options are not enabled when selecting the Import BHDB option.
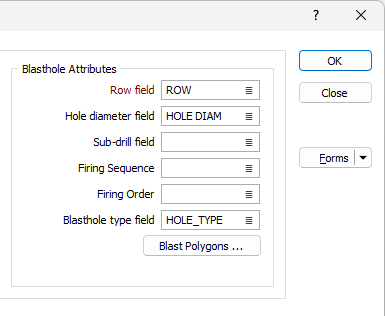
The Blast Polygons button is used to import blast polygons for the blasthole attributes. If you click the button, the Import Blasthole Polygons form opens.

Double click (F3) in the File field to select the file to be imported. Select the file type from the Type drop down if required. Optionally, you can apply a Filter to restrict the information in the file that will be imported.
Use the East, North and Z fields to select the names of the fields that define the coordinates of the blast polygons in the file.
Select the name of the field that defines the join for the blast polygons from the Join Field.
Use the Block Name field to select the name of the field in the file that defines the name of each block for the blast polygons.
When the blast polygon import is configured, click Close.
Import BHDB
Select the Import BHDB option to enable the import of a .BHDB file into the blasthole database. The data in the file will be converted to the .mmbdf format.
Double click (F3) in the File field to select the BHDB file to be imported.
Optionally, select the Generate block boundary if missing check box to generate a boundary for the blast design if none exists in the selected BHDB file.
Report
Double click (F3) in the File field to locate and name the output file for the import.

When the Import Data into Blastholes Database form has been configured as required, click OK to begin the import process.
Upon successful completion of the import, the blast design will be displayed and a prompt is presented.

Forms
Click the Forms button to select and open a saved form set, or if a form set has been loaded, save the current form set.
By design, the Forms button is not available for loaded Vizex layers (i.e. when opening the form set properties of a layer in the Vizex Layer Display pane). In Vizex, the Forms button is only available for new forms opened via the Home tab or the Vizex tab, in the Layer group (or by double-clicking on a form type node in the Vizex Layer Types pane).
Save and Save As
Click the Save button to save the changes you have made to the form set. Click Save As to save your changes as a new form set. Save As will default to the first available form set number.
Reset
Click Reset to clear the form of all values and reset the form to its default state.
Reset Tab
For tabbed forms, select Reset Tab to clear the active tab of all values and reset the tab to its default state - without making any changes to other tabs in the dialog.
Undo and Redo
Click Undo (CTRL + Z) to undo recent changes in the form. After an Undo, click Redo (CTRL + Y) to restore the last change that was undone.
Collapse
Collapse (roll-up) the form to preview a chart, or preview the results of an operation in Vizex, or obtain input values from Vizex, the Property Window, the File Editor, or the Plot Editor.