Tunnels
On the Tunnels tab of the Setup Tunnels dialog, setup the different kinds of tunnels and shafts of which the Development Network Layer is comprised. The technical information you specify here will include Cut parameters, Task Rate parameters and the Tunnel Profiles you have defined on the Profiles tab.
Use the tools on the local toolbar to Add ![]() , Delete
, Delete ![]() and Re-order
and Re-order ![]() the Tunnels that will be applied to a Development Network Layer. As an alternative, click the Wizard
the Tunnels that will be applied to a Development Network Layer. As an alternative, click the Wizard ![]() button to semi-automate the Tunnel Creation process.
button to semi-automate the Tunnel Creation process.
On the Tunnels tab of the Setup Tunnels dialog, the Tunnel Wizard can be used to create tunnels based on the unique values of a selected attribute. If an attribute value exists without a tunnel of the same name, a tunnel of that name is added to a list of tunnels in a Preview pane.When the Accept button is clicked, new entries are created on the Tunnels tab of the Setup Tunnels dialog with the same names as the attribute values shown in the Preview list. The tunnels defined on the Tunnels tab are subsequently used to populate the Tunnel property of the Centrelines in the Development Network, based on their corresponding tunnel names/attribute values. See: Tunnel Wizard
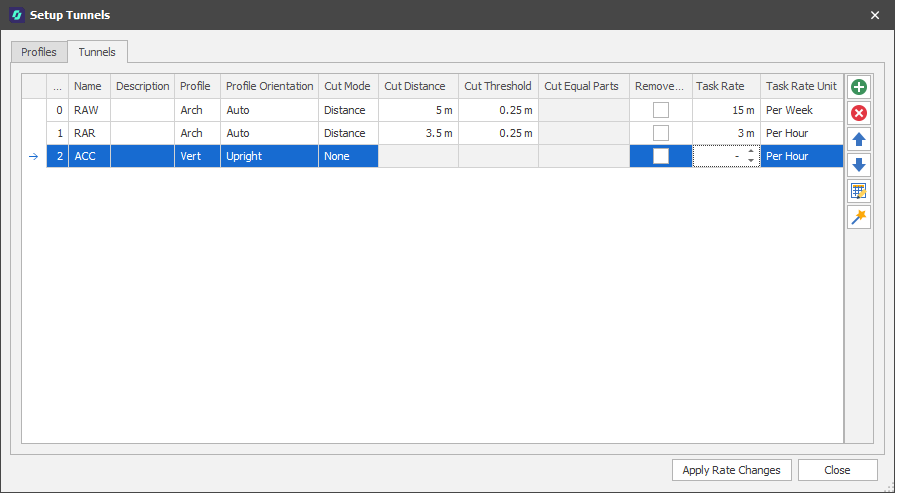
Name
Specify a short name that will help clearly identify the tunnel and the tasks undertaken therein.
Description
Optionally, add a description of the tunnel and the tasks undertaken.
Name
Specify a short name that will help clearly identify the tunnel and the tasks undertaken therein.
Profile
Select the profile shape used to extrude the tunnel solid from a list of profiles defined on the Profiles tab.
Profile Orientation
Double-click to select a profile orientation:
| Orientation | Description |
|---|---|
| Auto |
The most appropriate profile orientation is chosen based on centreline gradient, direction and cut settings. This is the default option and is the best option for most non-vertical centrelines. Auto will work for purely vertical tunnels but may fail on tunnels that have a mixture of purely vertical segments and segments that are not vertical. |
| Perpendicular |
A profile orientation which is perpendicular to the centreline direction (bearing and grade). Centrelines that change directions have profiles facing a direction based on the previous and next segments. |
| Gradual |
Like Perpendicular except that the profile orientation gradually transitions from the previous to the next orientation for cut segments. |
| Flat |
The profile is always flat on the XY axis. This is the orientation to use for tunnels that are intended to be vertical. |
| Upright |
The profile is always facing directly up with a rotation based on the centrelines bearing. |
Cut Mode
Specify how the material to be worked will be cut.
| Mode | Description |
|---|---|
| None | Choose this for an access tunnel or shaft which is non-productive. |
| Distance | Material is cut by a specified Cut Distance. |
| Equal Parts | Material is cut in a specified a number of Equal Parts. |
Cut Distance
When the Cut Mode (above) is Distance, enter a Cut Distance (in metres),
Cut Threshold
Specify a Cut Threshold (in metres). If the length of the final cut of a tunnel is less than the Cut Threshold, the cut segment is combined with the previous segment.
Equal Parts
When the Cut Mode (above) is Equal Parts, enter the number of Equal Parts.
Remove (Double Counts)
Ensure tunnel volumes are not counted twice. This is enforced by ensuring that when two tunnels intersect, the intersected volume is removed from one of the tunnels. This works based on the tunnel order in the Development Network. The volume from a tunnel will only be removed when the tunnel in question has the Remove Double Counts check box enabled. Volume will only be removed from a tunnel when it intersects with tunnels that appear BEFORE it in the Development Network.
Task Rate
A field in the Source table of the Scenario is generated which contains the Task Rate in an specified period. This field can then be used to define rates in the Scenario as desired (typically Hourly unlevelled process rates).
Task Rate Unit
Choose an (Hour, Day, Week, Month, Tear) Unit to which the Task Rate applies.
Apply Rate Changes
If changes have been applied to the Task Rate or Task Rate Unit and tunnels have already been generated, then pressing Apply Rate Changes will update the Task Rate field in the Source Table with the newly-calculated (typically Hourly) task rate without having to generate the tunnels again.