Profiles
On the Profiles tab of the Setup Tunnels dialog, setup the different kinds of profile shapes that will be used to extrude tunnels from the centrelines of the network. The profiles you define here can then be assigned to the tunnels you define on the Tunnels tab.
Add New
To create a new tunnel profile:
-
Right-click on the Tunnel Profiles node and select Add | New Tunnel Profile.

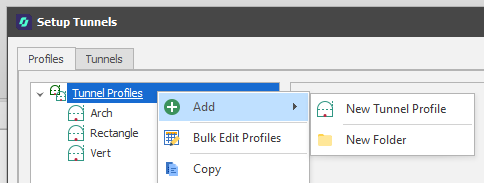
(Optionally, use the Add | New Folder option to organise your profiles into groups by dragging and dropping profiles into the folders you create.)
-
Change the default name of the profile to something short but descriptive that identifies the characteristics of the profile.
-
Choose the profile shape the tunnel extrusion will take. A Rectangle, Circle, Arch by Heights, Arch by Radius, or Arch by Ratio profile shape can be selected. Arch and Rectangle profiles define the shape of the tunnels in cross-section. "Circle" allows a profile shape to be applied to a vertical shaft.
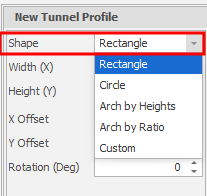
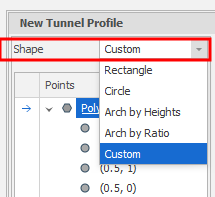
When Custom is selected, a Custom shape can be defined as a series of points. A Preview window is shown alongside the dimensions of the shape you have selected or created.
Edit
Once tunnels have been generated, you can filter the display and then set a different profile for crosscuts and vertical shafts, etc, via Tunnel Properties in the Properties pane.
The profile parameters you can specify will depend on the profile shape you have selected:
Shape
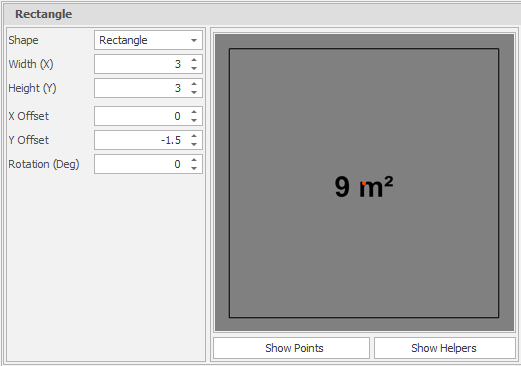
A Rectangle profile can be used to define the shape of a tunnel in cross-section. Set the following properties of the Rectangle shape:
Width (X)
Enter the Width labelled as X in the panel showing the shape display. Optionally, double-click to select the name of a field containing Width values in the String file. The values in this field will be used to control the width of the extrusion.
Height (Y)
Enter the Height labelled as Y in the panel showing the shape display. Optionally, double-click to select the name of a field containing Height values in the String file. The values in this field will be used to control the height of the extrusion.
X offset
This field controls the horizontal position of the extrusion relative to the centreline and defaults to negative half the width of the extrusion. If the field is empty it will default to zero.
Y offset
Defaults to zero. Optionally, enter the distance the extrusion will be offset from the centreline in the Y direction.
Rotation (Deg)
Enter a Rotation value in degrees. Enter a value (0° to 360°) if you want to rotate the profile shape. Use positive or negative values to rotate in a clockwise or anti-clockwise direction.
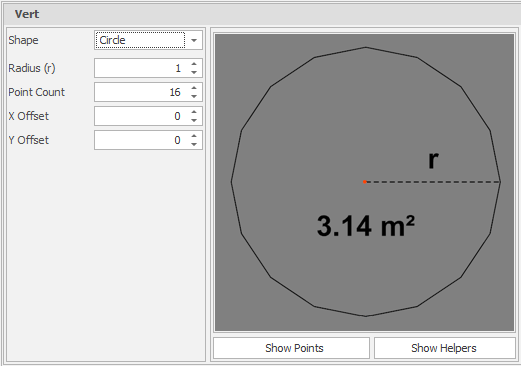
The default profile shape for a vertical shaft is a Circle. Set the following properties of the Circle shape:
Radius / Point Count
Enter the radius of the vertical column and the number of points used to construct the circle. As you use the increment/decrement controls, the shape of the column will change in the Preview window.
X offset
This field controls the horizontal position of the extrusion relative to the centreline and defaults to negative half the width of the extrusion. If the field is empty it will default to zero.
Y offset
Defaults to zero. Optionally, enter the distance the extrusion will be offset from the centreline in the Y direction.
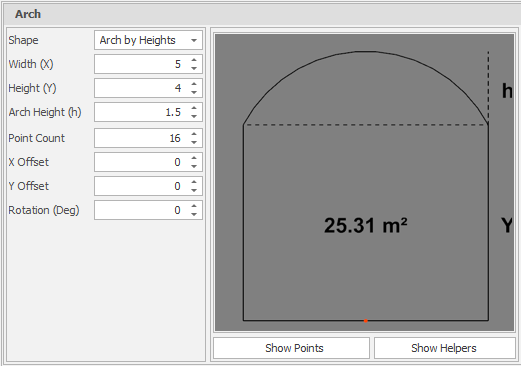
An Arch by Heights profile can be used to define the shape of an arched tunnel, where the shape of the arch is determined by its height and the number of points. Set the following properties:
Width (X)
Enter the Width labelled as X in the panel showing the shape display. Optionally, double-click to select the name of a field containing Width values in the String file. The values in this field will be used to control the width of the extrusion.
Height (Y)
Enter the Height labelled as Y in the panel showing the shape display. Optionally, double-click to select the name of a field containing Height values in the String file. The values in this field will be used to control the height of the extrusion.
Arch Height (h)
Enter the height of the arch.
Point Count
Enter the number of points used to construct the arch. As you use the increment/decrement controls, the shape of the arch will change in the Preview window.
X offset
This field controls the horizontal position of the extrusion relative to the centreline and defaults to negative half the width of the extrusion. If the field is empty it will default to zero.
Y offset
Defaults to zero. Optionally, enter the distance the extrusion will be offset from the centreline in the Y direction.
Rotation (Deg)
Enter a Rotation value in degrees. Enter a value (0° to 360°) if you want to rotate the profile shape. Use positive or negative values to rotate in a clockwise or anti-clockwise direction.
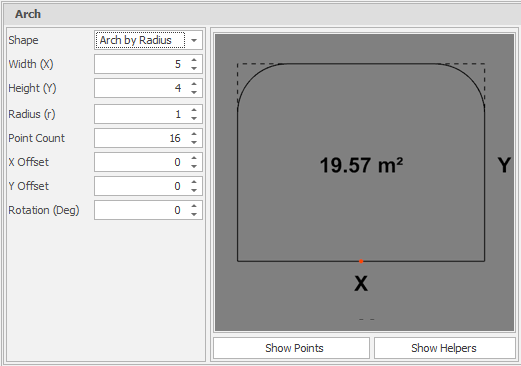
An Arch by Radius profile can be used to define the shape of an arched tunnel, where the shape of the arch is determined by maximum width and height values, a radius and a point count.
Width (X)
Enter the Width labelled as X in the panel showing the shape display. Optionally, double-click to select the name of a field containing Width values in the String file. The values in this field will be used to control the width of the extrusion.
Height (Y)
Enter the Height labelled as Y in the panel showing the shape display. Optionally, double-click to select the name of a field containing Height values in the String file. The values in this field will be used to control the height of the extrusion.
Radius (r)
Enter the radius of the arc. Depending on the radius, the arch can take one of three forms:
-
A radius of zero will produce a square with four points.
-
A radius < half the width will produce rounded corners. An arc on each shoulder.
-
A radius > half the width* will produce a rounded top. A single arc.
*Profiles with a very short height to width ratio will only produce a single arc when the radius is large enough to produce valid geometry. The profile will always give the Width and Height properties a higher priority than the Radius.
Point Count
Enter the number of points used to construct the arch. As you use the increment/decrement controls, the shape of the arch will change in the Preview window.
X offset
This field controls the horizontal position of the extrusion relative to the centreline and defaults to negative half the width of the extrusion. If the field is empty it will default to zero.
Y offset
Defaults to zero. Optionally, enter the distance the extrusion will be offset from the centreline in the Y direction.
Rotation (Deg)
Enter a Rotation value in degrees. Enter a value (0° to 360°) if you want to rotate the profile shape. Use positive or negative values to rotate in a clockwise or anti-clockwise direction.
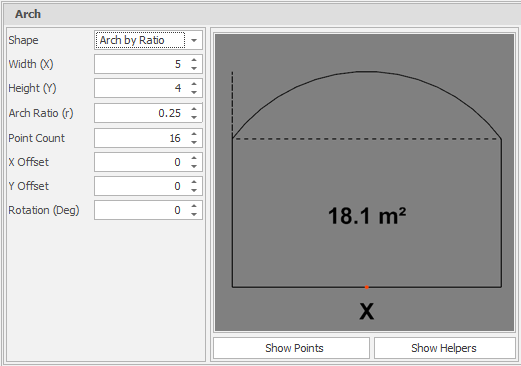
An Arch by Ratio profile can be used to define the shape of an arched tunnel, where the shape of the arch is determined by its height, width, the ratio of the arch and the number of points. Set the following properties:
An Arch profile can be used to define the shape of a tunnel in cross-section. Set the following properties of the Arch by Ratio shape:
Width (X)
Enter the Width labelled as X in the panel showing the shape display. Optionally, double-click to select the name of a field containing Width values in the String file. The values in this field will be used to control the width of the extrusion.
Height (Y)
Enter the Height labelled as Y in the panel showing the shape display. Optionally, double-click to select the name of a field containing Height values in the String file. The values in this field will be used to control the height of the extrusion.
Arch Ratio (r)
Enter the ratio of the arch.
Point Count
Enter the number of points used to construct the arch. As you use the increment/decrement controls, the shape of the arch will change in the Preview window.
X offset
This field controls the horizontal position of the extrusion relative to the centreline and defaults to negative half the width of the extrusion. If the field is empty it will default to zero.
Y offset
Defaults to zero. Optionally, enter the distance the extrusion will be offset from the centreline in the Y direction.
Rotation (Deg)
Enter a Rotation value in degrees. Enter a value (0° to 360°) if you want to rotate the profile shape. Use positive or negative values to rotate in a clockwise or anti-clockwise direction.
Profiles (Top)
Custom
If you have selected Custom as the shape of the extrusion, a profile shape can be created by specifying and interactively editing a series of points. See: Custom
Bulk Edit
The Bulk Editor provides a spreadsheet-like user interface and functions which allow you to edit the parameters you would normally enter and add individually in another dialog or form.
Note that column widths in the Bulk Editor can be automatically resized to fit the column content and the header text. This is applied when the ui_bulk_edit_autofit_columns_default user setting is set to True under All Settings .
You can also choose a Best Fit (all columns) option from the editor's right-click menu:
To bulk edit existing tunnel profiles:
-
Right-click on the Tunnel Profiles node and select Bulk Edit Profiles.
-
Click Accept to save the changes you have made to the properties of each profile (or Cancel).

Profiles (Top)