Output
You can choose to Overwrite the input file or nominate an Output file as the target file to which the intervals will be written.
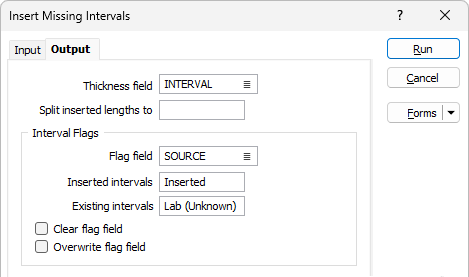
Thickness
(Optionally) If you specify a Thickness field, the function will calculate and enter the downhole length of each continuous interval.
Split inserted lengths to
The Split inserted lengths to option is used to enter the split length of inserted intervals where splitting is necessary while retaining the original intervals.
If the field is left blank, no splitting will occur.
Interval Flags
Intervals that were added should be flagged so that they can be filtered out or grouped separately when reporting. Use the Flag Field to select the field containing the interval flag. If the field is left blank, no Interval Flag options are required.
If a Flag field is selected, you can specify the flags for Inserted intervals and Existing intervals in the fields provided.
If the Flag field exists, you can set the option to Clear or Overwrite the field, or neither.
-
If Clear is selected, all values in the Flag field are wiped before inserting intervals.
-
If Overwrite is selected, the flag string will overwrite any values already present in the flag column.
The difference between Overwrite and Clear is that Overwrite will not do anything if the flag string is left blank; whereas Clear will clear the flag field.
-
If neither is selected, then flag strings are only written to blank cells in the file.
Note: This means that once Clear is selected, Overwrite has no additional effect. Additionally, Clear and Overwrite don’t have any effect on inserted intervals, since they do not exist in the input file - only existing intervals are affected.
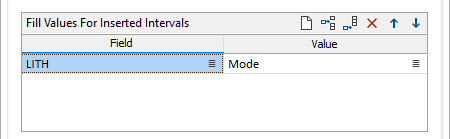
Fill Values for Inserted Intervals
The Fill Values For Inserted Intervals grid is used to assign values to fields in the inserted intervals.
Use the buttons on the grid list toolbar to Manage the rows in the list.
Field
Double click (F3) in the Field cell to select the field in the inserted interval to be populated:
Value
Enter a Value in the cell, or double click (F3) to pick a value for the selected field in the inserted interval. The available options are dependent on the selected value in the Field cell. For example, for Numeric fields:
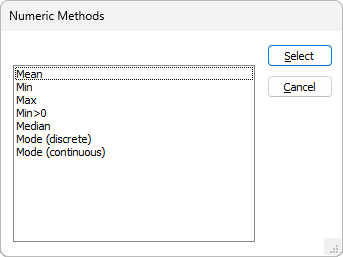
Use the Select button to insert the required method in the Value field.
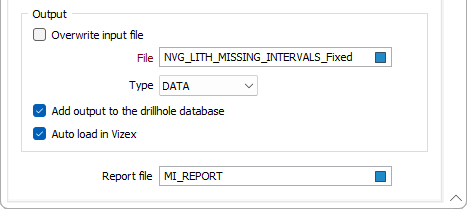
Output
The options in the Output group determine the ways in which the output data is used.
Overwrite input file
Select the option to write the output data to the specified input interval or drillhole database file.
File
If you do not want to overwrite the Input file, select a file type and enter (or click on the Select icon to select) the name of an Output file.
Add output to the drillhole database
Select this option to automatically add the missing interval output to the specified drillhole database.
In many cases, it may be useful to store the results of the process to the database that the input interval or assay file is associated with. This aids in visualisation, making it easier to display related downhole data in Vizex.
Auto load in Vizex
Select this option to open the file in Vizex (if applicable for the type of Output file). Text files which contain non-spatial data will not be loaded.
This option is only available when the Use Drillhole Database option is selected and either Overwrite Input File or Add output to Drillhole Database are selected.
Report file
Enter (or click on the Select icon to select) the name of a Report file.
Forms
Click the Forms button to select and open a saved form set, or if a form set has been loaded, save the current form set.
Run
Finally, click the Run button to begin the Intersection calculation.