Dispatch System
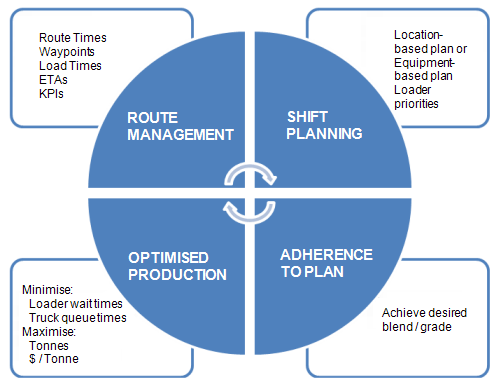
The objective of the Pitram Dispatch system is to improve the efficiency and effectiveness of operations, optimise production, and adhere to a shift plan. Adhering to a shift plan is particularly important when there is a need to achieve a desired grade or blend.
The Pitram dispatching system can be triggered at the following times:
- When a truck dumps.
- When a truck drives through a waypoint.
- When the Control Room operator chooses the Dispatch Truck option from the right click menu shown below:
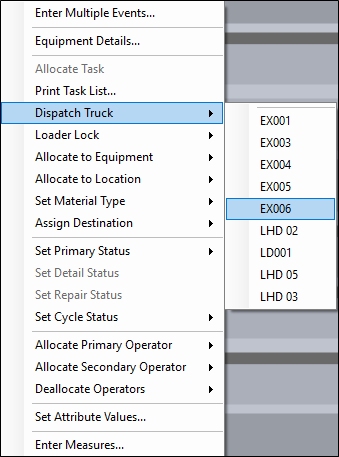
The Dispatch Truck menu will show valid loader assignments as well as the current scores calculated by the dispatching system using the configured dispatch weightings.
Dispatch Configuration
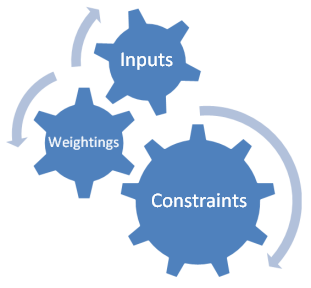
The dispatch system takes into consideration site-defined inputs, weightings and constraints to formulate a decision.
- Inputs. These include the route travel times that are either user-defined or collated by the route management system or in Reference Edit, defined loader priorities, and a shift plan that defines the tasks to be undertaken.
- Weightings. Weightings are a way of applying a level of importance to some of the inputs. Should the current input be rigidly adhered to or could an input be overridden by a dispatch system decision? Weighting values, in most cases, range from zero (no need to comply with the current input setting) through to 1 (must comply with the current input setting). The weighting value is a measure of level of compliance that is required by the dispatch system.
- Constraints. There may be operational reasons why a particular truck needs to be locked at a particular loader. Defined dispatch regions, for example, may restrict a truck from servicing a loader in a different dispatch region.
The inputs, the weighting and the constraints applied are used to calculate a total score for the each of the loaders. The next available truck will be allocated to the loader with the highest score if the dispatch system is enabled.
Dispatch Regions
A mine site may be divided into separate geographical areas or regions. For example, the material mined in particular areas may need to be stockpiled separately; the geology on each level requires that particular capacity trucks be used, or site infrastructure automatically lends itself to separate regions. A truck servicing a loader which is located in a particular dispatch region can only travel within that region. If dispatch regions are not defined, all locations are available to a truck.
The Dispatch system takes into account the Dispatch region of a loader when allocating the next available truck.
Dispatch regions are defined in Reference Edit. They may consist of a number of mine areas; a mine area can be unique to a dispatch region or it may be included in one or more regions. If dispatch regions are not defined, trucks are not restricted by location.
For example:
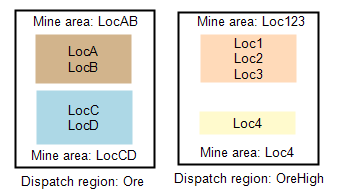
In the example above:
- Dispatch region Ore = Mine area LocAB and LocCD. Trucks servicing loaders within those mine area would be restricted to those mine areas.
- Dispatch region HighOre = Mine area Loc123 and Loc4. Trucks working in the dispatch region HighOre would be restricted to these mine area.
Route Management
The Route Management system keeps track of all the routes and hauling movements on site. The Dispatch system calculates how long it takes a unit of equipment (typically a truck) to travel between a source and a destination, taking into account the model of the equipment and its status (for example, Loaded or Unloaded).
Only uninterrupted travel is taken into account. Movements for which an equipment unit has any down time or delay time are not included in the computation. For the Dispatch system to function effectively, it is important to record realistic and authentic travel times.
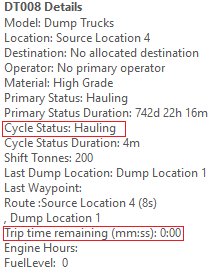
For trucks, once the haul times, the load times, and the estimated times of arrival are calculated, they are displayed on the Loader and Trucks Panel and the Truck Trips Panel in Data Acquisition.

On the Loaders and Trucks panel, for example, when you hover the mouse over a truck, the details of that unit are displayed:
If an Automated data capture system is installed on-site, the estimated time of arrival of a truck is also displayed on the screen of the mobile device in the cab of the loader.
For a loader to be included in any dispatch decisions made by the Dispatch system, it must be Dispatch Enabled. This can be set in either:
- The Equipment tab of the Display pane.
- A panel, such as a Loaders and Trucks panel or a Location Activity panel.
To enable a loader for the Dispatch system:
- Right-click on the loader name and select the Dispatch Enabled option.
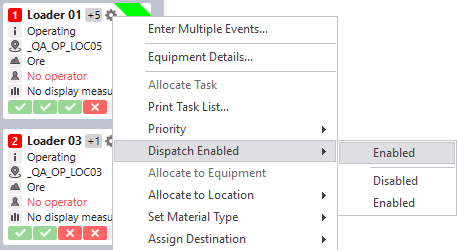
A half-cog icon is displayed above the loader name: this indicates that dispatch is enabled for the loader.
A route includes a source and a destination, and can be split into sections by defining waypoints. A waypoint is an intermediate location along a truck route. Waypoints are defined in Reference Edit.
The Route Management system stores the time taken to travel between each segment of the route and adds these together to determine the entire route time. The advantage of this approach is that a truck may be part way through a route. Using the last known waypoint, a more accurate estimated time of arrival can be determined.
Routes are keyed by truck model, since the time taken to travel a route will differ depending on the truck model. The load state of the truck is also considered when determining the route time.
Routes can be static or dynamic. Static routes are configured in Reference Edit. See: Defining a route. Dynamic routes are created as they are travelled. The times defined between waypoints in static routes can either be fixed or inferred. If fixed, then the defined value will always be used and never updated. If inferred, then the defined value will only be used when a more up-to-date duration does not exist.
Fixed values can only be changed by editing the reference data. The times between waypoints in dynamic routes will automatically update as routes are used. Even if a waypoint pair is defined as fixed, the dynamic routes will be captured and stored in the knowledge base. However, these are not used when working out route times.
When determining which route a truck should take, the system will determine the route with the shortest total time between the source and the destination. Routes which are marked as closed will not be considered. If a route is marked as locked for a source-destination combination, then it will be used over all others.
If no route can be determined between a defined source and destination for a truck model and load state, then in order to arrive at an approximation of the route duration, the following will occur:
- Find a route with the same load state, but with the source and destination reversed.
- Find a route with the opposite load state, but with the requested source and destination.
- Find a route with the opposite load state and with the source and destination reversed.
- If one end of the route is a primary location, then find the previous location of the loader and lookup the route to/from this location.
- Double the average route time to other locations in the same mine area.
- If one end of the route is a primary location, then substitute this with the mine area attribute and lookup the route to/from the mine area.
Waypoint Management
Waypoints are intermediate locations along a truck route. When a truck hits (drives through) a waypoint, Pitram records it. This allows the Pitram Dispatcher to have a better idea of where the truck is along the route.
Rules can also be set so that a particular action will occur (for example an alarm might be shown on a truck driver's mobile screen) when the truck hits the waypoint.
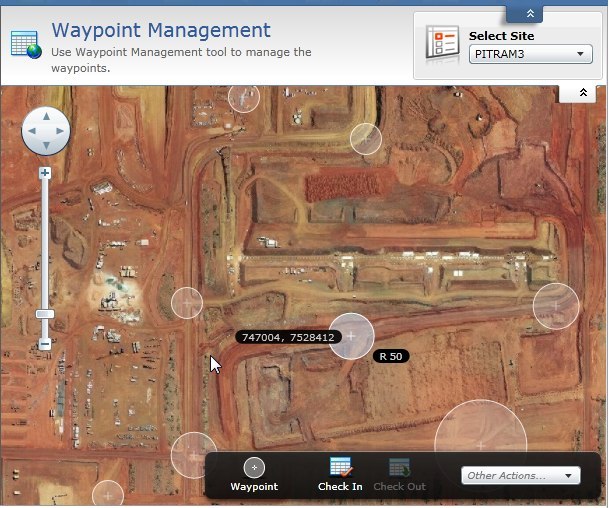
A Waypoint Management tool is provided in the Pitram Portal. The waypoints configured on-site are displayed as a layer of circles over an aerial map. Waypoints can be repositioned by dragging and dropping them with the mouse. When you hover the mouse over a waypoint, the name of the waypoint and it's position are shown.
As trucks approach a waypoint, the estimated time of arrival is displayed in Data Acquisition and can be adjusted. When a waypoint is hit (a truck, for example, passes by the waypoint) the name of the waypoint will show up on the Truck driver's mobile screen.
Waypoint Configuration
Waypoints are configured in Reference Edit.
You can specify what actions will occur when the waypoint is hit and specify the criteria that will trigger those actions.
Pairs of waypoints can be configured so that the fixed duration for a particular model of equipment travelling between a source and a destination waypoint can be recorded and used to calculate estimated times of arrival (ETAs).
Data Acquisition
In Data Acquisition, a number of tools can be utilised in order to minimise loader wait times and truck queuing times, and maximise tonnes hauled.
Loader Dispatch Enabled
For a loader to be included in any dispatch decisions made by the Dispatch system, it must be Dispatch Enabled. This can be set in either:
- The Equipment tab of the Display pane.
- A panel, such as a Loaders and Trucks panel or a Location Activity panel.
To enable a loader for the Dispatch system:
- Right-click on the loader name and select the Dispatch Enabled option.
A half-cog icon is displayed above the loader name: this indicates that dispatch is enabled for the loader.
If dispatch is enabled on a loader then trucks allocated to that loader will be dispatched when required. If dispatch is disabled then the trucks will remain with their allocated loader.
Loader Lock
Trucks may be assigned to a loader by the Control Room Operator or by the Dispatch system based on a score. For loaders that have dispatch enabled, the dispatch score is displayed. The Control Room Operator may take this score into consideration when assigning a truck to a loader.
The dispatch system will make a decision to allocate a truck to a loader when:
- A truck dumps. The truck will be empty at this stage and ready to service a loader. The truck will be allocated to the loader with the highest score.
- A truck drives through a waypoint along a route. A waypoint, for example, can be configured to dispatch the truck to a particular destination and therefore to a particular loader.
To lock (or unlock) a truck to the loader it is allocated to:
- Right-click on a truck that has been allocated to a loader and select Loader Lock | Locked (or | Unlocked).
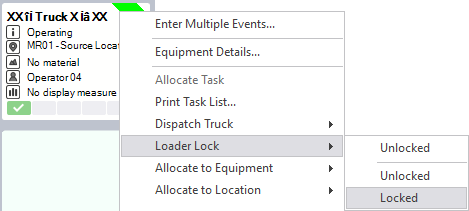
When a truck is locked the Pitram dispatch system will not attempt to reallocate the truck automatically.
Loader Priorities
As part of the Dispatch process, it is useful to be able to increase the priority of loaders in particular locations, to ensure that they are adequately trucked. This will also help to ensure that the desired grade or blend is achieved.
In Data Acquisition, a Loader Priority attribute can be allocated to loading equipment. These priorities and other inputs can then be combined to provide a final score that can be used to determine which loaders are allocated to which trucks.
In a panel, the priority of each loader is shown to the left of the loader name:
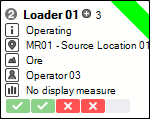
A priority is a positive integer which ranges from 1 (the highest priority) to n. When a truck becomes available it will be allocated to the loader with a high priority (1, for example) in preference to one with a lower priority. When attributing priority to a loader, factors such as the capacity of the loader, the experience of the operator, the quality of the material mined, the efficiency history of the loader, etc. may be taken into account.
Factors, other than priority, may also determine which loader a truck is allocated to:
- Is the Loader Locked?
- Is the truck restricted to a Dispatch Region?
- The truck travel time to the loader.
- Loader is already adequately trucked. Is waiting for a truck at a minimum?
- The loader Equipment KPIs production targets. Are they behind or on schedule?
- The loader's primary status. Is it Operating or Down?
- The Dispatch Weightings applied to some of these inputs.
Otherwise, if a truck is available it will be allocated to the loader with the highest priority.
When allocating trucks the Dispatch system will always aim to minimise loader wait times and truck queuing times, and maximise the tonnes hauled.
Loader Performance
A Loader Performance Panel can be configured in Data Acquisition to show the workload and performance of loaders over a specified time period.
Loader KPIs
Equipment KPIs are configured as KPI Reference Groups in the Pitram Portal and then assigned to each model of equipment.
In Data Acquisition, a bar shown at the bottom of each primary equipment tile provides a visual indication of the key performance indicators (KPIs) configured for that type of equipment. When you hover the mouse over a button on the KPI bar, the details of the KPI are shown.
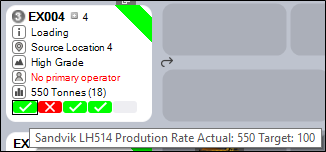
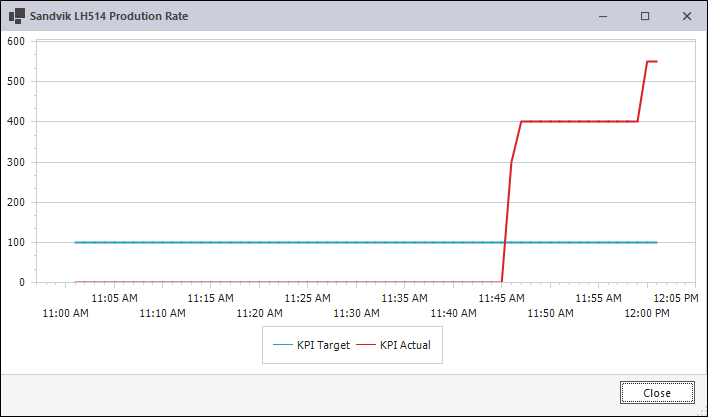
A red button on the KPI bar indicates the fact that the equipment unit is under-performing. In other words, the key performance indicator (Production Rate for example) has fallen short of target.
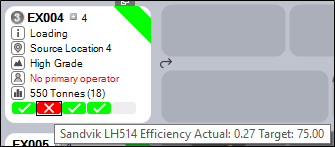
For any KPI on the KPI bar, you can click the mouse to select the KPI and display a graph which shows a history of KPIs for that equipment unit.
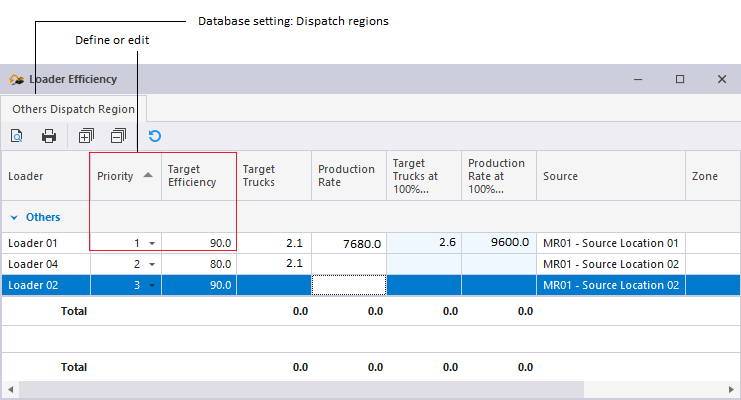
Loader Efficiency
The View | Loader Efficiency window in Data Acquisition allows the dispatch operator to set the target efficiency and priority for each loader within a dispatch region.
Two factors influence the production rate of a loader:
- Efficiency. Efficiency may take into account how efficient a loader has been historically, or how efficient it needs to be for a particular shift. This is a user-defined value and may vary from shift to shift.
- Number of trucks servicing the loader. If the loader is not fully utilised because of lengthy truck waiting times, production will drop. With truck wait times at a minimum, efficiency can be maintained and production targets achieved.
The Loader Efficiency window requires a user-defined target efficiency and a loader priority to be entered for the displayed loaders. With this information, route travel times, truck capacities, and other factors, the optimum target number of trucks and the production rate that will be achieved can be displayed.
Loader Down Dialog
If a loader enters into a non-operable state the dispatcher will be notified via the Loader Down Dialog.
Dispatch Decision Pane
In Data Acquisition, the Dispatch Decision pane (View | Dispatch Decision) shows the decisions that have been made by the Dispatch system and also why the decision was made.
If the Dispatching system is active (On) then the actions resulting from these decisions will have already been taken.
If the Dispatching system is inactive (Recommended), then the actions are displayed as recommended actions.
If the Dispatching system is inactive (Off) no actions will be shown or taken.

Dispatch Simulation
The Shift Planner is not only a useful planning tool in its own right, it is also a useful input into the Dispatch system. Once a shift plan has been loaded in Data Acquisition, it is possible to simulate a number of operational scenarios (by decreasing or increasing the number of trucks, for example, or by changing loader priorities and weightings).
The result of these simulations can then be analysed to determine how Dispatch performed for each simulated scenario, and what efficiencies were achieved in each case.
Following this analysis, the tasks in an optimal shift plan can then be allocated to the equipment and the locations in an active shift.
