Edit Source Path
A Source Path is the primary set of source scheduling instructions for a particular piece of Equipment and controls which Leaves are worked and in what order, as well as controlling the behaviour of equipment when it is unable to complete those defined instructions. For a conceptual overview, see: Equipment Source Path
Source Paths are written in the Source Path tab under each piece of Equipment.
Equipment Source Path Editor
Source paths are both case and white space insensitive and the path can be built up over multiple lines with each line adding more steps to the path. You can quickly Insert several path elements through the right-click menu:
The Basics
The simplest Source Path possible is a single wildcard asterisk (‘*’) character which tells equipment to work logically lowest index to highest (refer to your Source table Setup Levels) and all sub levels are completed before moving to the next index.
*
Paths are built up in a similar structure as ranges with each level of the table separated by slashes (either ‘/’ or ‘\’). For each level, a subset of positions for that level can be generated. These can either be a span of positions between two ends (e.g. ’1-5′), individual positions (e.g. ’1,2,3,4,5′) or a combination of both (’1-2,3,4-5′). To select every position for a level, the asterisk (‘*’) character can be used as a wildcard (or ‘-*’ to include all positions in reverse order). If any level is omitted, it is assumed that all positions of lower levels are included (e.g. ‘A’ is equivalent to ‘A\*\*\*’, although ‘A\’ would create no steps as nothing has been specified for the second level).
‘DEV\RL200’ --> Prioritise work on any Development on the Level RL200. Or ‘DEV\RL200\*\*\*’
The specific solid to be added to the source path can be interactively selected. For more information, see: Equipment Path Using Animation
Processes: <“Processes”>
<Processes> is a comma separated list of what processes will be used. As a individual line Processes: (Source Path Only) limits the processes that will be included in subsequent lines of the path (unless overridden on an individual line). Multiple processes can be included by comma separating them.
Stope\4\N\Primary\700 <Waste Filling, Bogging>
OR
 Processes: Waste Filling, Bogging
 Stope\4\N\Primary\700
Default (if not explicit): All Processes
Prefix: “Node Prefix”
<Node Prefix> will be prefixed to all subsequent lines that describe a node or nodes.
 Prefix: LAT
 \3\N
Default (if not explicit): None
Edit Source Path (Top)
Allow Advance: "On/Off"
If turned ‘On’ or set to ‘True’, allows the schedule to look further down the path to find the first task that is available (or until Allow Advance is set to ‘Off’ or ‘False’). Only has an effect when Dependencies are set. See: Allow Advance
The first step when adding a new piece of equipment, if we want it to work on any available activity, is to ensure that Allow Advance is turned ‘On’:
 AllowAdvance: On
 *
The command above will ensure the equipment works on any task available in any order.
Default (if not explicit): Off
Edit Source Path (Top)
Ignore Constraints: "On/Off"/<Priority>
By default all constraints will be adhered to unless the Ignore Constraints flag is set to ON in the Source Path. In addition to setting the Ignore Constraints flag as ON/OFF, the flag may also take a numeric priority value. For example, if Ignore Constraints: 2 is specified in the Source Path, all constraints at that priority or lower will be ignored. For example:
Ignore Constraints:2
will ignore a constraint at priority 2,3,4,5 ...
Ignore Constraints:10
will ignore a constraint at priority 10,11,12, 13 ...
This allows users to specify “safety” constraints (such as not more than 1 equipment per heading, not more than 3 equipment per level), as well as “operational” constraints (such as 100kT per year total, or not more than 10kT on this level in this month) and provides a way of ignoring some or all of the operational constraints, while maintaining all the safety constraints.
Ignore Dependencies: "On/Off"
By default all dependencies will be adhered to unless the Ignore Dependencies flag is set to On.
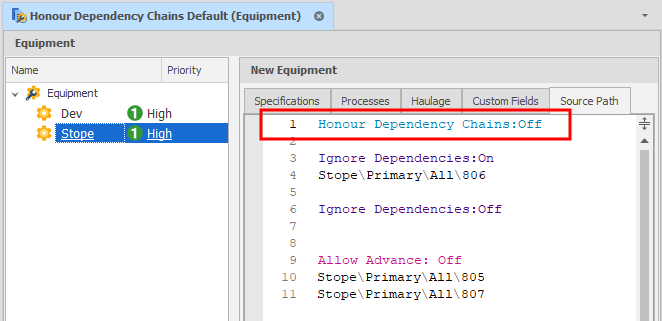
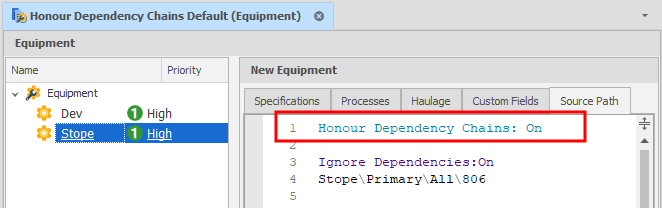
Honour Dependency Chains: "On/Off"
When a task is completed with an ignored dependency, by default dependency chains are honoured. Like Ignore Dependencies, the Honour Dependency Chains flag can be turned On and Off,
There are three cases: Honour Dependency Chains Off, Honour Dependency Chains On, and Honour Dependency Chains Default.
-
Off - if something is completed with an ignored dependency, subsequent tasks are released.
-
On / Default - if something is completed with an ignored dependency, subsequent tasks are not released until predecessor tasks are completed.

For example, if you have three nodes: Stope\Primary\All\807 → Stope\Primary\All\806→ Stope\Primary\All\805 and you ignore dependencies and complete task 806, the default behaviour will ensure 805 waits on 807 until it is done.
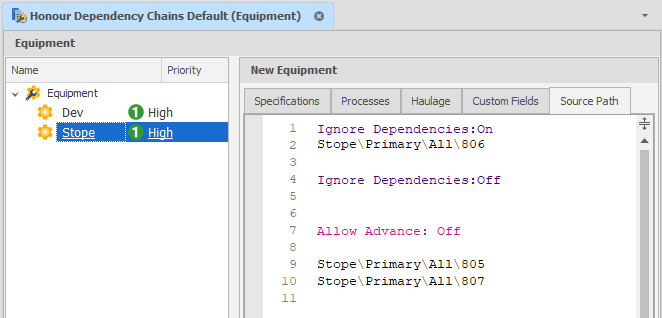
Set Honour Dependency Chains = Off if you want to release all subsequent tasks:
To ensure the default behaviour, explicitly set Honour Dependency Chains = On.
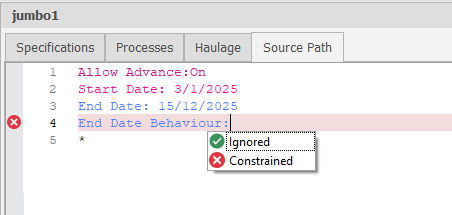
Start Date, End Date/Behaviour
Use these commands to set the Start Date and End Date for a set of tasks. An End Date Behaviour flag can also be set which allows two states:
-
Ignore - the end date is only a suggestion
-
Constraint - the end date is respected in source step selection
Include Predecessors: "On/Off"
If turned ‘On’ or set to ‘True’, this command ensures all predecessor tasks that are required to unlock the wanted task in the source path are also completed (or until Include Predecessors is set to ‘Off’ or ‘False’).
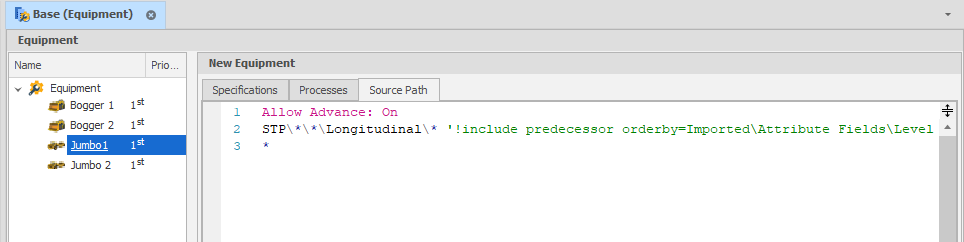
 Include Predecessors: On
 *
When On, any paths you type do not just add the specified tasks, but all predecessors of those tasks (recursively).
Unless there is a specific process constraint, all tasks that exist in that path range are considered, rather than just what the equipment can work on.
For example: Equipment “Jumbo” can only work on Development, not Stope. A path line of “Stope” with include predecessors On should make the Jumbo work on all development tasks that are predecessors of stope tasks.
This allows some equipment to focus on “facilitating” rather than working on specific source tasks themselves. They exist to create opportunities for other equipment to work.
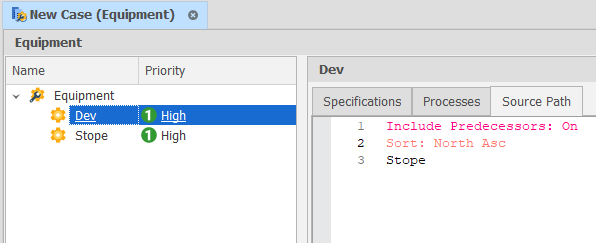
Orderby
If the wanted node has many combinations,
Even though Stopes are not activity conducted by Jumbos, the predecessors to Stopes include many development tunnels that are performed by the Jumbo. We are requesting the jumbo to prioritise development that is required to unlock Stopes. However, if we did not use any order, the jumbo would just work on any development associated to Stopes. By adding the attribute Level, for example, we can tell the Jumbo to work on Stope development, prioritising from Level 1 Up.
Thenby
The thenby command, allows the user to set a second set of priorities. For example, orderby Level, thenby Tonnes.
Edit Source Path (Top)
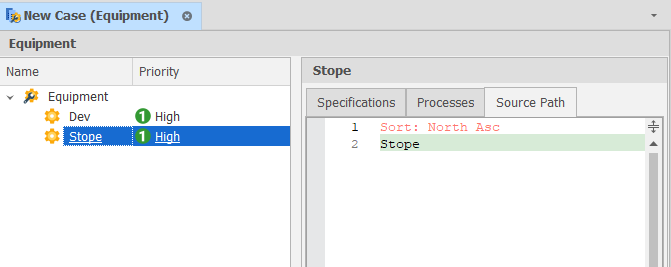
Sort
The Sort command may be used to order the path nodes based on their positions and attributes as defined in an ordered list of Sorting Entries saved as a Node Sorting.
Node Sortings facilitate a degree of “auto-scheduling” by allowing tasks to be worked using an arbitrary ordering and/or grouping of nodes which might be intended, for example, to target the highest grade, or work in a structured or grouped order not specified by the level structure.
Sorting entries are setup in the Project Explorer by right-clicking on a Data Table and selecting Setup | Node Sortings. For more information, see: Node Sortings
Interaction of Include Predecessors and Sort
If Include Predecessors is On and a Sort is used, the Sort is applied to the path nodes. Include Predecessors acts on the sorted list.
For example, if the Sort is set to order by gold grade descending and Include Predecessors is ON, the jumbo will prioritise the development needed to get to the highest grade stope, then the 2nd highest, and so on.
This does not impact the ordering of the predecessor tasks added.
Delays
Time delays can be specified using the format ‘Time Delay: TimeDelay TimeUnits <NonProductiveProcess>’ where TimeDelay is a number specifying how long the delay should occur for, TimeUnits is a unit of time that the TimeDelay is measured in and NonProductiveProcess is the name of a non productive process to use for the delay (e.g. ‘Time Delay: 6 hours <Relocation>’). Valid time units are ‘Minutes’, ‘Hours’, ‘Days’ or ‘Weeks’.
Date delays can be specified using the format ‘Date Delay: DelayToDate <NonProductiveProcess>’ where DelayToDate is text that describes the date to delay until (in the format of the user’s region settings) and NonProductiveProcess in the name of a non productive process to use for the delay (e.g. ‘Date Delay: 1/1/2016 <Delayed Start>’)
 AllowAdvance: On
 Date Delay: 2027-07-01 00:00:00 <Commissioning>
 VER\1\E\19\1
 Time Delay: 120 hours <Maintenance>
The example above delays the commissioning of the Raisebore until the first of July 2027. After completing, the first leg of the shaft VER\1\E\19\1, the Raisebore goes into Maintenance for 5 days.
Edit Source Path (Top)
Amount ‘( )’
Allows for only a portion of a task to be scheduled (e.g. ‘VER\1\E\19\1 (50%)’ or (0.5)’). Can also be used with = Modifiers (see below).
 AllowAdvance: On
 Date Delay: 2027-07-01 00:00:00 <Commissioning>
 VER\1\E\19\1 (50%)
 Time Delay: 120 hours <Maintenance>
Default (if not explicit): 100%
Rate ‘[ ]‘
Overrides the rate of the equipment by multiplying it by this factor when scheduling these tasks.
 AllowAdvance: On
 Date Delay: 2027-07-01 00:00:00 <Commissioning>
 VER\1\E\19\1 [50%]
 Time Delay: 120 hours <Maintenance>
Default (if not explicit): 100%
Edit Source Path (Top)
Rate and Equipment Count [#/#]
Similar to Rate but adds a second number to multiply the Equipment Count. Can also be used with = Modifiers.
Modifiers '='
Used for Amounts, Rate and Equipment Count. Changes their effect from a factor/percentage to a hard-coded number. Note: If a Modified Amount is greater than 100% of the available Source Quantity in that leaf, the actual Amount will be 100%.
 AllowAdvance: On
 Date Delay: 2027-07-01 00:00:00 <Commissioning>
 VER\1\E\19\1 [=2/=2] ‘A modified Rate of 2/hour, Modified Equipment Count of 2’
 VER\1\E\18\1 [=80] ‘A modified Amount of 80 (Source Quantity units)
InRange and NotInRange: Range Name
Allows for only Tasks in (or not in) a Range to be included in instructions to Equipment. Affects subsequent lines in the Path until overridden by another InRange or NotInRange. Can be reset with a Wildcard e.g. InRange: *
 AllowAdvance: On
 InRange: SubZone\N
 *

 Equipment to work in SubZone N
Intersect Ranges/ Union Ranges
The Intersect Ranges command allows two or more specified ranges to be combined in a Boolean AND expression. To pass the filter, nodes must be in ALL specified ranges.
Intersect ranges: <Range1, Range2…RangeN>
The Union Ranges command allows two or more specified ranges to be combined in a Boolean OR expression. To pass the filter, nodes must be in AT LEAST ONE of the specified ranges.
Union ranges: <Range1, Range2…RangeN>
Edit Source Path (Top)
Path Arrays
Path arrays allow for multiple lines to be combined into single line paths. The arrays are specified between {} characters with semi-colons (;) delimiting entries. For example:
STP\3\S\Primary\{15734-15855} ; STP\5\N\Longitudinal\{15905-15960}
Gets expanded to:
STP\3\S\Primary\15734 <Process>
STP\3\S\Primary\15756 <Process>
STP\3\S\Primary\15983 <Process>
STP\3\S\Primary\15909 <Process>
STP\3\S\Primary\15889 <Process>
STP\3\S\Primary\15879 <Process>
STP\3\S\Primary\15869 <Process>
STP\3\S\Primary\15855 <Process>
STP\5\N\Longitudinal\15905 <Process>
STP\5\N\Longitudinal\15915 <Process>
STP\5\N\Longitudinal\15920 <Process>
STP\5\N\Longitudinal\15925 <Process>
STP\5\N\Longitudinal\15930 <Process>
STP\5\N\Longitudinal\15935 <Process>
STP\5\N\Longitudinal\15940 <Process>
STP\5\N\Longitudinal\15945 <Process>
STP\5\N\Longitudinal\15950 <Process>
STP\5\N\Longitudinal\15960 <Process>
The number of items in each array for a path must be the identical. Hovering the mouse over an arrayed line shows the expanded version of it.
Arrays can be used in the Node Paths themselves, but also to in-line <Processes>, (Percentages) and [Rates]. Since arrays are used more frequently in dependencies, a more comprehensive description is covered in the Dependencies Dependencies topic.
Edit Source Path (Top)