Workflows
What are workflows?
-
A workflow represents a process containing multiple steps. Each Step represents an action that needs to be taken in the overall process.
-
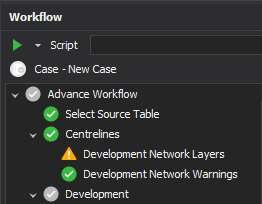
Steps are ordered and executed as a list in the Workflow dock panel. Steps may be grouped into folders like a node tree, but only leaf nodes (steps) are executed. Grouping may be useful for conveying the intent of a group of steps.
-
A workflow can be progressed by running one step at a time or by attempting to run all steps in succession. Successfully running a step will change it’s state from incomplete to complete. When error is encountered it is shown and will prevent the workflow from progressing.
-
A workflow can act as a reference for a user to check where they are up to in a given process.
-
A workflow may be used for the auditing of a process to check that all steps have been completed and validated.
-
A workflow can be used to guide a user around the program using navigation. Each step will have a navigation action which focusses on a specific part of the user interface.
-
Checklist mode can be used to forfeit the progression logic of the workflow for more freedom. When this mode is enabled, steps may be run in any order and be checked/unchecked manually.
-
Workflows can be created, modified, and configured using scripts. This means that workflows can be moved between projects by exporting and importing the relevant scripts which create the workflow.
Features
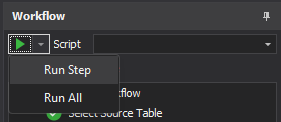
Run Step
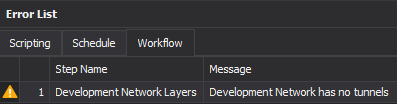
The Current step can be run to using the Run Current Step button in the workflow UI. This will Execute the step and a success value will be returned. If the execution is a success, then the step will be ticked and the workflow will move onto the next step. If the workflow is on the last step Running will continually execute the last step. If errors occur when running a step, the icon will change to a cross and the error message will be shown in the Errors dock panel under the Workflow tab. This is the same with warnings, except warnings will not prevent the workflow from progressing.
Alternatively the user can chose to Run All steps using the run all option in the drop down menu of the Run button. This will attempt to run all steps in order from the current step onwards. If an error occurs during this run then the workflow to stop on the step with the error.
Hovering over the Run button will show a tooltip with the current step’s name.
Checklist Mode
Scripted workflows support Checklist mode. Checklist mode can be used to forfeit the progression logic of the workflow for more freedom. When this mode is enabled, steps may be run in any order and be checked/unchecked manually.
Checklist mode has to be built into the workflow on creation as not all processes will be inherently compatible with the mode. This mode can be useful when a workflows' steps are not directly related and order is not a necessity.
Checklist mode can be activated by pressing the Checklist Mode icon in the Workflow panel on supported workflows.
Interacting with the Workflow
The node tree in the Workflow panel can be interacted with to run various actions. The node tree also has a context menu which is opened on right click. This context menu provides different options for interacting with the workflow. The following actions are supported:
Run Step
This action runs the current step of the workflow. Available when Checklist mode is Disabled.
Run All
This action runs multiple steps in the workflow, starting at the current Step and onwards until the last step. If an error occurs the workflow will stop at the errored step. Available when Checklist mode is Disabled.
Run
This action runs the selected step of the workflow. Executed with the context menu item. Available when Checklist node is Enabled or when the step is the current step.
Navigate To
This action calls the navigate to action on the workflow step. Each step can have a unique navigate to action which will take the user to a specific place in the user interface. Executed by double clicking the node or with the context menu item.
Reset To/Reset
This action will reset the current node, changing it back to it’s uncompleted state. Doing this with Checklist mode disabled with reset all steps that come after the selected step and change the selected step to the current step.
Progress To
This action will attempt to advance the workflow to the selected step by running all previous steps that have not yet been run. It functions like Run All except it stops at the selected step instead of the last step. Available when Checklist mode is Disabled.
Check
This action is only available with Checklist mode enabled. It will toggle the node state from Checked/Unchecked. Checking folder nodes will toggle all steps in the folder. Executed by clicking the node check mark icon or with the context menu item.
Persistence
Some workflows can be run over multiple sessions, their states can still be saved with the project so a half completed workflow will still be at the same state after reopening a project. This can be great for the auditability of a process between sessions, so the user knows exactly where they are up to. Persistence is up to the implementer of the workflow and can be as complex or as simple as they like.
Context Changing
Some workflows have a context based on the last focused tab in their project.
In some workflows, this context is a case/scenario. In others, the context can be a Data Table.
Whether the workflow uses a context is up to the implementer. The context gives the implementer access to the case or table which the user is currently/was most recently looking at. This can be useful when a workflow’s process revolves around a specific Case or Table and means multiple workflows can be progressed independently (one per case or table).
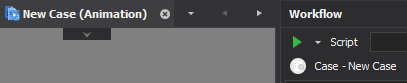
If a workflow is context based, then the state of the workflow will be saved per context. The current workflow context is provided in the label under the script select in the Workflow panel.
Portability
In their current implementation, workflows can be thought of as scripts that can be loaded in the Workflow panel to setup a workflow. This means that workflows can be moved between projects by exporting and importing the relevant scripts which create the workflow and then selecting the imported workflow script from the Workflow panel.
Note that any workflow progress is saved in the project, so exporting to a new project will forfeit progress.
Scripting
All workflows are scripted. This means that a script needs to be created which will instantiate a workflow when it is selected by the user. The user will select the current workflow script in the Script select in the Workflow panel.
For details on how to create a workflow with a script, see: Workflow Scripting