Workflow Scripting
FAQ
-
A workflow represents a process containing multiple steps. Each Step represents an action that needs to be taken in the overall process.
-
Steps are ordered and executed as a list in the Workflow dock panel. Steps may be grouped into folders like a node tree, but only leaf nodes (steps) are executed. Grouping may be useful for conveying the intent of a group of steps.
-
A workflow can be progressed by running one step at a time or by attempting to run all steps in succession. Successfully running a step will change it’s state from incomplete to complete. When error is encountered it is shown and will prevent the workflow from progressing.
-
A workflow can act as a reference for a user to check where they are up to in a given process.
-
A workflow may be used for the auditing of a process to check that all steps have been completed and validated.
-
A workflow can be used to guide a user around the program using navigation. Each step will have a navigation action which focusses on a specific part of the user interface.
-
Checklist mode can be used to forfeit the progression logic of the workflow for more freedom. When this mode is enabled, steps may be run in any order and be checked/unchecked manually.
-
Workflows can be created, modified, and configured using scripts. This means that workflows can be moved between projects by exporting and importing the relevant scripts which create the workflow.
This topic provides an overview of how to create or modify a workflow through scripting. The major features that can be added to a workflow are described here with animated examples and sample code.
Note that the Scripts panel provides tools that are only applicable to developers, consultants or power users familiar with scripting in C#.
Adding Errors and Warnings to Steps
Creating a Workflow Script
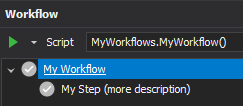
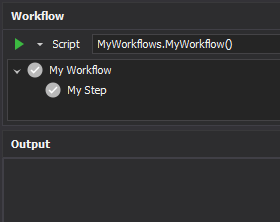
The easiest way to create a new workflow is create a new Script in an active project and modifying the automatically generated class and method to be a workflow entry method. As an example, create a new script called My Workflows and rename the class to MyWorkflows and the method to MyWorkflow as seen in the screenshot below.
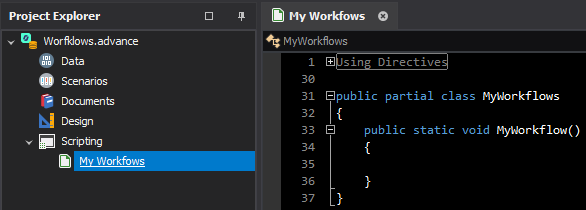
The scripting document will now be a standard scripting entry point. It will be visible in the scripts dock panel but running it will do nothing since there is no code.
To convert this script into a workflow script we need to add a IWorkflow parameter to the MyWorkflow method. We will call the workflow parameter workflow for simplicity.
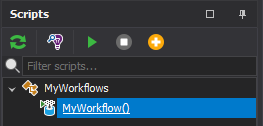
public static void MyWorkflow(IWorkflow workflow)Once we have added the IWorkflow parameter, we can recompile the scripts and we will notice two things. Firstly, the MyWorkflow script is missing from the scripts dock panel, and secondly, the MyWorkflow script will be added to the Script Select of the Workflows dock panel.
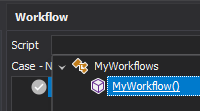
Selecting the workflow script will update the current workflow in the Workflows dock panel but the script currently does nothing so we will only see the root workflow node. The quickest way to make sure that our workflow script is workflow would be to give our workflow a name.
Naming a Workflow
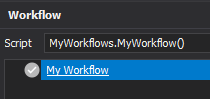
To name a workflow the easier way would be to set the Caption property of the workflow variable inside the MyWorkflow method. We are going to give the workflow the name My Workflow to keep the theme with the method.
public static void MyWorkflow(IWorkflow workflow)
{
workflow.Caption = "My Workflow";
}
After this change if we recompile the scripts and select the MyWorkflow node in the script select of the Workflow Panel, then we should see that the root node has been renamed to My Workflow.
From now on we will be assuming that workflow refers to the variable as per the code snippet above and for conciseness we won’t be showing the MyWorkflow method. Additionally any changes made to the workflow script should be followed by recompiling the scripts to see changes reflected in the workflow panel.
Adding a Workflow Step
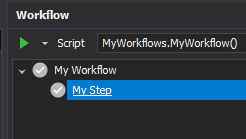
The most important part of the workflow are the steps. Adding steps to the workflow is necessary to do anything productive. Adding steps is quite simple, we can do so by calling workflow.Add().
workflow.Add("My Step");Adding the above code with add a single step called My Step to the root node of the workflow.
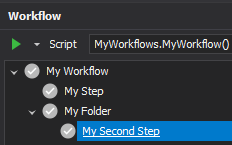
Steps can also be added into folders by specifying the folder path parameter in the Add() method.
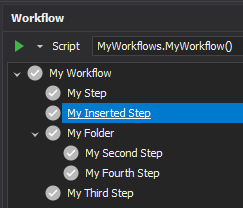
workflow.Add("My Second Step", "My Folder");Adding the above code will add a folder to the workflow tree called My Folder with a leaf node called My Second Step.
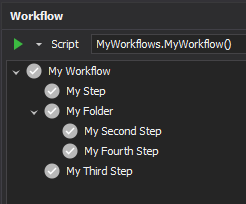
When using the Add() method, steps are appended to the end of the workflow or the end of the folder if it is specified. If we add a third step without a folder path and a fourth step with the same folder path as previous we will see that the last step in the workflow will be the third step and the last step in the folder will be the fourth step.
workflow.Add("My Third Step");
workflow.Add("My Fourth Step", "My Folder");Add the above code to the workflow script below the previous code. The order matters.
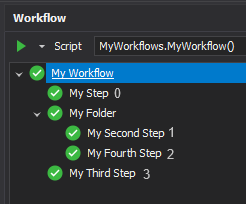
As seen in the above animation, when adding steps to the workflow be aware of which steps are added first since order often matters. For execution, the workflow steps are stored in a flat list where the first index is zero. The index of the steps indicate their order in the three and their execution. In the above example the indexes would be as shown below.
When working with a full scripted workflow like the example above, it is recommended to only use the Add() method for adding steps. This is because it is by far the simplest and robust way to add steps to the workflow without having to think about indexing.
Step Captions
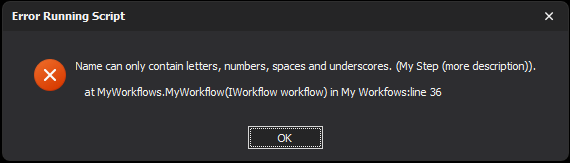
Sometimes it is desire to have a more descriptive name for a workflow step than is allowed by the normal workflow naming rules. For example, you really want brackets in the name of your workflow step. If you were to try to add a name with brackets or other special characters, like the following example:
var myStep = workflow.Add("My Step (more description)");You would be met with the following error.
In cases like this it would be wise to create a workflow step with a caption. Captions are a display string which allow any characters that you like. You could use the workflow.CreateStep() method which takes the input parameters of a name and a caption.
var myStep = workflow.CreateStep("My Step", "My Step (more description)");
workflow.Add(myStep);Make sure to remember to add the step to the workflow with the Add() method, otherwise the step will not be added to the workflow. The step should now appear in the workflow node tree with the caption display text.
Remember than a caption is just the display text of the workflow item. If you want to access the item by name, remember to use the Name property of the workflow item. Some example where this is applicable is the workflow.Remove(fullname) or the workflow.MoveToStep(fullname) methods.
Insert and Remove Steps
While it often won’t happen with bespoke workflows, when working with the Advance Default Workflow, it might be necessary to add steps in the middle of the workflow. This can be done using the workflow.Insert() method. For example if we wanted to add a new step before the folder of the workflow above but after the first step, then we would use the index of the step we would be replacing.
workflow.Insert("My Inserted Step", 1);Add the above line to the end of the MyWorkflow method and notice the inserted step is added below the first step and above the folder.
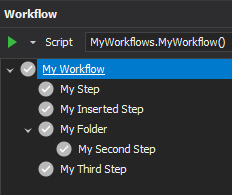
In a workflow that already has steps like the Advance Default Workflow, it might also be desired to remove steps that are not needed for a specific process. This can be done by calling workfow.Remove()with the name of the step the should be removed. The name of the workflow step excludes the root node but includes any folders that parent the step.
If we wanted to remove the fourth step for example we would add the following line.
workflow.Remove("My Folder/My Fourth Step");
Executing a Step
The workflow is getting a bit crowded and currently does nothing when run so let’s clear it and start adding steps which do something! Set the MyWorkflow method back to just the caption and we will start adding execution actions.
public static void MyWorkflow(IWorkflow workflow)
{
workflow.Caption = "My Workflow";
}Add a step called My Step but this time make sure to assign the newly added step to a variable. We will called the variable MyStep to stick with the theme.
Now that a we have a variable to work with we can make the step do something when executed. We will keep it simple and write to the Output console to make sure the step is working correctly. To do this we must subscribe to the step’s OnExecute event. This event is triggered when the step is executed and has a special event argument called WorkflowStepSuccessEventArgs. This argument can be used to determine is the executing was determined to be successful by assigned the Success property to true. By default a step will automatically return true if this event is not subscribed to but when we do subscribe to it we need to specifically state that the event was a success, otherwise the step will not progress the workflow.
var myStep = workflow.Add("My Step");
myStep.OnExecute += (s,e) => {
Console.WriteLine("Hello world.");
e.Success = true;
};After adding the above code we can run My Step and check the Output dock panel to see our Hello world. text and notice that the step was completed successfully and ticked as a result.
Note that more complicated execute actions can be moved to their own methods for convenience. The below code should function the exact same as the above code, but it is a matter of preference.
public static void MyWorkflow(IWorkflow workflow)
{
workflow.Caption = "My Workflow";
var myStep = workflow.Add("My Step");
myStep.OnExecute += MyStepExecuted;
}
private static void MyStepExecuted(object sender, WorkflowStepSuccessEventArgs e)
{
Console.WriteLine("Hello world.");
e.Success = true;
}
Adding Errors and Warnings to Steps
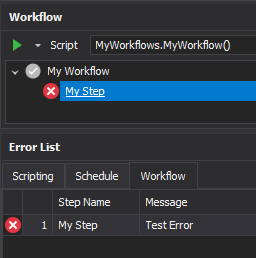
Sometimes a workflow step will not be able to execute successfully and it can be handy to notify a user that the workflow cannot progress because there is an problem. For example, a workflow step requires user input as a text string but there was a typo in the input. In this case it would be helpful to notify the user that the step could not be completed. To add one or more errors to a step use the step.AddErrors() method.
private static void MyStepExecuted(object sender, WorkflowStepSuccessEventArgs e)
{
var step = sender as IWorkflowStep;
step.AddErrors(new Error("Test Error"));
e.Success = false;
}This method can access a variable number of Error objects which represent an error. Each error will be reported in the Errors Dock Panel Alongside the step name. An error icon will also take the place of the tick icon on the workflow step.
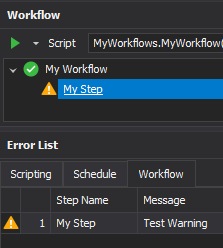
In some cases it might be desired to report a warning message instead of an error message when their might be a potential problem or a workflow step can still progress even after an error. In this case we can simply construct an Error object with a Warning type and set e.Success to true.
step.AddErrors(new Error("Test Warning", Error.ErrorType.Warning));
e.Success = true;This change will now display warning icons instead of errors and the step will be completed successfully.
It is up to the workflow implementer to determine the best way to validate their workflow and report errors and warnings to the user.
Restoring the Workflow State
Depending on the process which the workflow is implementing, it could be useful to restore the previous state of the workflow after a different workflow is selected or the project is closed and reopened. The process of restore the workflow state can range from being very simple to being very complex depending of the workflow implementation.
To start we will restore values for a simple workflow, using the workflow.RestoreValues() method. This method take a text string as input parameter which will be used as a unique identifier for saving the workflow state to the project.
Make sure that every workflow in the project has a unique key when using RestoreValues(). Otherwise workflows may not save or restore correctly.
The following code demonstrate how simply calling RestoreValues(string key) can save the workflow steps' state.
public static void MyWorkflow(IWorkflow workflow)
{
workflow.Caption = "My Workflow";
workflow.RestoreValues("MyWorkflow");
workflow.Add("Step 1");
workflow.Add("Step 2");
workflow.Add("Step 3");
}Now the workflows step state will be saved (alongside some other workflow properties like Checklist Mode, which will be discussed in Checklist Mode (below). Change will even be restored after closing and reopening the project.

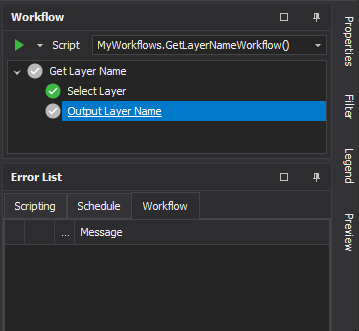
Sometimes, it will be desired to store more information than just the step state to effectively restore the workflow state. For example, a workflow step requires the user to select a design layer which needs to be restored before the next step can be completed.
public static void GetLayerNameWorkflow(IWorkflow workflow)
{
// Declare a layer variable
Layer layer = null;
// Name the process
workflow.Caption = "Get Layer Name";
// Declare restore values key (this does not work as expected)
workflow.RestoreValues("GetLayerNameWorkflow");
// Select Layer Step
var selectLayerStep = workflow.Add("Select Layer");
selectLayerStep.OnExecute += (s,e) =>
{
// Create UI for selecting a layer
var optionsForm = OptionsForm.Create("Select Layer");
var layerSelect = optionsForm.Options.AddLayerSelect("Layer");
// Assign existing layer if relevant
layerSelect.Value = layer;
// Show UI
optionsForm.ShowDialog();
// Set layer value and report error or success
layer = layerSelect.Value;
if (layer == null)
selectLayerStep.AddErrors("Please select a layer.");
else
e.Success = true;
};
// Output Layer Step
var outputLayerStep = workflow.Add("Output Layer Name");
outputLayerStep.OnExecute += (s,e) =>
{
// Write the layer name to Output console
Console.WriteLine(string.Format("Layer Name: {0}", layer.FullName));
// Always succeeds
e.Success = true;
};
}The above code snippet does not work as intended, because the layer will be null while the Select Layer Step could be completed, this would cause an exception in the OnExecute action in Output Layer Name. Read the following section to fix the above code snippet.
The above code In this case, it would be best to use the RestoreValues(string key, Func<string> serialise, Action<string> deserialise) method. This method not only stores the workflow step states, but also runs the serialise and deserialise delegates which can allow you to save any kind of data that you prefer, as long as it can be serialised to a text string.
The code below is an example of how the above workflow can be changed to also restore the layer data.
// Declare restore values key and restore layer data
workflow.RestoreValues("GetLayerNameWorkflow",
() =>
{
// Save layer full name
if (layer == null)
return "";
return layer.FullName;
},
text =>
{
// Restore layer from full name
if (string.IsNullOrEmpty(text))
return;
var existingLayer = Project.ActiveProject.Design.LayerData.GetLayer(text);
if (existingLayer != null)
layer = existingLayer;
});Replace the previous RestoreValues() method with the above code snippet and now the layer should be restored correctly when reopening the workflow. If the workflow ends on the Output Layer Name step then running the step should report the selected layer Full Name to the Output Dock Panel console.
Initialising Steps
In certain situations, you might want to logically determine if you want a step to be restored to its previous state. Consider the previous code snippet where we saved the selected layer with RestoreValues. What if the layer was remove after the layer name was saved with the workflow? We would need a way to determine if the layer was restored correctly and only restore the state of the select layer step if it was successful. This is where the OnInitialise event comes into play.
The OnInitialise event is called once when the workflow is first setup and contains a Success event argument just like the OnExecute event. This way an implementer can determine if a step has been successfully initialised/restored. In the case of the missing layer, we would add the following code snippet below the line whereselectLayerStep is assigned.
// Only restore when layer is not missing
selectLayerStep.OnInitialise += (s,e) => e.Success = layer != null;This will prevent the Select Layer step from restoring if the layer have been moved or removed. Note that this will reset the state of any steps that occur after the step which failed to initialise. For example, if the Output Layer Name step was previously completed, but the layer was moved or removed, then the step will be reset as if it was never completed. Just remember that all steps after a step that fails initialisation will be reset, making it as if the workflow was starting from the failed step.
This last point become irrelevant if you are using Checklist Mode (below).
Navigating the User Interface
One of the key features of workflows if to allow the user to navigate the application user interface and specific functionality that relates to given workflow steps. Consider the Output Layer Name step of Restoring the Workflow State (above). It may help new users or users who haven’t used the panel in a while to quickly locate the Output Dock Panel where the output of the step will be written. This can be done with the OnNavigateTo event.
The OnNavigateTo event is called whenever a workflow step if double clicked or when the right click menu item called Navigate To … is selected. Pairing the OnNavigateTo event with the methods in the Navigation class can allow an implemented to easily allow the user to navigate to and focus a particular section of the UI. In this example we would want to use the Navigation.GoToDockPanel(MainDockPanel dockPanel, bool pinDockPanel) method. Add the following code snippet below the line where outputLayerStep is assigned.
outputLayerStep.OnNavigateTo += (s,e) => Navigation.GoToDockPanel(MainDockPanel.Output, true);After adding the above code snippet we can see that navigating to the Output Layer Name step will show the dock panel and pin it (meaning it won’t disappear after losing focus).
Note that the OnNavigateTo event runs on the UI thread of the application. This means that the event can take full advantage of the UI utility methods provided by Navigation.
Further note that some method in Navigation can only be run on the UI thread and will do nothing if run outside the OnNavigateTo event of workflow steps.
All of the methods in the Navigation.Dialog class must be run on a UI thread, otherwise they cannot function correctly.
Context Workflows
Sometime a workflow process might be strongly related to a given case or data table. In these scenarios it might be desired to have a separate workflow instance for each case or table. Let's call the case/table a context from now on. A handy way of having a distinct workflow instance for each context is to use the most recently focussed context in the UI. This means that the workflow will be up to date depending on the specific context that the user is working on. This is similar to how the Filter or the Legend dock panels are updated based on which case has focus.
To have a distinct workflow per context, we can implement the workflow as a context workflow. There are currently two types of context workflows, an ICaseWorkflow and an ITableWorkflow. This context workflows will update to a new workflow instance when a new context of their respective type is focused in the program UI.
We will use the example of an ICaseWorkflow to illustrate the features of context workflows. To create a context workflow or change an existing workflow into a context workflow, simply change the IWorkflow parameter in the workflow entry point method to either an ICaseWorkflow or an ITableWorkflow.
public static void MyCaseWorkflow(ICaseWorkflow workflow)
{
workflow.Caption = "My Case Workflow";
}When the MyCaseWorkflow script is selected in the Workflow Dock Panel, and if you do not have a case form focused, then you will see two things of note.
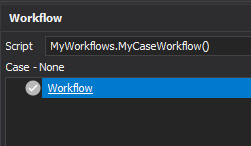
Firstly, there will be a label text under the script select which will state Case - None. This label is notifying the user that the workflow is a context workflow which is expecting a case but there is no case currently selected. Secondly, you will notice that the caption of the workflow root node has not been set. This is because when a context workflow does not have any context to work with, it is not instantiated. Suppressing the instantiation is important because it means that the workflow cannot be interacted when a context has not been selected. The beneficial consequence of this is that when implementing a context workflow, you can always assume that the workflow will have a context when the user is interacting with the steps.
Next, select and open a case form in your current project.
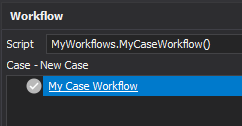
Now you will notice that the context label has been updated and the Workflow Root Node has the correct caption. This signifies that the workflow has been instantiated correctly with the selected context.
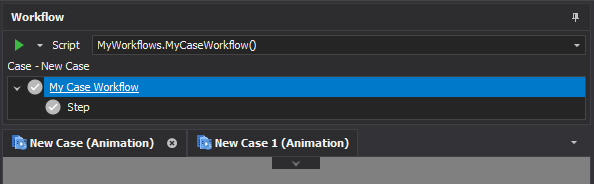
Changing the focused context form will update the workflow panel based on the context. To test this try adding RestoreValues(string key) to the workflow and progressing to notice a change in state between the contexts.
workflow.RestoreValues("MyCaseWorkflow");
workflow.Add("Step"); // Blank step to show progressionAdd the above code snippet and notice the restored state being different between the workflow instances.
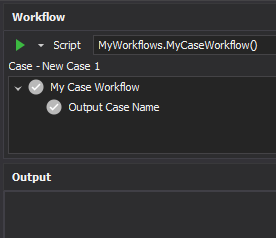
The main benefit of using a context workflow is the ability to use the context from the workflow object inherently. This allows easy access to the context when implementing the workflow. For example the below code uses the ICaseWorkflow.Case property to output the case name to the Output Dock Panel.
var caseNameStep = workflow.Add("Output Case Name");
caseNameStep.OnExecute += (s,e) => Console.WriteLine(string.Format("Case Name: {0}", workflow.Case.FullName));The result is the case’s full name being output to the Output Dock Panel.
This OnExecute event does not set the Success event argument and therefore does not progress the workflow.
This can also be done with the ITableWorkflow.Table property.
Checklist Mode
Checklist mode can be used to forfeit the progression logic of the workflow for more freedom. When this mode is enabled, steps may be run in any order and be checked/unchecked manually.
Checklist mode is useful for situations where workflow steps are only weakly related and the order of execution does not matter. For example, if you were to create a workflow whose sole purpose is to navigate a user around the program.
In Checklist mode there is no Run button and steps can be run by right clicking the step and selecting the Run option. Items are either checked when they are run or are manually checked by clicking the tick icons alongside each workflow step or folder.
To enable Checklist mode for a workflow, simply set the workflow.CheckListMode property to True. To demonstrate this, the code snippet below creates a Checklist mode workflow which has a couple steps that allow the user to navigate around the program:
public static void MyCheckList(IWorkflow workflow)
{
workflow.Caption = "My Checklist";
workflow.CheckListMode = true;
var designStep = workflow.Add("Go to Design");
designStep.OnNavigateTo += (s,e) => Navigation.GoToDesign();
var filterStep = workflow.Add("Go to Filter");
filterStep.OnNavigateTo += (s,e) => Navigation.GoToDockPanel(MainDockPanel.Filter, true);
}Adding RestoreValues() to the above code snippet with save the current checked state of the workflow.
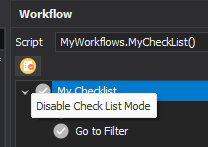
On rare occasions a workflow may be suitable to work as both a conventional or a checklist workflow. This will typically be desired when there is a long an interconnected workflow where a power user may want to skip steps to complete the process faster. By setting the workflow.ShowCheckListMode properties to true, you can enable a button in the workflow dock panel which allows the user to toggle between conventional and checklist mode at will.
workflow.ShowCheckListMode = true;ShowCheckListMode allows the user to choose which mode they want which is powerful for the user. However, it makes implementing the workflow much more complicated as the implemented has to consider both the conventional and checklist modes when building the workflow. Implementers need to be aware of this otherwise it could lead to more undefined behaviour.
Try adding the above code snippet to the above workflow to see the Checklist mode toggle button appear. The tooltip of the button will display what will happen when the button is clicked.
When ShowCheckListMode and RestoreValues are both enabled, note that both the conventional and checklist mode states of the workflow will be saved. This means that the Checked state of each step will be saved separately from the conventional properties and includes the CheckListMode property of the workflow itself.