Spreadsheets
Ever used Excel before? Good! Spreadsheets used in the application are very similar to Excel and assuming you've already looked at the Expression Editor topic, there aren't too many concepts you shouldn't already be familiar with. Just be aware that although it's very similar to Excel, it is not fully featured and will never be a full replacement.
Spreadsheets are extremely useful when a set data structure is required, and most Excel spreadsheets can be imported into the application and modified with ease. This includes in-sheet charts and contextual formatting.
![]()
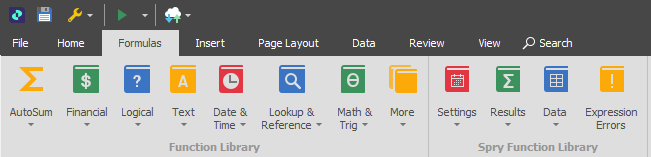
When you switch to the Spreadsheet window, note the additional tabs available, specifically the Formulas tab, which you will use quite frequently.
The Function Library includes over 250 Excel type Functions such as SUMIF, VLOOKUP and the full documentation for these and their application is available here:
https://documentation.devexpress.com/#WindowsForms/CustomDocument14649
Micromine Spry Function Library
Settings: These will provide you with Constants from your Scenario. Includes SCHEDULESTARTDATE which is used in our examples below. Full List:
- SOURCETABLE - Source Table Name (string)
- DESTINATIONTABLE - Destination Table Name (string)
- CALENDARTABLE - Calendar Table Name (string)
- SCHEDULESTARTDATE - Scenario Start Date (date)
- SCHEDULEENDDATE - ScenarioEnd Date (date)
- RUNSOURCESCHEDULING - Source Scheduling Switched On? (true/false)
- RUNDESTINATIONSCHEDULING - Destination Scheduling Switched On? (true/false)
- RUNHAULAGE - Haulage Switched On? (true/false)
- AssignedTruck - Truck assigned to Equipment/Process combination (string)
- ProjectName - Project Name (string)
- CaseName - Scenario Name (string)
- Reporting Period Count, Name, Start and End Dates (various)
Results: Pulling values off the Output Schedule (numbers only) requires these functions. Includes Schedule Sum, Schedule Min, Schedule Max and Schedule Weighted Average contextual menu appears after selecting, the most complex is for Schedule Weighted Average which is shown below.
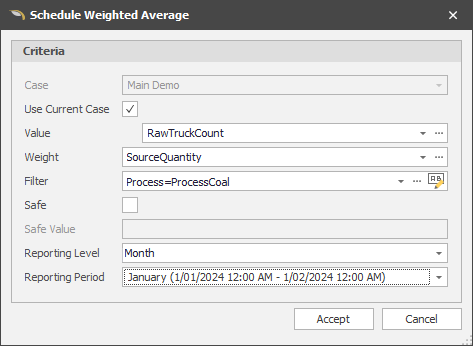
All Results functions require a Value, a Reporting Level and Reporting Period (and Weight when Schedule Weighted Average) with an optional Filter. With the exception of the Reporting Level, these use the Expression Editor.
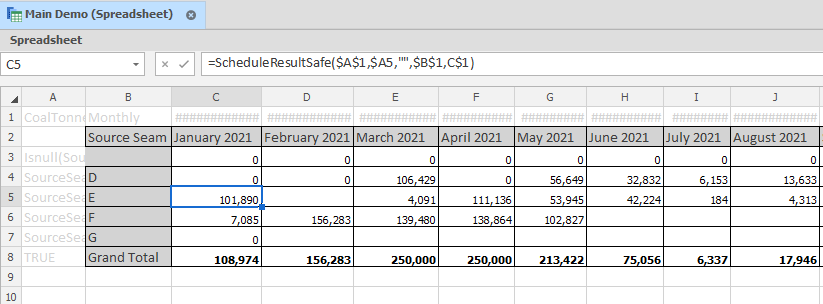
User Note: Generally, after selecting your Reporting Period in the menu above and populating the cell, you would return and change the Reporting Period reference to a Date Cell. e.g. =ScheduleSum("SourceQuantity", "Process=ProcessCoal", "Month", DATEVALUE("1/10/2013")) changes to =ScheduleSum("SourceQuantity", "Process=ProcessCoal", "Month", B$1).
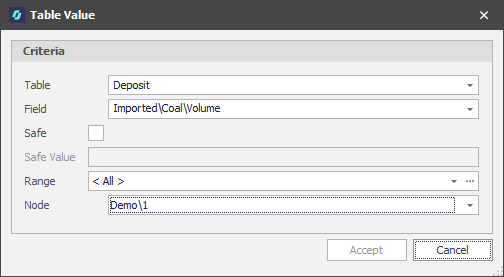
Data: There is only one Data function, which is TABLEVALUE. This pulls data directly from your table of choice and like a Results function has a menu to populate the options.
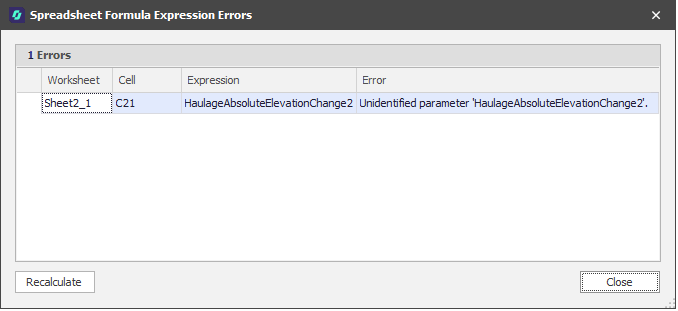
Have a #VALUE error? The Expression Errors button will give you an idea of what could be wrong.

Import/Export
You can export your Spreadsheet either keeping your application-specific formulas intact, or make the application calculate-out all internal (non-Excel type) functions. Once exported, if functions have been pre-calculated, the application-specific functions are lost.
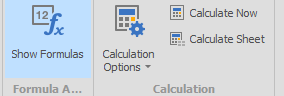
Show Formulas (CTRL + ')
Toggle the button ON to display the formula in each cell instead of the resultant value.
Calculation Options
Specify when formulas are calculated (Automatic or Manual). If Automatic calculation is turned off, you can also select Calculate Now (F9) to calculate the entire workbook now or select Calculate Sheet (SHIFT + F9) to calculate the current sheet now.
Examples
Start with your reporting periods. Use the SCHEDULESTARTDATE() to set your first time period, and then use the DATE() function to add increments that match the reporting periods you plan to use. For example =DATE(YEAR(C1),MONTH(C1)+1,DAY(C1)) adds 1 month to each sequential cell and you can just drag and drop across as many cells as you need.
Next format your date cells by right-clicking the selection of cells, choosing Format Cells... -> Date, and selecting the preferred Date Format.
You'll note how instead of referencing a Constant explicitly, the formulas reference other cells that help to complete the formula and make quick changes.