Profile Images
When the Haul Profiles Window is open, from the Import/Export menu on the application window title bar, select Export | Profiles Images. GRAB A NEW SCREENSHOT SET BACKGROUND BLACL
![]()
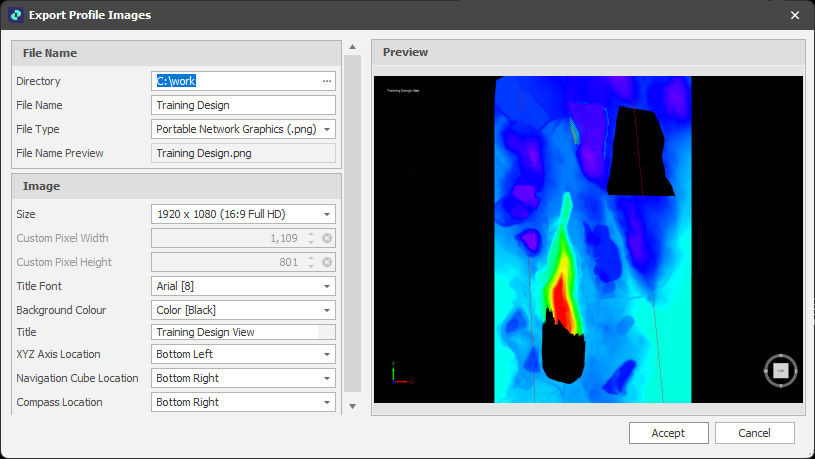
Export Profile Images Preview
From here you can control the dates, view layout, filename, image type, image content, image size and title of the exported images.
Schedule
Single Image
Select this check box to generate a single image of the schedule at a specified Date/Time.
By default, the check box is unselected and the Total number of images (shown at the bottom of the pane) is the total number of specified periods in a specified Date/Time Range.
Schedule Type
Choose one of the following Schedule types:
| Type | Description |
|---|---|
|
Manually Specified
|
The schedule as it was on/at the specified Date/Time (when the Single Image check box is selected). The schedule By Period during a specified Date/Time Range (when the Single Image check box is NOT selected). |
|
Reporting Period
|
The Schedule By Reporting Level (FY, Monthly, Quarterly, Yearly) on/at the specified Date/Time (when the Single Image check box is selected). The Schedule By Period, By Reporting Level (FY, Monthly, Quarterly, Yearly) during a specified Date/Time Range (when the Single Image check box is NOT selected) |
Date/Start Date
When the Single Image check box is selected, the "Date" and Time to generate an image for.
When the Single Image check box is NOT selected, a "Start Date" that together with an "End Date" defines a Date/Time Range (See "Schedule Type" (above).
Period Length
When the Single Image check box is NOT selected, specify the Total Number of Images to generate based on a specified Date/Time Range, a specified (Days, Weeks, Months, Quarters, Years) Period and Period Length, i.e. 2 Months (See "Schedule Type" (above).
View Settings

View Layout Type
Use the drop-down to select an (Animation View Layout, Design Layout, Animation Layout, Sectional View) View Layout Type.
View Layout
Select a layout of the chosen type.
Use Fixed Source
The selection of a View layout ensures that a consistently sized image is exported, irrespective of the current window size. As an alternative, select this check box to specify the Source Width and Source Height of the image to be generated from the Animation/Design Window.
File Name
Directory
Click on the ellipsis button to select a folder destination for the exported image file.
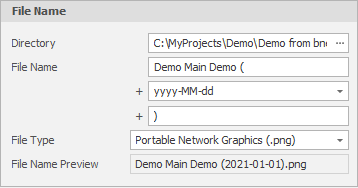
File Name
Specify the name of the image file. The option to add a formatted date, plus a further suffix, is provided.
File Type
Choose an image (PNG, JPG, BMP) file format.
File Name Preview
A preview of the file name is shown here.
Image Options
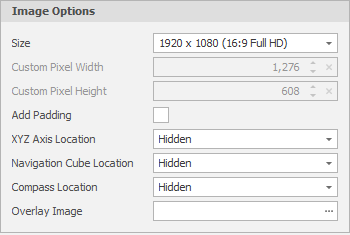
Size
Choose a predefined image size or select Custom to specify your own Pixel Width and Pixel Height values.
Add Padding
Select this check box to add padding around the edges of the image(s).
XYZ Axis Location
Choose to hide (Hidden) or select a (Top Left, Top Right, Bottom Left, Bottom Right) location for the XYZ Axis.
Navigation Cube Location
Choose to hide (Hidden) or select a (Top Left, Top Right, Bottom Left, Bottom Right) location for the Navigation Cube.
Compass Location
Choose to hide (Hidden) or select a (Top Left, Top Right, Bottom Left, Bottom Right) location for the Compass.
Overlay Image
Click on the ellipsis button to add an Overlay image. An Overlay image might be used to set a company logo or a watermark.
It is recommended to make the overlay image size the same as the output image size.
Title
Location
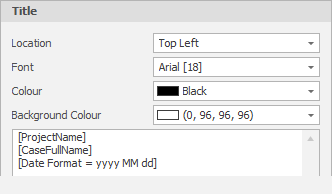
Click on the drop-down control and then use the mouse to select a (Top Left, Top Right, Bottom Left, Bottom Right) location for the Title.
Font
Click on the drop-down control to set the Font Characteristics of the Title text.
Colour
Optionally select a Colour for the Title Text. The default is Black.
Background Colour
Optionally, set a Background Colour for the Title text. The default background is Transparent (selectable on the Web tab of the Colour Selection dialog):
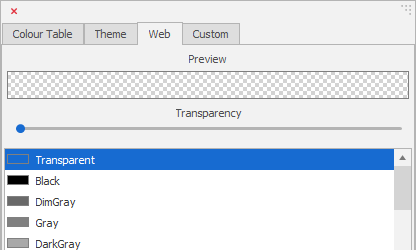
Web Colour Selection
Title (Metadata)
Click the drop-down control to the left of the Insert button to specify a Title. The ability to insert project metadata is provided.
System variables such as [Project Name] and [CaseFullName] are available for selection. Click the Insert button to insert the variable you have selected.
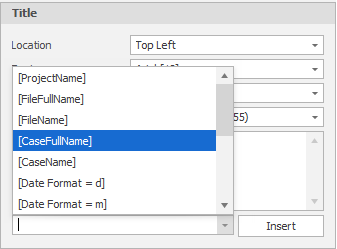
Title Metadata