Scope Your Requirements
Before completing the setup of your logical corporate structure in Nexus, stakeholders and colleagues should be consulted and a plan outlined. It is recommended that you reflect the current organisational structure already in place at your company.
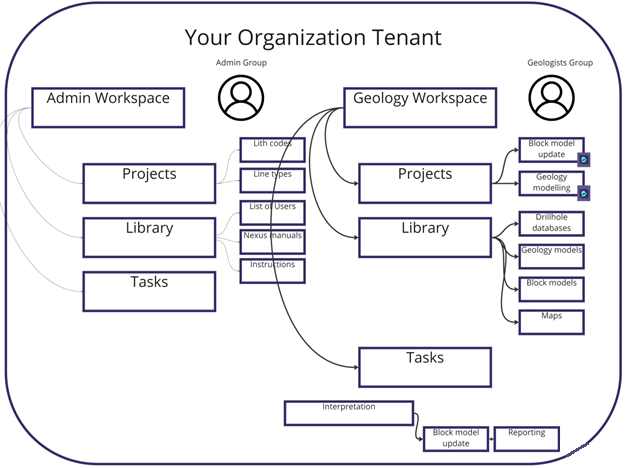
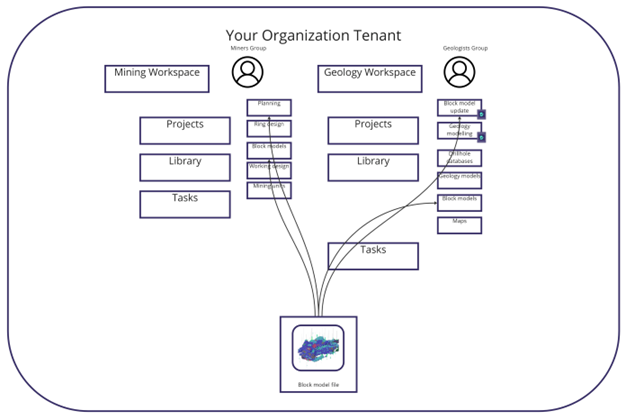
For instance, the initial workspace created can be used as the Admin workspace where your Projects are not linked to Micromine Origin &Beyond (MMO&B) - as your Administrators may not be users of MMO&B. Instead, the Admin Workspace can store important MMO&B information such as form sets or lookup tables - lithology codes or line types etc. The Library can have multiple nested folders, for storing the list of users, Nexus documentation and other manuals for example.
Additional Workspaces can be created for the other departments in the organisation, such as Geology or Mining. In this instance, inside the Geology department Workspace there could be Projects linked with MMO&B and separate Libraries with dedicated folders for each object type. In addition, the Geology department Workspace could have special tasks which are for Geologists only; i.e. only Administrators and members of the Geologists User Group have permission to access the Geology department Workspace.
Every mining enterprise company is unique, which is why Nexus does not provide a predefined structure.
By following the Setting up the Tenant section, or creating a Workspace and inviting people with permissions granted, you will build a structure for your organisation.
Object Types
Object Types and their Attributes are configured globally and selected at the workspace level. When you upload a file, the option to select its object type and set its attribute values is provided.
Files
Nexus can store multiple object types. A predefined list of default object types has been added to the application. This list includes all MMO&B object types (including Block model .DAT, String.STR, Wireframe.TRIDB and others), as well as all MS Office and CAD file formats and Images. The default Object Types list is displayed on the Admin | Settings | Object Types page.
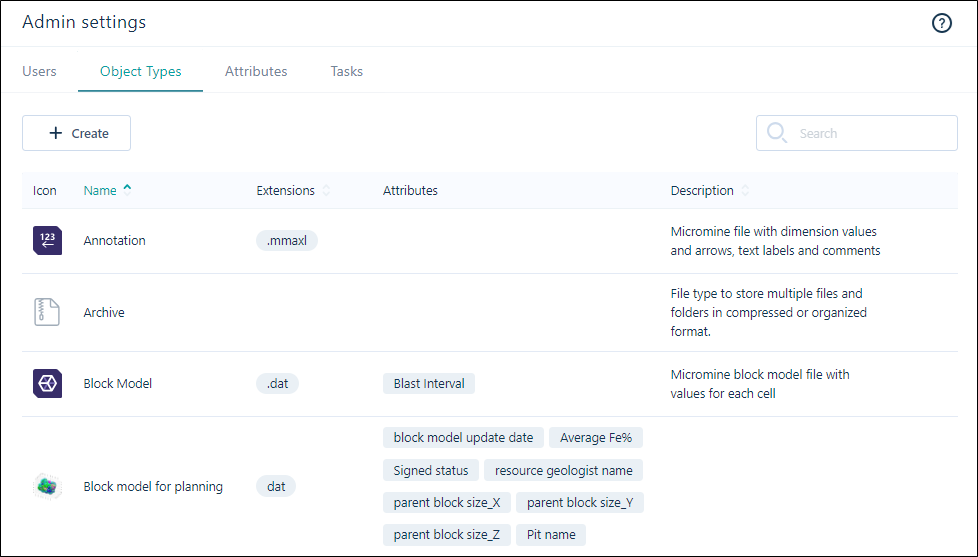
Administrators can use these standard object types as well as create custom object types for use in the Tenant.
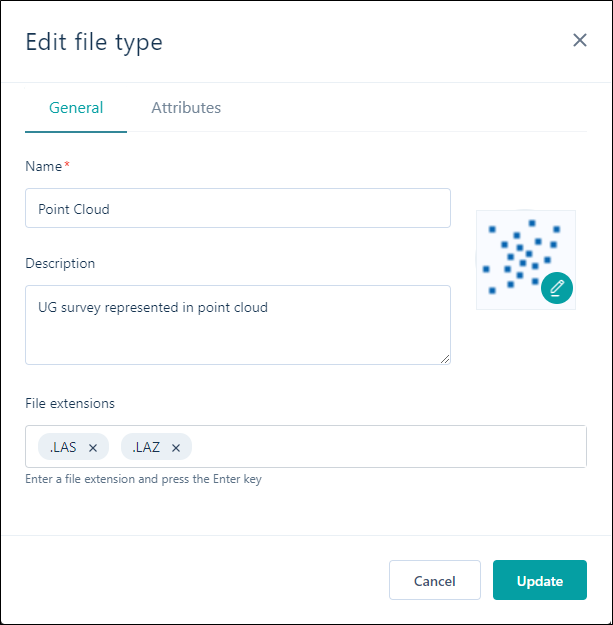
Object types you create will have defined file extensions. Uploading a file with one of the defined extensions to Nexus, will assign the file to that object type. For example, point cloud file formats could be added to a custom File Type called POINT_CLOUD with the extensions .LAS or .LAZ defined.
Administrators can define as many object types as required for the Tenant.
Object Types are assigned to the Workspace in the Workspace settings. Each Workspace can have a special set of object types. For example, a Geologist Workspace could have only the Geology model wireframe object type, whereas the Mining Workspace would have the Workings wireframe object type.
There could of course be many cases where one custom object type is not enough. For instance, one wireframe object type can sometimes be divided into a Geology model object type or a Mining units wireframe object type. The difference between the two object types in this case would be in the attributes assigned. The Geology model wireframe object type could have Domain and Average Grade attributes, whereas the Mining units wireframe object type could have Resource and Period attributes. Different object types can also have attributes in common - for example, Tenement Code.
Attributes
Administrators should consider the attributes required while object types are being created.
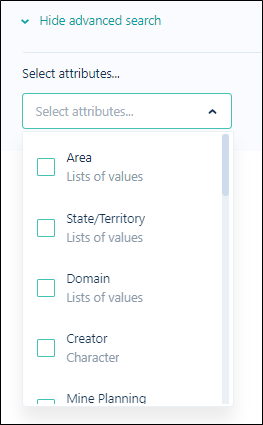
Attributes created and assigned to object types can be used as 'tags'. These tags can be used as filters to quickly search for required files and used in Advanced search where all the existing custom attributes are presented in a drop down list. The User can select multiple attributes and set a value for each.
If multiple object types have the same attribute, they can be grouped: For example, the Block model, Ore body wireframe and Interpretation strings object types might be grouped by the Domain attribute.
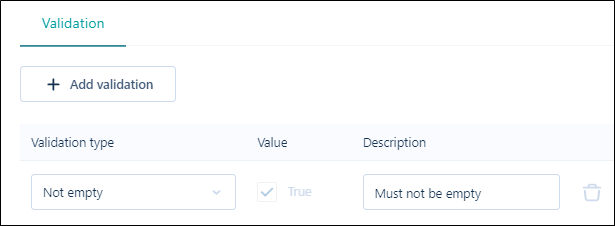
Attributes can be of various types and use different methods of validation. Validation should be used to avoid User input of invalid or incomplete information.
Another benefit of using Attributes is they contain descriptive information about the content of the file. A User can understand what is inside the file without opening it. Different versions of a file can have different attribute values. When the attribute values of a file are changed before uploading it, a new version of the file is created.
Creating Object Types and Attributes
It is recommended practice to create all the required Object types first, before creating the list of Attributes. The Attributes can then be assigned to the Object types already created. However, the Admin settings contain both the Object types and Attributes tabs, and Admin can decide on the correct working order for the organisation. For instance, you may want to create a range of Attributes first which can then be assigned to the Object Types as they are created.
If a File is uploaded for a File type that does not exist in the Workspace, the User can upload it to another Workspace which does include the right type, using the Workspace selection in the Upload, Move and Copy functions.
If the File type does not exist across any of the object types in all Workspaces, the file can still be uploaded, and Nexus will display an Information prompt for the file.
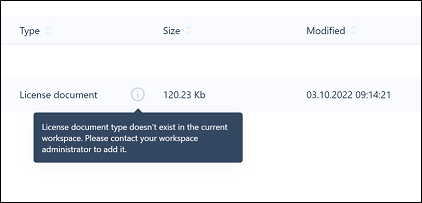
This File type will have inactive attributes which cannot be edited, and a new version of the file cannot be uploaded for the object type, because it does not exist in this Workspace.
See Object Types and Attributes.
Sharing Data between Workspaces
Among the many benefits of Nexus is its storage architecture capabilities which allow read or write actions for a file or object from different directories by different users. The same file can be viewed or edited in different places and will be kept up to date everywhere.
For example, a block model file could be uploaded by a Geologist to their Workspace in two places, such as the Block model update Project and in the Library in the Block models folder. This file could then be copied to another Workspace, such as the Mining workspace to the Planning Project and the Library in the Block models for planning folder. In this example, the Miners Group would have Read only permission. Each time the Geologist group updates this block model file in one of the directories, the other directories in which it appears will have a new version of this file. Additionally, all subscribed users and members of the relevant User groups will receive notification of the new version via email.
Task Types
Administrators can create custom Task types to suit the processes performed by the organisation - such as mining and geology related tasks. Task types can have different Statuses, Priorities and Attributes, which can all be created for the Tenant. For example, statuses can be created to represent each stage in a process such as Block model recalculation; as associated statuses of Drillhole database update, String interpretation update, Wireframe update, Block model update, Interpolation updated and Reporting update.
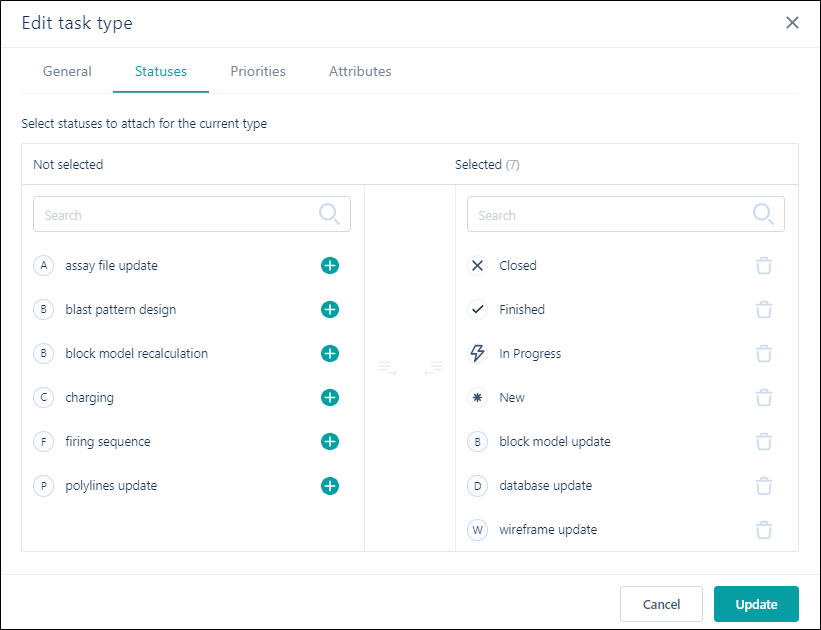
Active Statuses will be reflected on the Gantt chart for the tasks, making the chart more informative. In addition to any custom statuses, it is recommended that the default statuses be added; such as New, Finished and Closed.
Task types are added on the Workspace settings page. Admin can create different Task types for different Workspaces - for example Mining units preparation task type for a Mining Workspace or Import survey data for a Surveyors Workspace and so on.
Statuses
Statuses can be created and assigned to the task types and tasks on the Gantt chart to specify the progress status of the task - e.g. Not Started, In Progress or Complete.
For example, a status of In Progress indicates that a task has begun and work is currently being carried out. Statuses can be added to a task type to generate tasks with that status for that type, or assigned to the tasks on the Gantt chart and updated by users.
When planning the requirements of your Tenant, consider any custom Statuses that will need to be created.
Priorities
Priorities created in Nexus can be assigned to task types and tasks on the Gantt chart to specify the priority or 'importance' of a task - e.g. High, Medium or Low.
For example, a priority of High means the task is more important to complete than a task assigned a Low priority.
See Task Types, Statuses and Priorities.
Workspaces
A Nexus workspace allows you to collaborate on group activities as part of a team and might be set up to represent a department or division of your organisation, or a mine site or region, making it easier to securely manage and deliver information and data which is relevant to a particular audience.
It is recommended that setting up a tenant involves the creation of at least one initial Workspace. This can be the Administrator Workspace which can be used as a Draft and the first entry point for the invited users. As Administrator, you can set your personal Workspace as the initial entry point to the application.
See Workspaces.
Projects
A Nexus project is typically a container for files which serve to achieve a single outcome, for example, a finalised block model or a periodic mining plan. You can link to a project when you integrate other Micromine applications with Nexus.
When planning for the requirements of your tenant, you should consider the projects that are required for the initial launch of Nexus for your users, as well as the permissions the users will require.
See Projects.
Groups
Groups created in Nexus represent a collection of users who are assigned to the group - such as Geologists or simply Night Shift.
Setting permissions for individual Users can be a time-consuming task. To make things easier, you can create User Groups, assign users to them and then set the Workspace and Project permissions for the whole group. Any exceptions to the group rules can then be made more easily at an individual level - including File or Folder levels.
When assigning users to a group, remember that one person can be a member of multiple groups. For example, a chief geologist can be part of the Head office group and the Geology department group. A recommended practice is to create a Group for each Workspace, including all its members and name it in a similar way. For instance, create a Geology department Workspace in the Tenant, and a Geology department Group which includes all the users from the Geology department Workspace. In this way, Groups are also convenient when assigning Informed and Consulted roles for tasks.
When the user groups have been created for your tenant, you can assign Users to them, and then add the groups to Permissions for workspaces and projects.
You may want to invite Users before creating Groups to assign them to, but take note that it is easier to set up permissions when you already have groups created with all of the required users assigned.
See Groups.
Users
Users on the Tenant can be assigned to Groups and Tasks, as well as given permission to access Projects, Workspaces, libraries and files on the system.
Planning for the Workspaces in your Tenant should include a list of the members to be invited. You can use your Windows Active Directory settings if you contact Micromine Nexus technical support*.
For each member successfully invited to use the Tenant, you need to consider the role that will be assigned. The default role for an invite is User, but you may have changed that option when sending invitations. For registered users, the Administration | Users tab has a drop down from which you can set the Role for each User.
*Only available for the Enterprise subscription tier.
See Users.
Permissions
Permissions allow you to control who has access to the files and folders in your Nexus workspaces and projects. Owner, Write and Read privileges can be set for individual users or user groups.
Permissions can be set for Users and Groups, as well as for Workspaces and Projects.
When scoping the requirements of your Tenant, you will need to consider the permissions for users and the Workspaces and Projects with which they will be interacting.
See Permissions.