Frequently Asked Questions
The following information contains answers to some frequently asked questions about using Nexus and its components.
How to quickly access a Workspace
If you need to quickly return to the Workspace start page from Settings or any other place in Projects, Library or Tasks; click the Micromine Nexus logo in the top left corner of the interface.
![]()
How do I select all objects?
In your Projects or Library, you can select every file or object using the Select All check box.
If you hover your cursor on the table header, you will see a check box alongside the Name column label. Selecting the check box will select all the objects in the directory.
The check box is also available from the Table view and will select all the files in the current directory.
How do I receive update notifications?
If you would like to be notified about any updates to a Project,
-
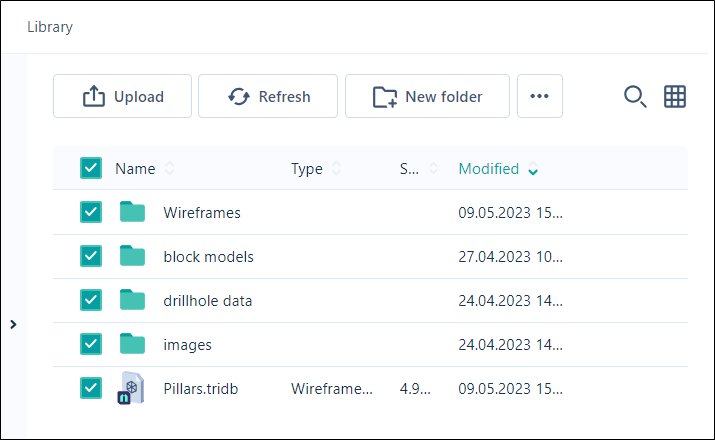
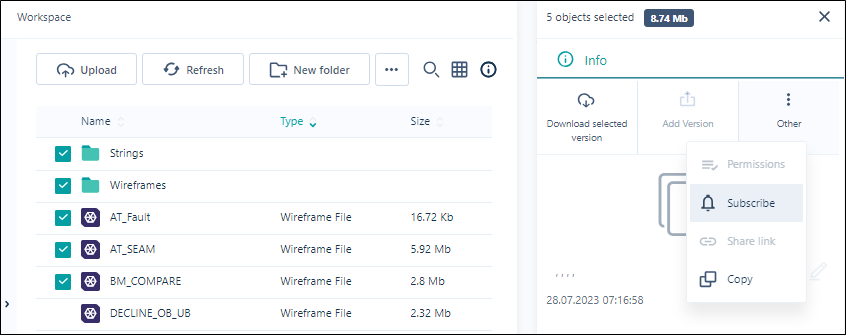
Navigate to the Project folder root and select all files and objects using the check box in the top left corner next to Name.
-
Click the Preview icon in the row for one file/object to display the Info panel at the right.
-
Select Other | Subscribe.
You will receive email notification from nexus@micromine.com if there are any updates to a
To receive notification about a particular folder, you should select it to display the Info panel and select Other | Subscribe. Similarly, you can Subscribe to any individual file in any directory.
The Owner of a Task can nominate individual users or a Group of users as Informed for the Task on the Users tab of the Create Task dialog.
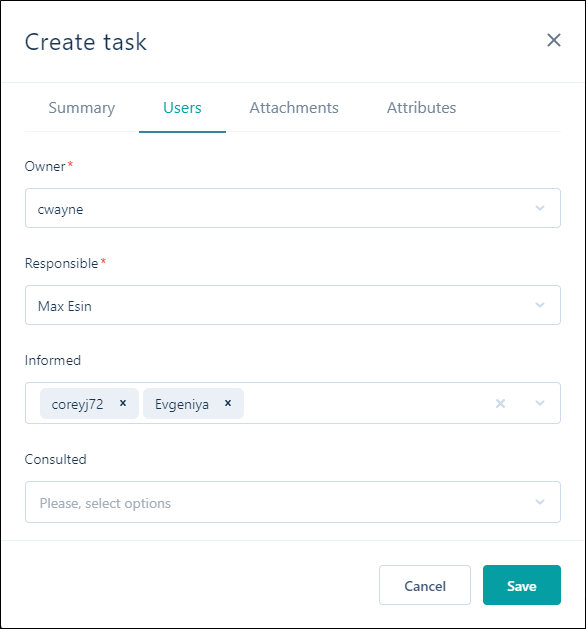
Users selected as Informed will receive notifications about any update to the task.
You can unsubscribe from notifications using the Unsubscribe option which appears in the menu when you are subscribed.
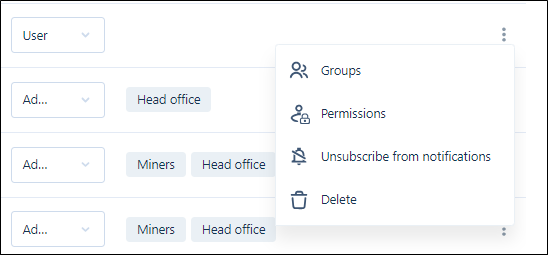
Administrators can Unsubscribe users from all notifications using the More menu in Admin | Users:
Deleted users are automatically unsubscribed from all notifications.
Administrators can only Unsubscribe Users, Guests and their own account. Administrators cannot Unsubscribe other Administrator accounts, and the option is not available from the More menu:

Administrators who need to Unsubscribe from notifications should go to their account details on the Users tab of Admin Settings and Unsubscribe themselves.
Users can unsubscribe from all notifications using the link provided in the email.
Can I download multiple files?
To download multiple files, use the selection check boxes to the left of each file name:
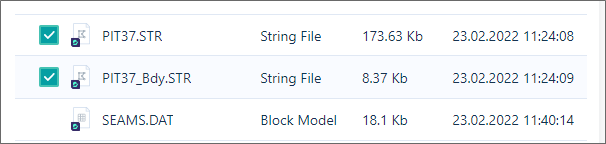
To download the files in a selected folder, use the selection check box to the left of the folder name:
Click Download on the More menu to download the file(s) or folder you have selected in your Nexus project.

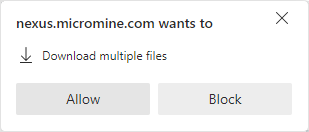
The first time you download multiple files, you may need to allow Nexus permission to download:
A notification that background tasks are running will appear, and the file(s) you have selected are downloaded to your Micromine Origin & Beyond project folder. On completion, a confirmation message is displayed:

Folders you download are saved as a .zip file with the same name as the selected folder to your default Downloads location. The [Folder Name].zip file will contain the folder you selected, with all of the valid files it contained.
To download multiple files from Search results,
-
Filter out unnecessary files in the results using Advanced Search or Basic Filters.
-
Select the check box in the header to select all of the files left in your Search. You can deselect the check box for any file you still don't want to download.
-
Now select any file in the list to display the Info panel at the right.
-
Select Download.
The selected files will be downloaded to the default Downloads folder on your machine.
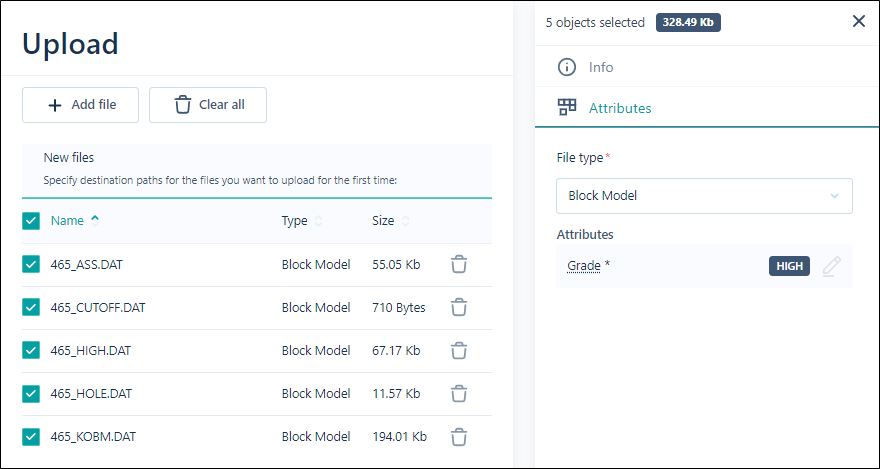
How do I upload multiple files of one type?
To save time, Nexus lets you upload multiple files with the same object type so that attributes can be set in bulk. To do this,
-
Add multiple files to the Upload form using Select file or the drag and drop option.
The list of files will appear in the New files section of the Upload form.
-
Click the check box alongside the Name label in the header.
-
Assign common attributes for the defined object type.
All uploaded files will have the same object type and attribute values.
Can I share Nexus files and folders?
If you need to share a file or folder with an external person (non-user), you can use the Download link functionality.
To create a download link,
-
Select the individual file or folder (do not select the check box)
-
Click the Preview icon to display the Info panel.
-
In the Info panel, select Other | Download link.
-
Select an option from the Link lifetime drop down to determine the length of time for which the link will be valid.
-
Click Copy link to clipboard.
You can now paste the link (using CTRL+V) to an email or a chat, for example. The receiver will be able to download the file or folder to their local machine using this link, for as long as it is valid for the selected Link lifetime. Once the link has expired, the receiver will be redirected to an expired link notification page.
Note: All roles, including the Guest role can use the Download link functionality.
How to filter the Gantt chart
The Tasks Gantt chart has multiple columns which can each be filtered in the header. Filters can be applied for Statuses, Priorities, Task Type, Start and End date or Task name.
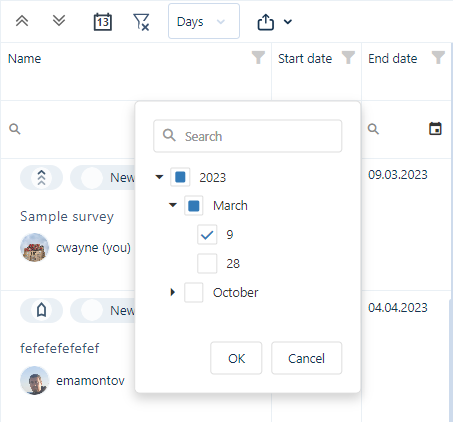
To remove all filters, you can click the Clear all button.
![]()
What are my Personal settings?
Personal settings including Name, Display Name and Position are very important for the Tenant. As such, it is recommended that Admin request that every user fill Personal Settings with detailed information. This is useful for all members of the Tenant to see information pop ups with the personal details of other users (their name, position, email, contacts etc.) in all menus - for example, in the Tasks chart.
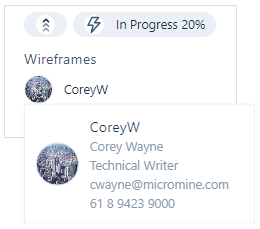
The Display name entered by each User should be relevant and obvious - because it will be displayed in the User attributes list in the Create task form and other places where a User must be assigned. When creating a task, for example, it will be much easier to select the right Responsible person if the Display name is obvious.
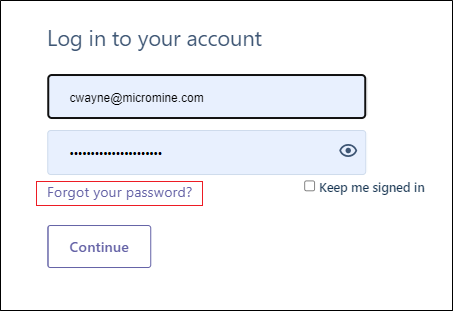
How to reset your Password
There is no doubt that users will forget their passwords at some time. To restore a password, Users can use the Forgot your password? link on the Log in page after entering their email address.
The user will then receive a 6-digit verification code via their email that can be entered into the Verification page and a new password then entered for the account.
Sometimes a new password entered is not secure and will not be accepted by the application. In this case, users can check their intended password from the Protected by password pwned service link to save time inputting multiple insecure passwords.
On the pwned service web page that opens, a user can check the password they want to use for any security breaches that may have exposed it. If the “no pwnage found!” status is received, the password can be used for the account.
How to request Workspace permission
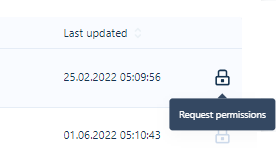
If you are not an Administrator, and you don't have permission to a Workspace you need or to a Project/File/Folder within it, you will still see these elements greyed out with a lock icon displayed. You will have the ability to Request permissions from Admin using the link.
In the Request form, you can select the permission type you want to request for the entity from Admin.
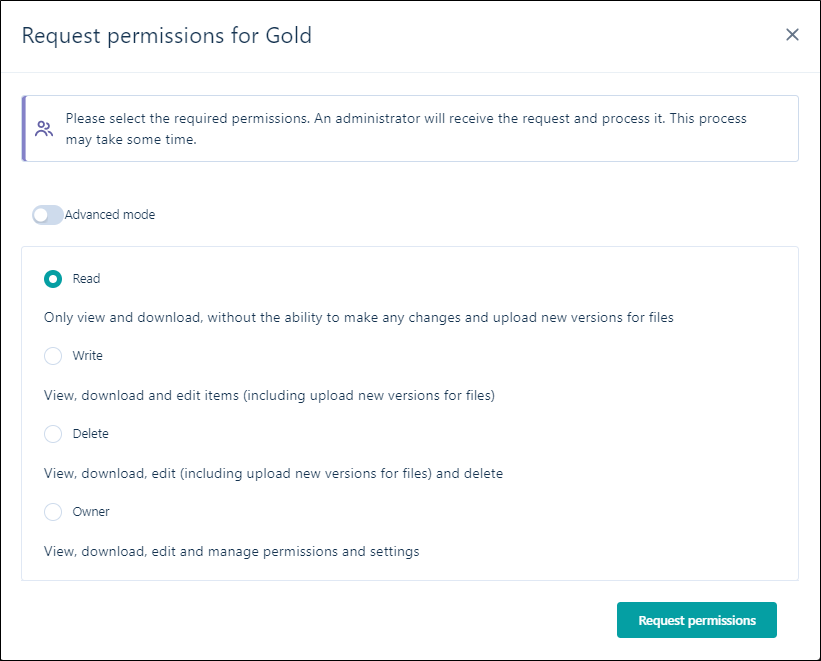
Advanced mode is also available from the Request form. If you know another user needs permission for the same entity, you can enable Advanced mode and select multiple users and request permissions. After Request permissions is selected, Admin receives an email from nexus@micromine.com and can approve or deny the request.
Should I use the Library or the Project?
The Library* is a well-organized storage structure where users can build any storage logic: such as Block model folder, Wireframe folder, Strings folder, Maps folder etc. This looks like standard hierarchy storage structure, which many users are used to working with, but it is more advanced due to versioning and other features. The Library can be a very convenient data representation for new members of the Tenant who don't yet know which tags to use in the Search.
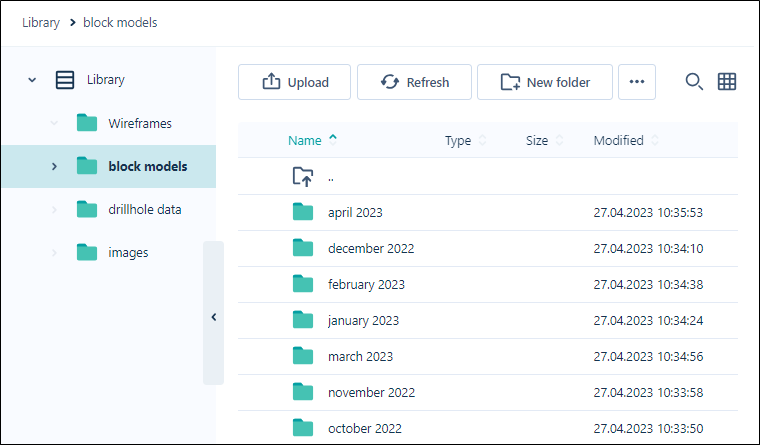
This above is an example of Library storage logic. In most cases, the Library contains output files and historical data.
*For Business and Enterprise subscription tiers only.
Projects are entities used to hold draft and intermediate input files to generate any output. Users can create multiple projects inside the Tenant.**
In most cases, Projects are linked with Micromine Origin and Beyond (MMO&B) local projects. Users can upload files directly from the MMO&B local project to the linked Nexus project and compare the local and Nexus versions. Projects in Nexus are very similar to MMO&B projects. All MMO&B project files can be linked with a Nexus project.
Usually, Projects are created for each business process of a Workspace. For example, the Geology workspace could have multiple projects such as Geology model update, Drillhole database update etc.
**For Teams, Business and Enterprise subscription tiers.
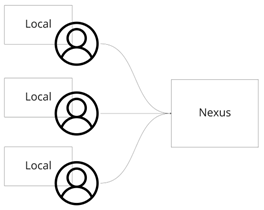
How many MMO&B local projects can be linked to Nexus?
Currently, any number of local MMO&B projects can be linked to one Nexus project. Multiple users can link their local projects to one Nexus network project.
For example, let us assume a consultant wants to upload finished (not draft) versions of files from their local MMO&B project to a Nexus project to which another person (his client) has Read or Write permissions. In this case, Nexus is being used as a cloud file sharing system allowing the users to control versions of the files and receive notifications about updates.
The Consultant shares data with the client through the project. The client can view the shared data using MMO&B or MFX (MMO&B for team viewers). The Consultant's draft project is on the local machine and contains auxiliary files and form sets of different object types and statuses and not always in an organised fashion. The Nexus project contains only published files required by the Client – such as ore body block models, resource estimation reports, drillhole databases and so on.
For an explanation of the benefits of linking projects, see the workflow example which follows.
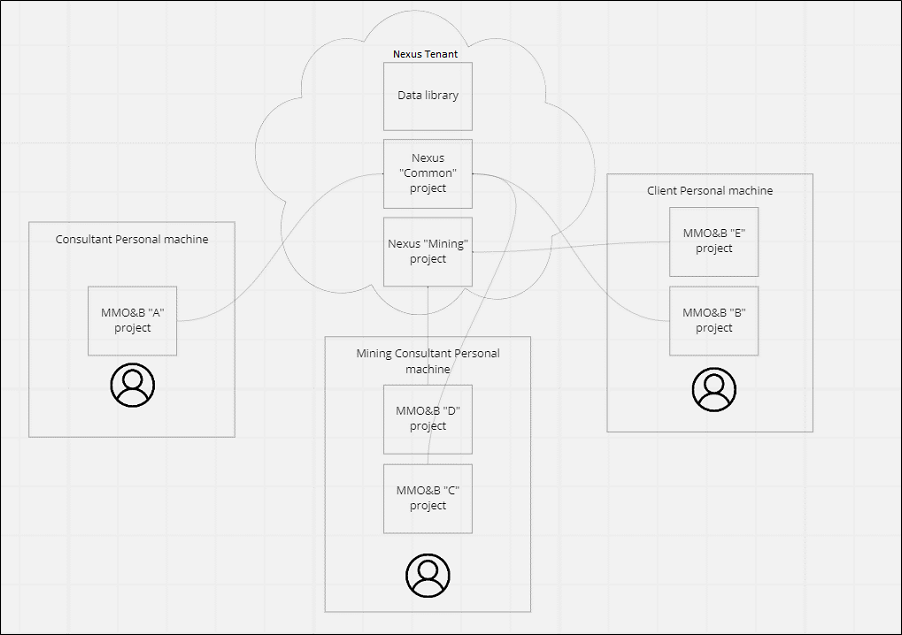
A Workflow Example
The Consultant works with their own MMO&B project called “A”, linked with a Nexus project called "Common". The Client creates their own project called “B” and links it to the same “Common” Nexus project. If the Client has Write permission, they can also publish files to the Nexus project, not just receive them.
If the Client wants to add a Mining consultant to the project to perform pit optimisation on the base of modelled block model, they would invite the user to the Nexus tenant. The Mining consultant then creates their own local project in MMO&B called “C” and links it to the Nexus "Common" project; downloading the block model from 'Common' to their local “C” project. If the Consultant updates the block model in their local "A" project and publishes it to Nexus, the Client and the Mining consultant receive notification about it through email, or by checking for updates for the block model file in their personal projects “B” and “C”.
To make their updated files easier to identify, the Mining consultant may want to create a Mining Data folder in the “Common” Nexus project. In this way, all users can have access to the Mining files while continuing to work within a single project - in this example, "Common".
If the Mining consultant wants to work within a separate project, they can create a new "Mining" project in Nexus and a local project with only mining data on their machine called “D”. The “D” project should be linked to the new “Mining” project. In this example, for pit optimisation, the block model that is periodically updated by the Consultant is required from the Nexus “Common” project. This means the Mining consultant needs to:
-
Copy the block model file from one project to another in Nexus (from “Common” to “Mining”)
-
Link the block model file with the local “D” project.
If the file is updated in the “Common” project in Nexus, the Mining consultant will see the update status (by email or by checking for updates in the “D” project). This is possible because Nexus doesn't use hierarchical storage: All files are stored in place; copying just adds the directory from which the file can be seen.
How do File Versions work?
If a user wants to upload a new version of any file, they can use the Add version option in the Info panel displayed at the right of the selected file. The new version will appear in directories where file is presented.
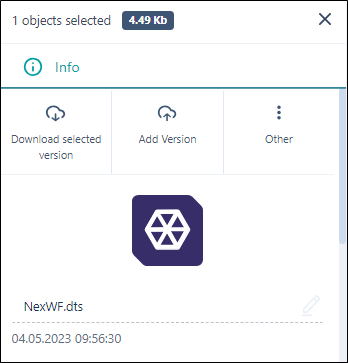
The new version will appear in the branch and can have a different name and attribute values. The User can switch between versions in the branch and download a selected version. The author of each version will be displayed for the selected node in the branch.
If a user wants to develop versions in an alternative way, such as a wireframe with a top cut and without, they will need to create a new branch for uploading a new version. Additionally, a new branch also needs to be created if the user wants to update a version that is not the most recent.
Note: If the file attributes are changed, a new version is created.
For more information, see Versioning.
Why use subtasks?
Subtasks are useful to comprehensively reflect the business processes throughout your organisation.
In Tasks, subtasks can be created to represent component steps that must be completed in order to complete a main (Parent) task. For example, completing a Geology modelling task may include subtasks for setting up the structural framework, identifying the rock type, estimating the reservoir quality and so on.
Subtasks are added to a main task within the configured time frames. Each task can have multiple subtasks, independently labelled, and the total progress of the parent task is calculated using the progress of all of these subtasks.