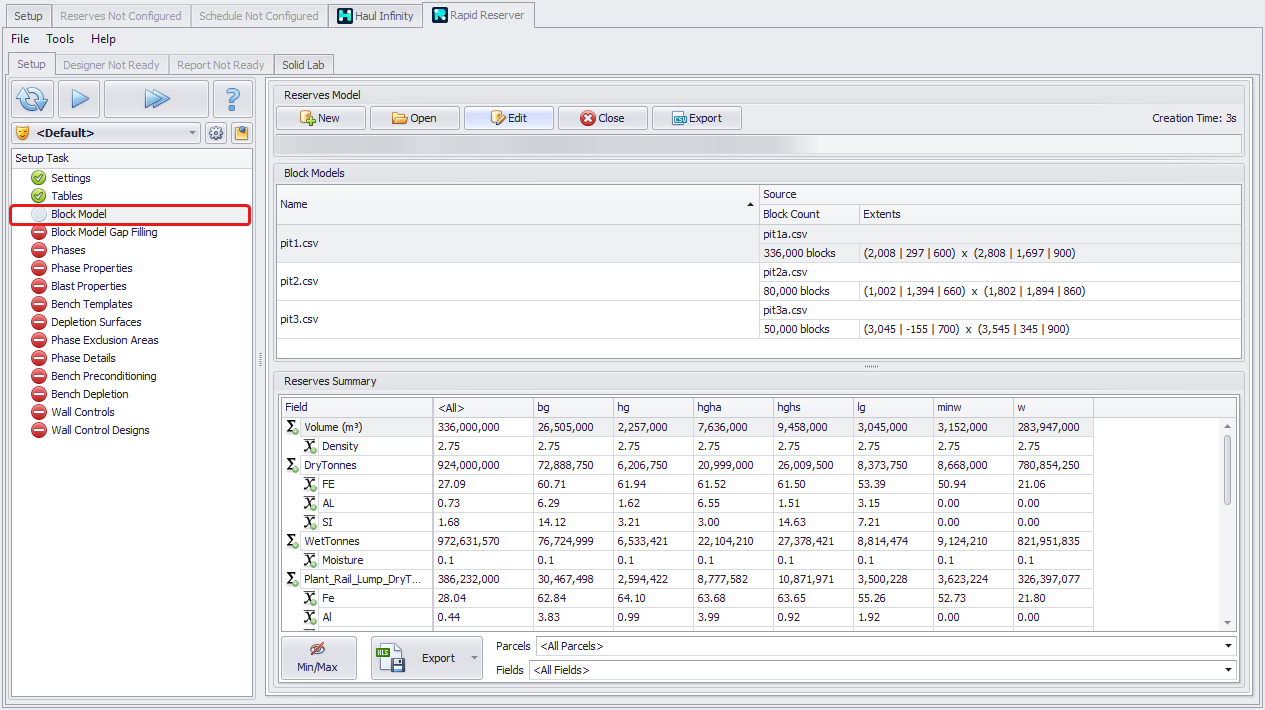
Block Model
In the Block Model step, you will be prompted to load your block models from CSV, Surpac (.mdl), Vulcan (.bmf), MineSight (.dat) or Micromine (.DAT) and convert them to Alastri (.resmodel) Block Model format.
Block Model Setup
Within Alastri’s resmodel we can take multiple block models and convert them to a common structure, common framework, with the same number of fields and the same field names. This makes it a lot easier to store and work with the data. Note that:
-
A Reserve Model (file “.resmodel”) is a collection of block models.
-
Each project loads a single ".resmodel" file at a time.
-
The New and Open buttons create and load a Reserve Model file.
-
The Edit button is the means by which Block Models may be added or removed from the Reserve Model.
Creating a Reserve Model by Loading Block Models
Block Models used to build a Reserves Model may be imported into a project from different third-party file formats. Below are examples of importing Block Models in the most common formats: csv and .dat. The same files may also be downloaded via Nexus Integration (when your project is already linked to Nexus).
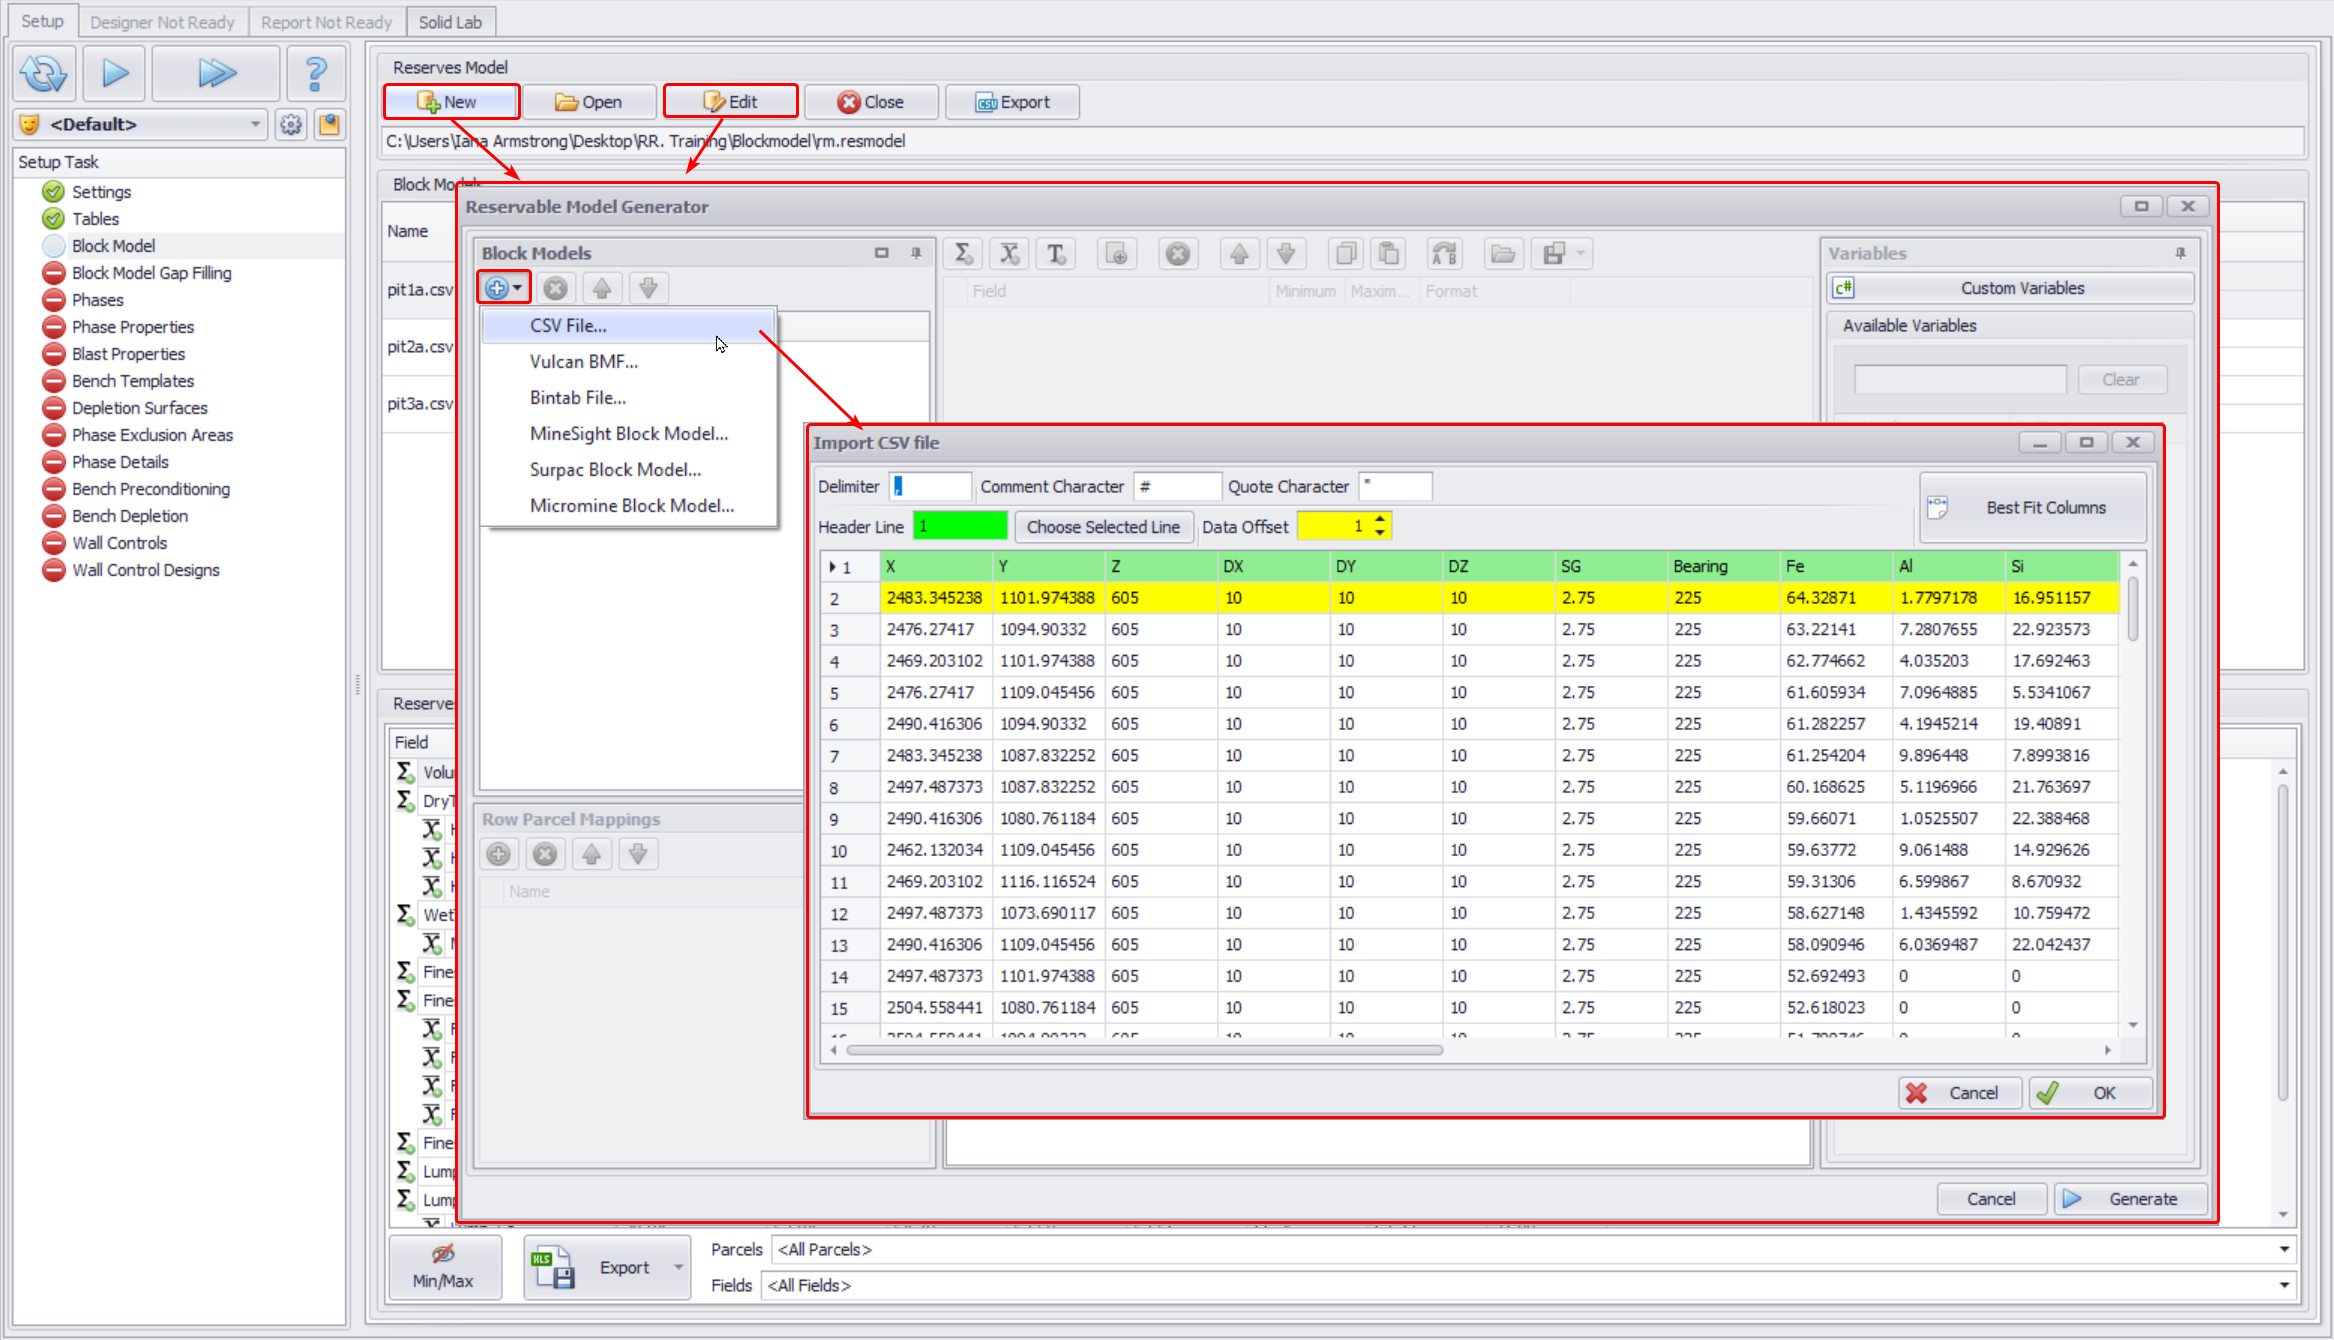
Importing from CSV
Click theNew button to open the Reservable Model Generator.
-
In the Block Models panel, click the blue plus icon and import the CSV file “.myblockmodel.csv”.
-
In the Import CSV window, set the green Header Line to match the header text.
-
Set the yellow Data Offset to match the first row of data.
-
Click OK to finish.
When importing Block Model CSV, you’ll see a preview of the first 100 rows of the CSV file. It's a good time-saving feature, as your site Block model CSV files may be very large in size and take a long time to open.
Block Model (Top)
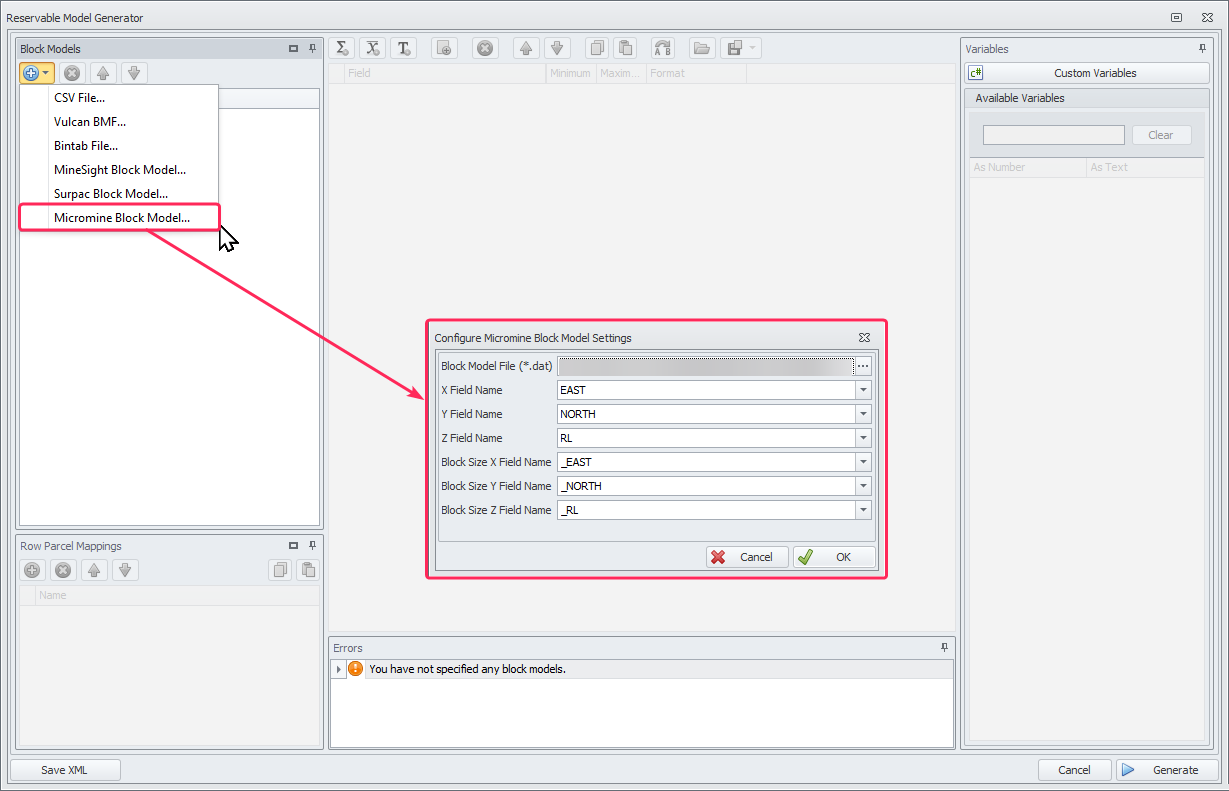
Importing from Micromine
To import a block model in .dat format created in Micromine, select the option “Micromine block Model” and populate the Configure Micromine Block Model Settings form.
-
Specify the path to the block model file.
-
Map block coordinates and block size fields to the Micromine fields accordingly.
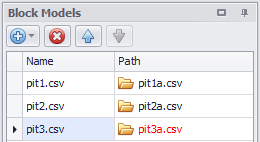
Note: If in the Reservable Model Generator the name of a block model appears red, it means the absolute path to the file cannot be found. The path to the block model must be relinked in order to use it.
Click the folder icon and specify the path to the folder where the block model file is stored.
Block Model (Top)
Loading Block Models from Nexus
Block models may be linked to Nexus which allows users to be notified when new models are uploaded to the cloud.
Once block models have been downloaded you can setup those block models using the Reservable Model Generator in the same way that you can setup block models imported from any other source.
For more information, see: Loading Block Models from Nexus
Mapping Fields
Block model header field variables are mapped to appropriate fields in the Reservable Model Generator.

Reservable Model Generator layout
-
Once the block model has loaded, its header fields are listed in the Variables panel on the right.

Block Model headers listed in the Variables list
-
Numeric fields use the N(“field”) syntax and Text fields use the T(“field”) syntax.
-
Drag and drop the variables to the appropriate field (or double click to map to the selected field).
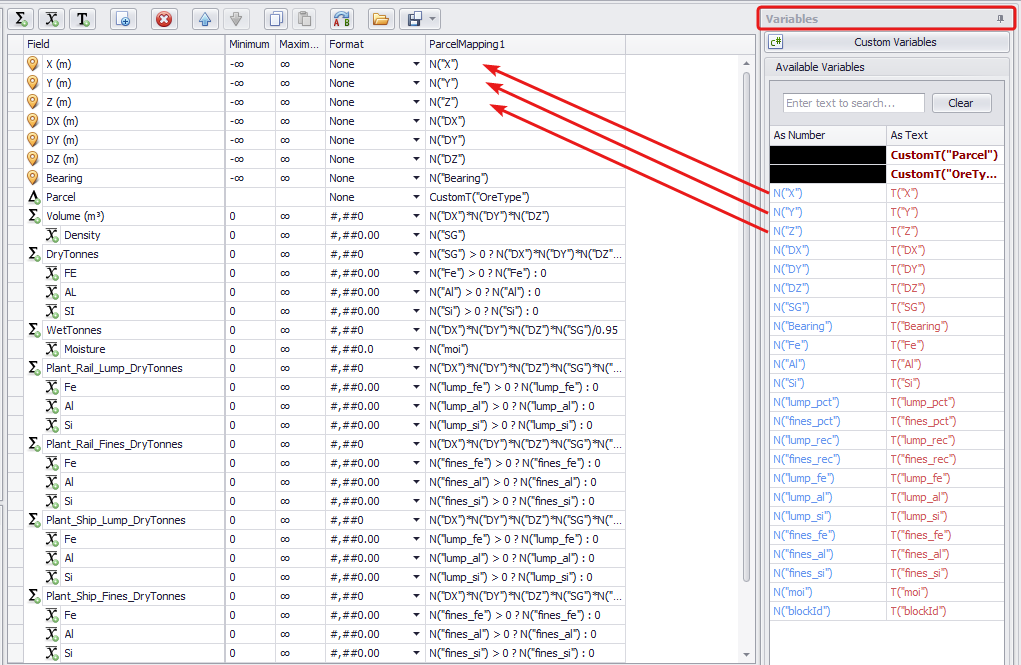
 The Parcel field is used to categorise the material type in each block model cell.
-
Most block models contain a material type field, such as “MatType” or “IDProduct”.
-
If there is no material type field in the block model, see the Block Model Formulas & Logical Operators topic to write your own.
Example mapping of Parcel, Volume, DryTonnes and WetTonnes fields
For the Volume field use the formula N("DX")*N("DY")*N("DZ").
For the DryTonnes field use the formula N("DX")*N("DY")*N("DZ")*N("Density"), or N("Density") > 0 ? N("DX")*N("DY")*N("DZ") * N("SG") : 0 to exclude negative values.
For the WetTonnes field use the formula N("DX")*N("DY")*N("DZ")*N("Density")/<moisture>.
-
Be careful to use the text T(“material”) syntax so that the parcel is read as text, not as a number.
Note for Micromine Block Models When importing Block Models in .DAT format, in the list of Available Variables on the right you will see a new variable MetaN(“Rotation”), which you do not see when working with a CSV file.
Map this variable to the “Bearing” field. This value pulls in rotation data from the Micromine block model, adjusted for Alastri rotation.
 variable to Bearing field")
Map MetaN(“Rotation”) variable to Bearing field
Block Model (Top)
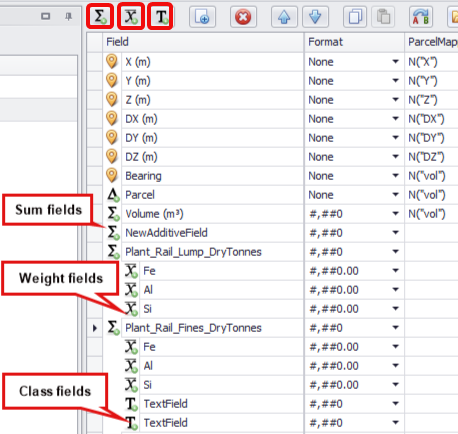
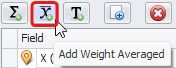
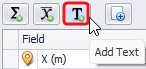
Creating Fields
New Reserve Model fields can be created by clicking the Sum, Weighted, and Class icons located in the top button ribbon. These add new rows into the field list.

|
Field type |
Description |
Example |
|---|---|---|
Additive
|
Additive fields are summed together, such as volumes, tonnes, and gold ounces. |
|
Weight Averaged
|
Weighted fields are weight-averaged by their parent field, such as iron percent or gold ppm. |
|
Text
|
Text (class) fields create subtotals of their parent fields, such as tonnes of Indicated / Inferred / Measured. |

Exercise: Create and map the fields for Fe, Al, Si, P, Mn, LOI, and S.
-
Use the top button ribbon to add the fields under the correct parent.
-
Use the variables list to map values into the fields.
-
Select the appropriate format for each field.
-
Check for hints in the Errors panel below the fields.
Block Model (Top)
Block Model Formulas & Logical Operators
There are a number of expressions available to use in the Reservable Model Generator.
Block Model formulas
|
A+B |
Add A and B |
|---|---|
|
A-B |
Subtract B from A |
|
A*B |
Multiply A and B |
|
A/B |
Divide A by B |
|
A.ToLower() |
Convert all upper case text (HG, Hg, hg) into lower case (hg) |
|
Math.Min(A,B) |
Return the minimum of A and B |
|
Math.Max(A,B) |
Return the maximum of A and B |
|
N("density") <= 0 ? 0 : N("volume") |
If density is less than or equal to zero, return zero volume, else return the volume field |
|
A.Substring(0,Math.Min(3,A.Length)) |
Return the first three letters of A |
|
( RowT("material")=="waste1" || RowT("material")=="waste2" ) ? "waste" : RowT("material") |
If material is waste1 or waste2, then return "waste", else return the "material" |
Logical operators
|
And |
&& |
If A is "true" and B is "true" and C is "true", then return "true", else return "false" |
|---|---|---|
|
Or |
|| |
If A is "true" or B is "true" or C is "true", then return "true", else return "false" |
|
Equal to |
== |
If A is equal to B, return "true", else return "false" |
|
Not equal to |
!= |
If A is not equal to B, return "true", else return "false" |
|
Greater than |
> |
If A is greater than B, return "true", else return "false" |
|
Greater than or equal to |
>= |
If A is greater than or equal to B, return "true", else return "false" |
|
Less than |
< |
If A is less than B, return "true", else return "false" |
|
Less than or equal to |
<= |
If A is less than or equal to B, return "true", else return "false" |
Block Model (Top)
Custom Variables
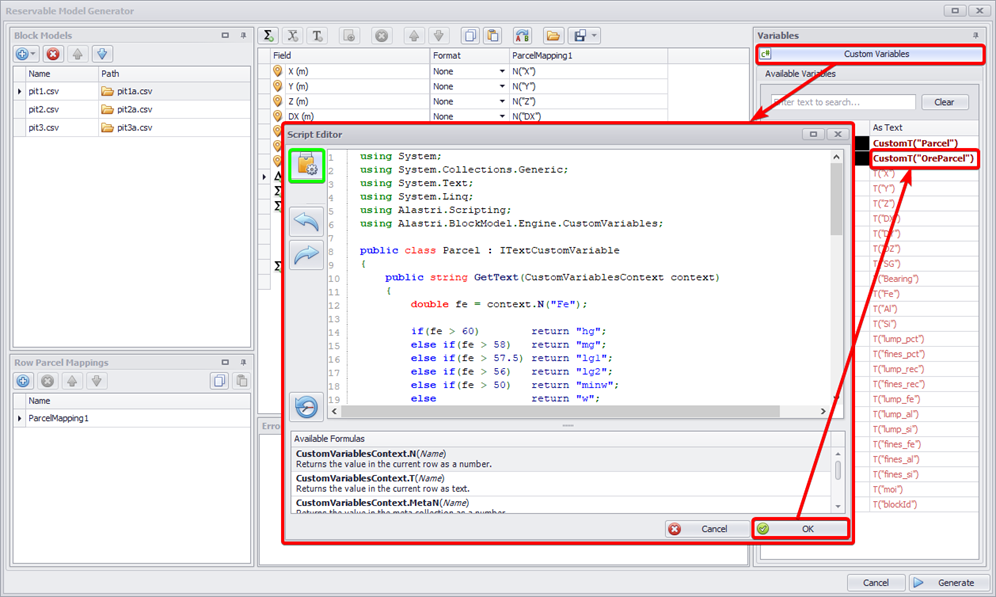
If a required variable is not available, you must create/edit that variable in the Script Editor window, which can be accessed via the Custom Variables button.
-
Click theCustom Variables button.
-
In the Script Editor window, customize the formula code.
Tip: You can copy sample scripts from the Block Model Custom Variables topic.
-
Change the required values, such as the parcel and thresholds.
-
Verify that the code is correct by clicking the Compile button.
-
If there are no errors, click OK.

Creating Custom Variable
The new custom variable will appear in the Variables list on the right in bold. Drag and drop it to map it to the applicable field.
Block Model (Top)
Reserve Field Value Clamping
Use Minimum and Maximum columns to clamp numbers by block to be >= Minimum and <= Maximum.
This functionality can be used to help with data hygiene by ensuring that values are somewhat sensible.

Using the clamping functionality to ensure the moisture value of a block is between 0 and .15
 Recommendation
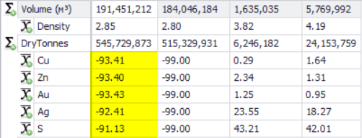
If the value in the Minimum column is set to a negative value, the Reserves Summary and subsequent data may incorrectly display the material contents or other inputs as negative values.
 To prevent showing negative values, in the Minimum column, limit the lowest values to zeros. This way, even if minus values (-99 or -∞) are used in the Block Model fields, you will not have negative values displayed for reserves during further setup and scheduling.
Set Minimum values to zeros to prevent reporting negative reserves
Copy and Paste
Copy and Paste tools can be used to copy and paste values between cells. You can also use <Ctrl+C> and <Ctrl+V> keyboard shortcuts.
![]()
![]()
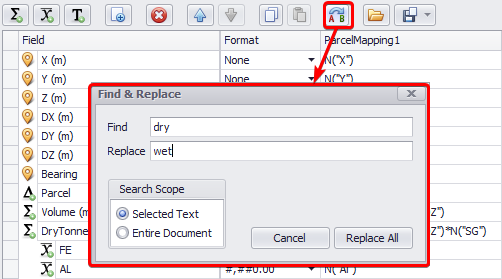
Find and Replace
Use the Find and Replace tool to speed up the filling of similar parameters in the copied mappings.
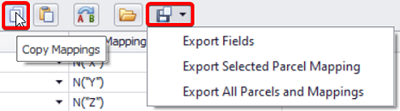
Export
Use the Export drop-down menu to export fields and parcel mappings.
Errors List
If the Errors panel is blank, and all relevant fields are mapped, click Generate to build the reserve model.

Once all fields are mapped, click the Generate button to build the combined Reserves Model
Block Model (Top)
Recommendation for file storage
Always save reserve model files locally (or on the same server on which Rapid Reserver is running). When sharing work with a colleague, the Rapid Reserver file and the Reserve Model file should be shared together.
As such, a good rule of thumb is to save the Reserve Model file in the same folder as the Rapid Reserver project, to reduce confusion when sharing or backing up files.
Note when updating the Reserves Model
Each time after updating Block Models and introducing a new parcel you will need to check your Mappings in ATS/APS to make sure that each parcel is mapped correctly.
You may also need to check Fields to make sure that field(s) for new parcel(s) exists.
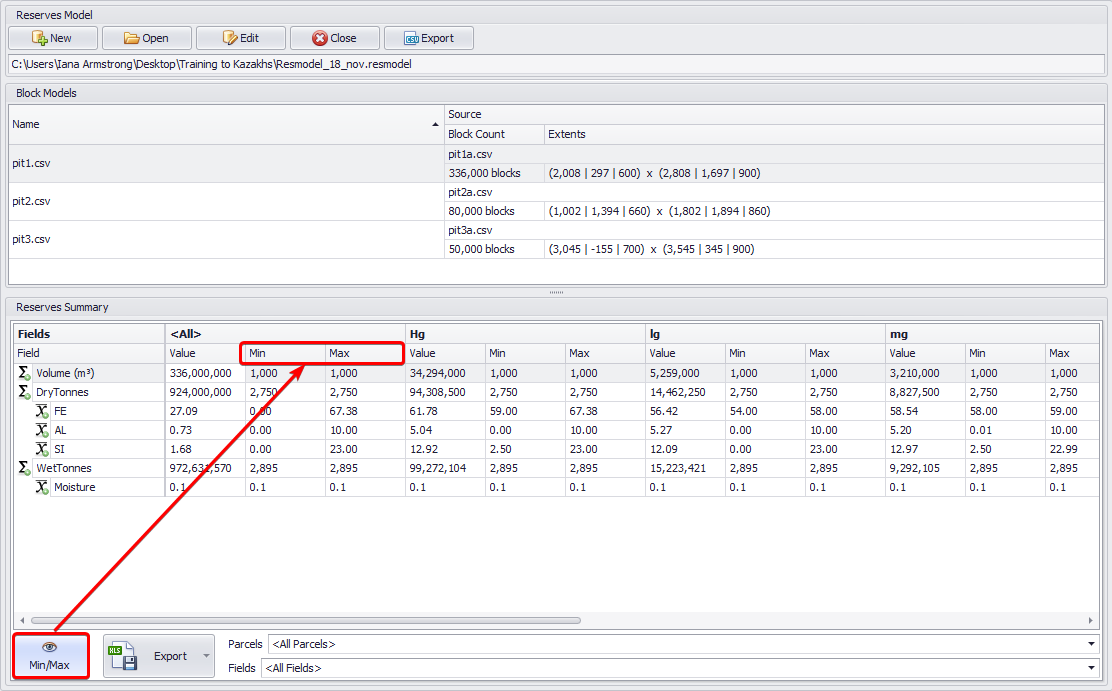
Reserves Summary
Once the Reserve Model file has been generated, a summary is displayed for each loaded Block Model.
-
Use the Min/Max toggle to inspect the data for missing or rubbish values.
-
Check the material types, tonnes and grades for ballpark accuracy.
Block Model (Top)
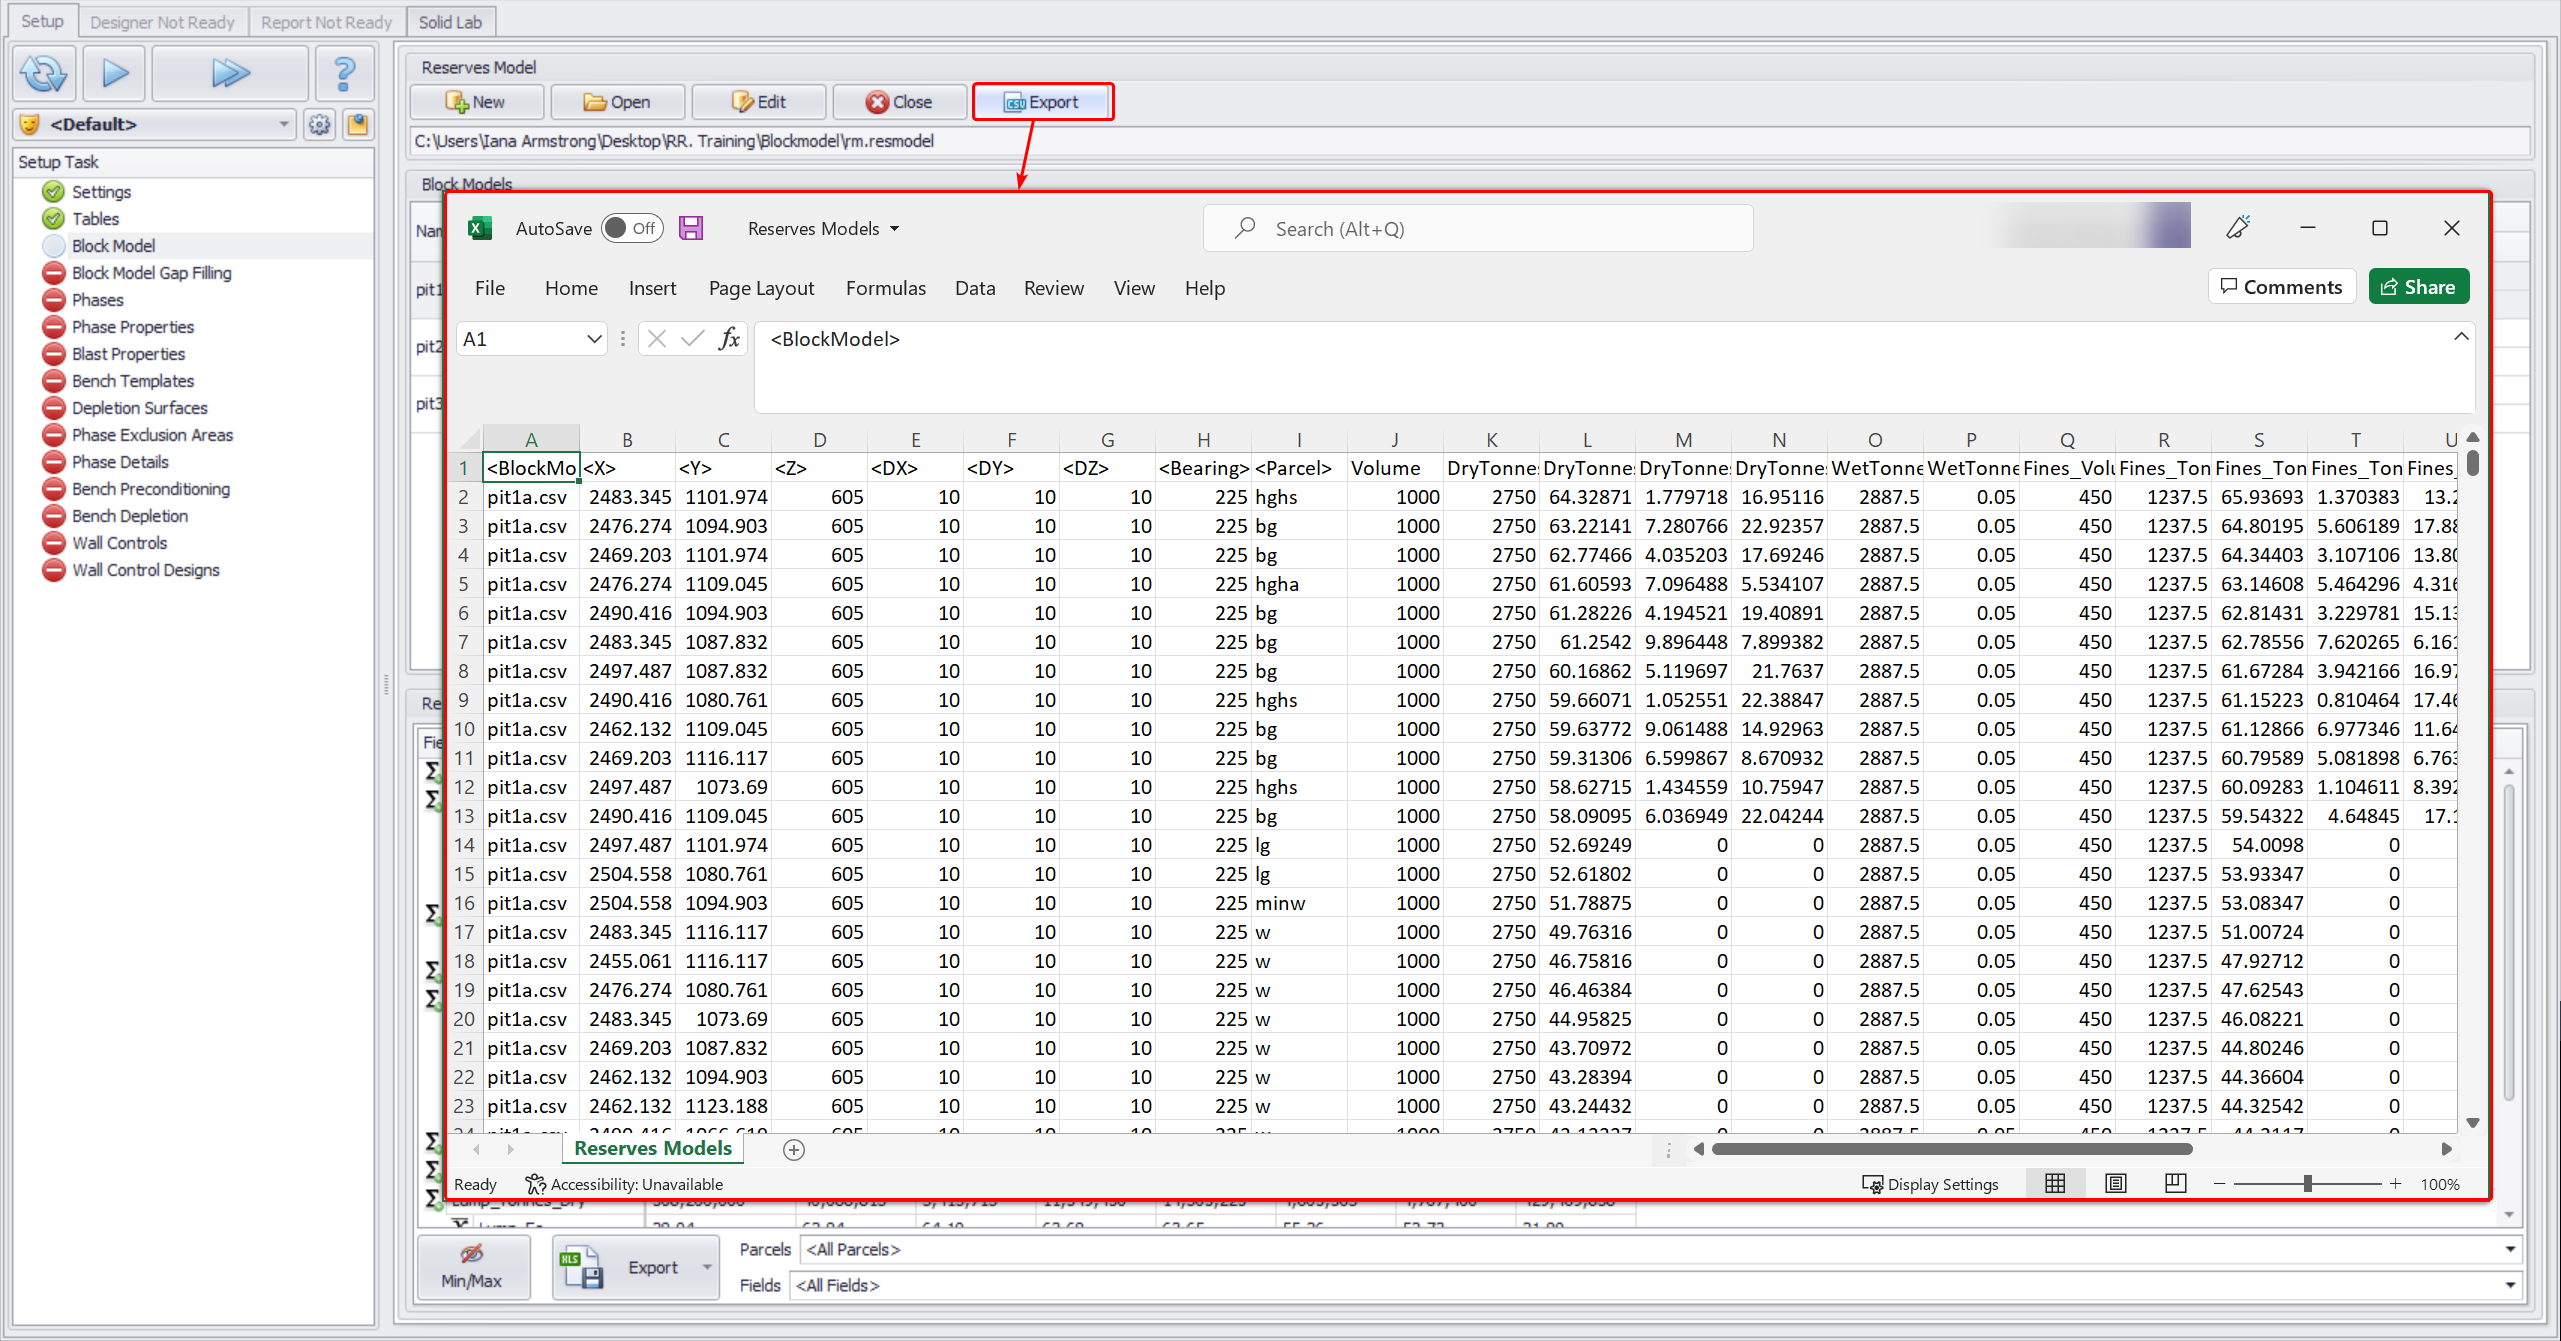
Export
You can export the entire Reserves Model to a CSV file. To do this, click the Export button on the top line and specify the path to the destination folder.
The new CSV file will contain all Block Models, with all the blocks and all existing fields added by the user.
You can also narrow your Block Model Data export by selecting which parcels and fields you wish to export from the Reserves Summary.
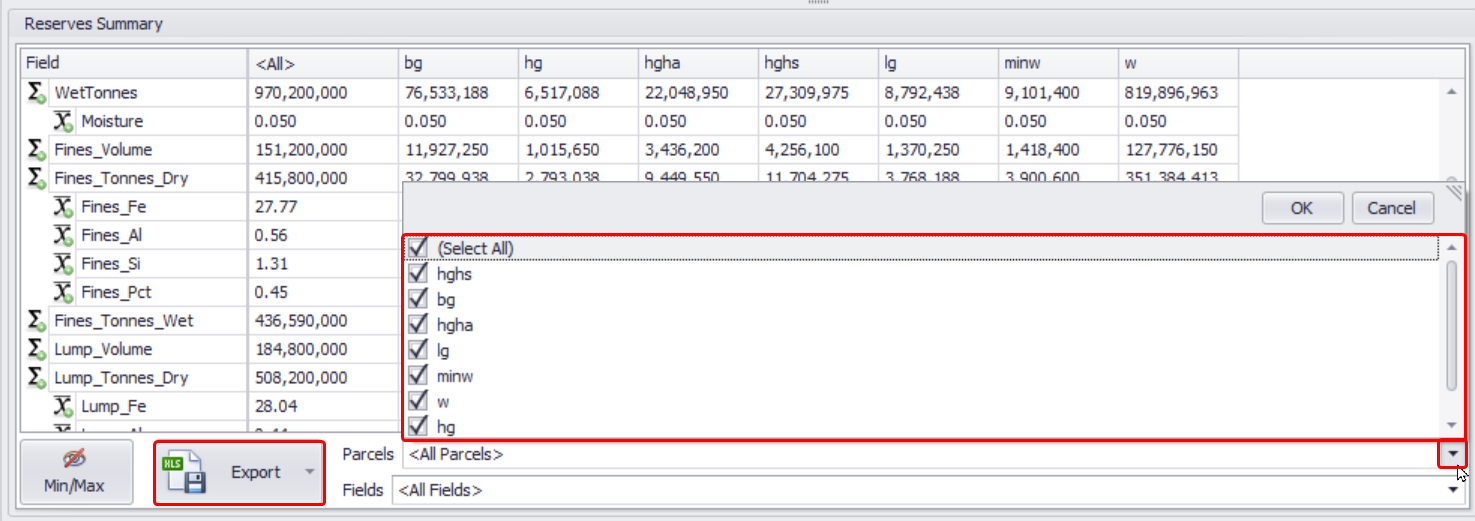
Selected parcels and fields of the Reserves Model can be exported to Excel or to Text/CSV formats.

Block Model (Top)
Recommendations when working with large Block Models
Depending on the volume of data stored, some Block Models can be quite large, resulting in the generation of very large Reserve Models as well (several GB), which can take considerable time to download/transfer and read. When working with a short-term plan in APS, you may not need inventory data for the benches not being mined, therefore, when generating a Reserve Model, you can limit the data to the certain Z-coordinates. This will significantly reduce the number of blocks within the Reserves Model, and consequently the size of the generated file for easy storage and transfer.
For example, the block model you are using is in coordinates (2,000 | 297 | 600) x (2,808 | 1, 697 | 900), but you know that only the upper benches will be mined in your schedule, so the data for the lower benches will not be applicable to you. Therefore, you can constrain the data included in the Reserves Model by the Z coordinate, using the formula like "if the benches of interest are above or at 750 meters along the Z axis, report the volume according to the dimensions, otherwise return zero" - "N("Z") >= 750 ? N("DX")*N("DY")*N("DZ") : 0".

Limiting the reserve data to the benches above 750
Generate a new Reserve Model and review the Block Count data, and compare the size of the Reserve Models before and after zeroing in on the unused benches - the values will be significantly lower. Also note that in the Phase Details step, part of the pit will be outside the green box of the Block Model, and the Gap Filling template will be used to calculate its reserves.

Difference in number of blocks and disk space occupied between the original and cut off Block Models
Block Model (Top)