Preschedule
In the Preschedule step set the proportion remaining to drill, charge, or mine.

Set the ratio remaining in each activity, in each record
Automatic Preschedule from Surface
Screen Elements
Preschedule step screen elements are listed below.
|
Field |
Usage |
|---|---|
|
Proportion Remaining |
The percentage remaining in every sum field for the selected activity |
|
Remaining |
The quantity of the field selected in the Display Field drop-down list after preschedule has been applied |
|
Total |
The quantity of the field selected in the Display Field drop-down list before preschedule has been applied |
|
Delays (days) |
The number of days before the selected activity can proceed on a record. Example: At the beginning of the plan, a blast may be halfway through pattern prep. A delay can be used to represent the remaining duration of the prep time, preventing the blast from being drilled straight away. |
Legend
See the Colors Legend in the bottom left-hand corner of the Preschedule step, which helps understand the meaning of the text colors.

Preschedule data Legend
Preschedule (Top)
Prescheduling
See different options of prescheduling below.
Single Record Preschedule
-
Select an activity from the Activity list.
-
Expand the record tree to the blast or dig solid.
-
Set the proportion (or volume) remaining for each parcel as required.
-
Manual Values will be displayed Bold Orange (as per Legend in the Activity panel).
")
Specify Proportion Remaining for single dig block (Reserves/M1/P1/P101/780/2/780/1)
Bulk Preschedule
-
Select an activity from the Activity list.
-
Expand the record tree to a given level.
-
Right click > “Set Values to …” option > (amount remaining).

Bulk prescheduling to a set value
Preschedule Options
Use the drop-down menu available through the right mouse click to:
-
Set all values for the selected record to 1.
-
Set all values for the selected record to 0.
-
Set all values for the selected record to the proportion specified.
-
Clear Proportion Values set manually.
-
Clear Proportion Values set automatically.
-
Clear Values set for Delays.

Set/Clear preschedule values
Preschedule (Top)
Graphical Preschedule
-
Select an activity from the Activity list.
-
Click the Edit Graphically button.
-
In the Reserves Shading field drop-down, select “<Proportion Remaining (Activity)>” option.
-
Select one or more blocks for prescheduling.
-
Right click > “Specify Remaining Value for Selected Blocks” option > enter new value in a dialog > OK.

Graphically select blocks to preschedule
Preschedule (Top)
Automatic Preschedule from Surface
-
Press Use Surface button.
-
In the Preschedule with Surface dialog choose the Surface to use for prescheduling, Min/Max Thresholds, the Records to Check and the Activities to Preschedule.
Note: The Prescheduling Surface must already be a loaded layer.

Select preschedule surface, records and activities
Preschedule (Top)
Import CSV
-
To help users know what data is required to update the preschedule, click the Create CSV Import Template button to create an example template with one input row per activity.


Notes:
Data columns do not need to be in this exact format as the import UI allows for fields to be mapped as required.
Portion remaining is percent based and must be between 0 and 1. Quantity remaining refers to the primary field for each activity.
Users can choose to use Portion or Quantity remaining. If both fields have valid inputs, then Portion remaining will be used.
-
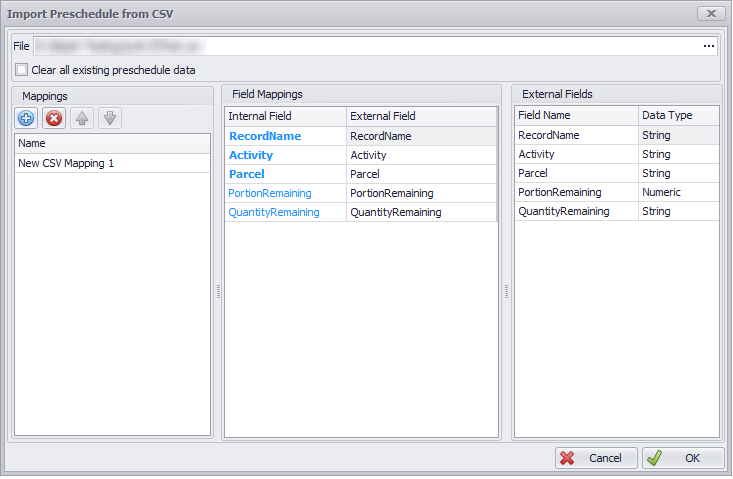
Click the Import CSV button to open the configuration window:

-
Select the file to import. Create a new Mapping template if one does not already exist and map the External fields to Field Mappings as required. If template names were used, this mapping will happen automatically.
Import via Scripted Extension
Extensions can be configured to update the Preschedule from other files or data sources.
Preschedule (Top)
Clearing Preschedule Data
To clear all manual or automatic prescheduled data, right-click on an activity in the Activity panel and select “Clear Preschedule Data for <Activity>”. All the Preschedule data will be removed and records color return to standard.

Right-click > Clear Preschedule data for <Activity>
Notes
Blocks set for mining as 0 remaining, will appear in graphics with 0 tonnes and 0 bcm. To remove completely use the Record Removal step.
Prescheduling does not recognise where material is spatially, just that a % of the block has been mined and the inventory of all parcels is reduced by that %. It is recommended that mining prescheduling with a depletion surface is done in Rapid Reserver which will remove material from the correct location spatially.
For models with multiple activities configured, setting an activity to be partially completed will automatically adjust the percent complete for predecessor activities. This adjustment will vary depending on the relationship of the activities. For example, drilling and charging may happen at the same time, so if the blast is 50% charged then drilling is set to also be 50% complete. However, if mining is set to be partially completed, then it is assumed the blast has been fired and therefore all predecessor activities will be set to 100% complete.
Preschedule (Top)
Error Messages
Note that each block must have values for Volume, Dry Tonnes and Wet Tonnes (or 0 for all of them), otherwise you will get an error message as below and won’t be able to proceed with your project setup.
“Block/parcel (<Reserves/…….>) must have values for volume, dry tonnes, and wet tonnes, or 0 in each.”
-
Double click on the error message to display the whole list of affected blocks/parcels.
Review the preschedule data, you may find that some blocks have volume but no tonnes, or vice versa.
-
Check the blocks affected in Rapid Reserver:
-
Navigate to Rapid Reserver > Designer tab > select the block from APS Preschedule error message description > check its tonnes and volume in the Reserves tab at the bottom of the screen > most likely you will see the same missing values.
-
Some blocks can be outside of the Block Model coverage > make sure you are using Block Model Gap Filling function, where default densities (this is essential) and tonnes are assigned (enable “Fill Block Model Gaps' in the Settings step).
-
If Block Model Gap Filling is used correctly, but the error message in APS Preschedule persists, check your Reserves mappings in the Block Model step > Reservable Model Generator.
-
Change the volume and tonnes expressions to exclude blocks with Zero density, ie:
-
volume = N("density") > 0 ? N("size (X)")*N("size(Y)")*N("size(Z)") : 0, or N("size (X)")*N("size(Y)")*N("size(Z)");
-
tonnes = N("density") > 0 ? N("size (X)")*N("size(Y)")*N("size(Z)")*N("density") : 0, or N("density") > 0 ? N("size (X)")*N("size(Y)")*N("size(Z)")*N("density") : N("size (X)")*N("size(Y)")*N("size(Z)")*2.5 (density).
-
Regenerate your Reserves Model and review the changes.
-
-
Preschedule (Top)