World View
When you create a Sectional View, a World View pane is docked alongside the Sectional View:
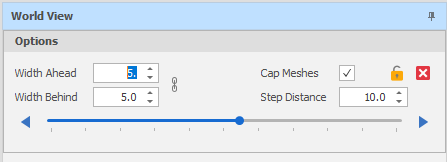
Options
Set the following options:
Width Ahead/Width Behind
Set the section width by specifying Width Ahead and Width Behind values. These values define the extents of a “data corridor”. In Sectional View, Ahead is a measurement taken from the section line towards you, the viewer. Behind is a measurement taken from the section line away from you.
![]() Click the Link icon to the right of the Width boxes to link or unlink the Width controls.
Click the Link icon to the right of the Width boxes to link or unlink the Width controls.
When the Width controls are unlinked you can increase or decrease the Width Ahead and Width Behind values separately to each other. This makes it possible, for example, to just view one side of the section.
To adjust Width Ahead and Width Behind values equally, simply click the icon again to link the Width controls.
A design_sectional_view_link_widths setting can also be set via All Settings and defaults to True.
Cap Meshes
Tick/Untick the Cap Clipped Meshes check box to toggle whether clipped solids are capped. For more information see: Cap Clipped Meshes
Note that a Triangulation Cap Outline is rendered as a red line on triangulations which are not already capped or are single sided. This makes it easier to see surfaces in sectional view.
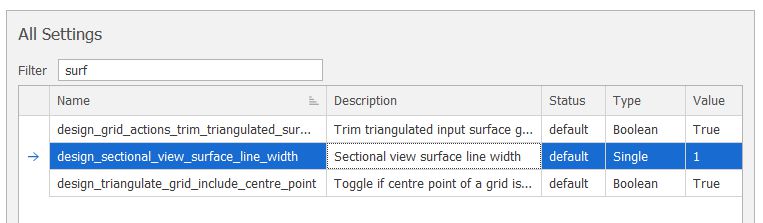
A design_sectional_view_surface_line_width setting in All Settings can be used to adjust the width of the cap outline.
Step Distance
Set the distance to move when you click the arrows at either end of the Track bar to move from the current section to the next or previous regularly spaced section.
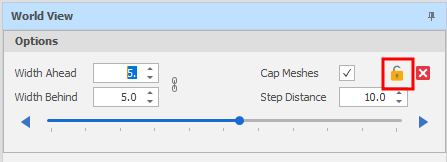
Lock Camera
Click the Lock Camera icon to lock and unlock the camera.
When the camera is unlocked and you use the track bar slider to scroll through the section view, design elements might not always be visible. However, when the camera is locked and the section plane changes, the camera will automatically zoom to the visible data extents.
A design_sectional_view_lock_camera setting can also be set via Settings and defaults to False.
Using the Track Bar
Click the arrows at either end of the Track bar to move, by the specified Step Distance, from the current section to the next or previous regularly spaced section.
The Track bar is preset to 100 steps and its start and end points are equivalent to the Min and Max of the visible data. When an upper or lower limit is hit, stepping in or out will move to the next 100 steps.
You can hold down the CTRL key as you use the mouse wheel to scroll the sections in the World View.
When the increment up/down controls are used to adjust the Width Ahead, Width Behind and Step Distance, or when the arrows on the Track bar are used to step in or step out, the camera is adjusted to show the new section in the Sectional View. The section position is also adjusted in the World View.
To revert back to the Sectional View after you've rotated it: On the Design ribbon, in the View group, click Reset View (or press R on the keyboard).
Exit
![]() Click Exit to close the World View pane.
Click Exit to close the World View pane.
Settings
Many of the options you can select in the World View pane can also be set via All Settings. These settings can be referenced by name in scripts and expressions. When you change the default settings, they are applied in the World View pane.
| Name | Status | Type | Value |
|---|---|---|---|
| design_sectional_view_cap_clipped_meshes | default | Boolean | True |
| design_sectional_view_cap_enable_lighting | default | Boolean | False |
| design_sectional_view_link_widths | default | Boolean | True |
| design_sectional_view_lock_camera | default | Boolean | False |
| design_sectional_view_plane_colour | default | Color |
 Blue Blue |
| design_sectional_view_reset_exits_action | default | Boolean | False |
To reset the defaults, click the Load Defaults button at the bottom of the All Settings window.
Note:
-
A Sectional View is applied to a single panel. Other panels will remain unchanged.
-
You can setup keyboard shortcuts to Step In and Step Out of a Section View in File | Settings > Keyboard Settings (Design.SectionalViewStepIn/Out).