Levels
In Micromine Advance, a Data Table can contain as many Levels as defined by the user. Advance allows for two sets of unique branches to be formed; one for Development and one for Stoping. It is important to note that each will have the same number of Levels. Each Level structure must contain unique full nodes or leaves. This is described below.
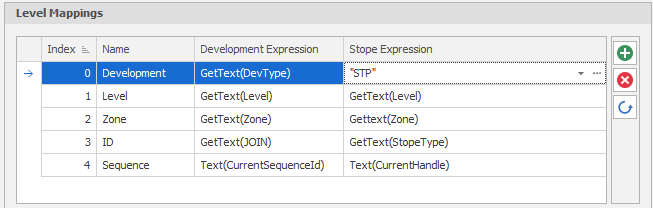
In the example below, Level Positions can have multiple entries (e.g., Activity may contain Lateral, Vertical and Stope). Sequence should reference the current sequence ID of the Development Network to ensure all cuts have sequentially ascending entries.
Nodes
A concept to be aware of is "Nodes", which are the progressive Positions within a Table Structure. A Node can have many Nodes underneath it (Child Nodes) but only one Node above it (Parent Node).
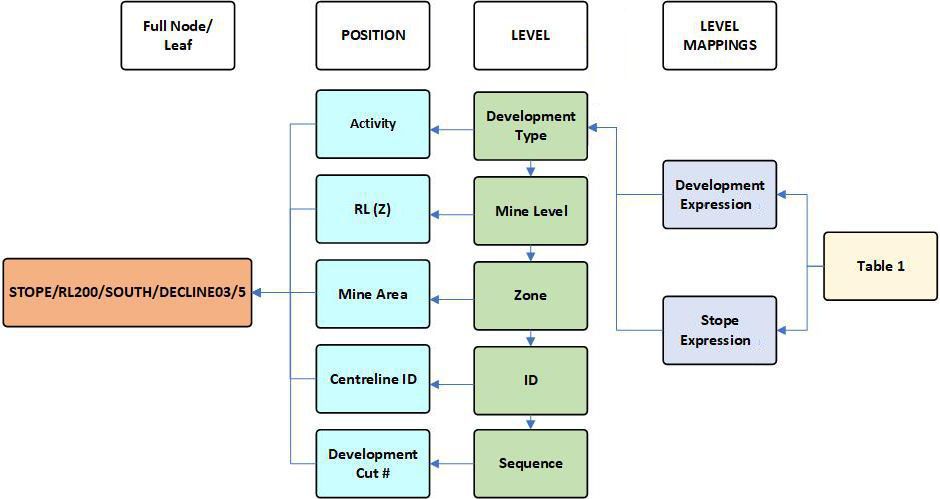
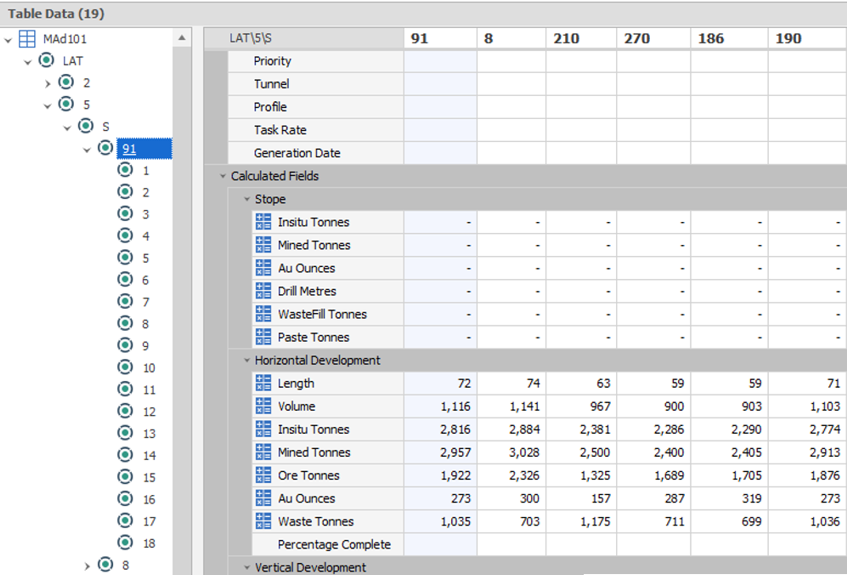
At the end of each branch (the Lowest Level) the data itself is contained in what is called the Full Node or a Leaf (STOPE/RL200/SOUTH/DECLINE03/5 in the image above). The number and different types of data each Leaf can contain is based on a structure defined in the Fields area in the application. As the user clicks on each parent node in the Table Structure, the aggregation of those fields is displayed in the Table, providing, for example, a 'Mine Level' or a 'Zone' summary:
![]()
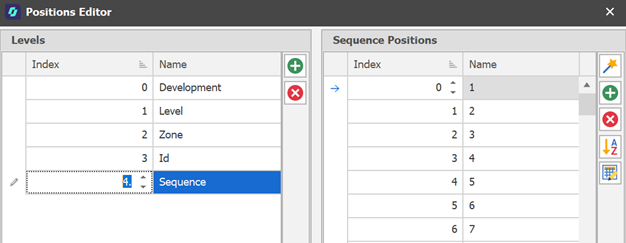
To create Levels, right-click your Table in the Project Explorer window and select Setup > Levels. Each level can be added with the Add Level button.
![]()
Positions
Positions can be added manually as you add Levels, however:
The recommended workflow is to automatically populate Levels and Positions (as described in the Conceptual section) by following the Level Mappings structure you have defined in your Scenario Settings when running the Generate Tunnels and Stope Importer processes. Adding manual positions should be carefully reviewed prior to actioning it.
![]()
In the Positions Editor, Levels and Positions have an Index which is the actual order that the application uses. If positions have a logical order, such as numbers (e.g. 1-20) or letters (e.g. A-F), then their related Indices should usually be in the same logical order. The screenshot below shows positions that are out of logical order. This can have ramifications that will be discussed later on in Ranges as well as Paths.
An additional Position Wizard tool can be used to create Numeric, Character or Month type Positions automatically.

Tip: When you are importing data into a table and the Position required does not exist, the application (if you select the option to do so) will append the Position to the end of the list regardless of "logical" ordering. If the application is creating Positions for you, you should ensure that you re-order once completed.
Use the Re-order Positions button to order/sort your positions.
![]()
Note: If position values are numeric, positions are sorted numerically, i.e. 1,2,3,4,5,6, etc. If position values are alphabetic, positions are sorted alphabetically, i.e. A, B, C, D, E, etc. If position values are alphanumeric, positions are sorted alphanumerically, i.e. 10A, 10B, 1A, 1B, 2A, 2B, etc.
The Bulk Editor is for renaming only. Using the Bulk Editor for ordering positions may have unintended consequences.
![]()