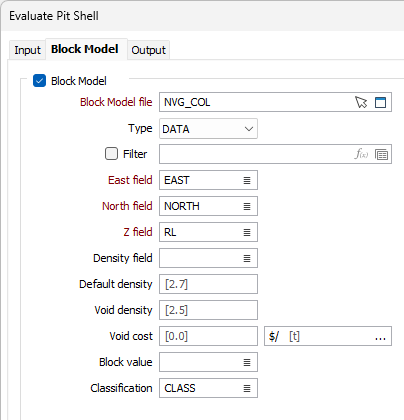
Block Model
The Block Model tab of the Evaluate Pit Shell form is used to optionally select and define a Block Model for the evaluation. Any Block Model defined will be used as a source of reserve data to quantify the shells. The block model parameters will be used to facilitate the grade and tonnage calculation.
Block Model
Select the Block Model option to enable the fields for configuring the Block Model.
Block model file
Use the folder icon to select the Block model file for the pit shell evaluation. You can also click the Pick from Vizex button to collapse the form and interactively select a layer containing the file to be inserted and return to the form.
Optionally, you can select a Filter or click the icon to open the Expression Editor and use an expression instead.
East, North, Z Fields
Specify the names of the Northing, Easting and Z fields for the Block Model in the fields provided.
Density field
(METRIC projects; optional; recommended where available.) Select the field in the input block model from which the Density for each block should be sourced.
If the selected field does not contain a value for a particular block, the value specified for Default density is used.
Default density
(Density field only.) Specify the default value for the density of the material in each block.
This value must be expressed in the units in which the values in Density field are expressed.
Void density
For the block model, you can optionally enter a density for the void. If a Void Density has not been specified, then the default density will be used for void regions. The void is the extra volume between the block model and the wireframe. Generally, the wireframe encloses the block model, but often there are little gaps between the two (these gaps are the void).
Block value
Select the field in the block model which contains the Block value information.
Rock type
Use the list icon to select the field in the Block model containing information for the Rock type.
Classification
Select the field in the block model containing Classification values (Ore or Waste for example).
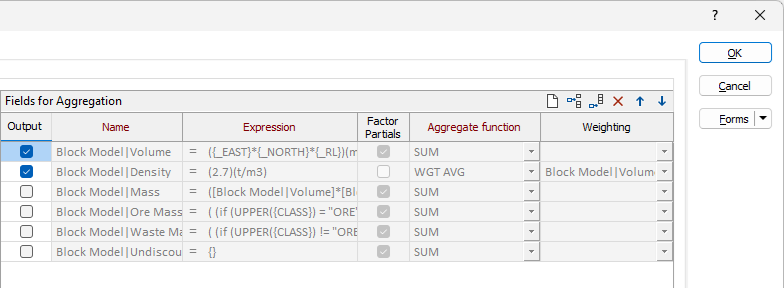
Fields for Aggregation
Output
Select the check box to add the specified attribute to the output. If this check box is not selected, the attribute is not saved to the output, however its value may be included in the Expression or Weighting settings for a subsequent attribute.
Name
The name of a wireframe attribute into which the block expression values will be aggregated.
Expression
An expression for which block values are to be aggregated. The expression may be defined by a single block model field or a previously-defined wireframe attribute. The context of the expression may include the block model fields and the wireframe attributes defined in a previous row.
Factor Partials
Use this check box to determine whether expression values for blocks not completely contained within a wireframe are to be scaled.
For example, if the check box is selected and only 15% of the volume of a block is contained within the wireframe, the expression values for that block will be scaled by 0.15.
The check box defaults to unselected, indicating that the block expression values will not be scaled.
Aggregate Function
Select the function to be used to aggregate expression values from constituent blocks into the attributes for the wireframes. WGT AVG is the default for Real or Float fields. DOMINANT is the default for Character fields. Statistical functions are available for selection, such as median, sample variance, population variance, sample standard deviation and coefficient of variation.
Weighting
This option is enabled or disabled depending on which Aggregate function (above) is specified.
Select a block model field or a previously-defined wireframe attribute, the values of which will be used to weight the result from the expression. If the Factor Partials check box is selected, then scaled values will be used for the weighting.
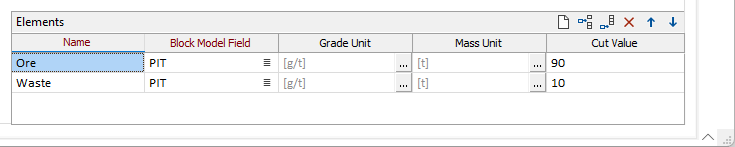
Elements
In the Elements grid of the Block Model tab, set up the profiles of the elements of interest for which attributes are to be calculated.
Name
Select the Name of the element produced. This name is used to build names for fields in report data sources and attributes for saved wireframes.
Block Model Field
Select the field in the block model file from which the element grade for each block should be sourced.
Grade Units
The following units of grade are supported:
| Description | ID | Label |
|---|---|---|
| Carats per Tonne | ct/t | ct/t |
| Grams per Tonne | g/t | g/t |
| Kilograms per Tonne | kg/t | kg/t |
| Pennyweights per Tonne | dwt/t | dwt/t |
| Ounces per Tonne | oz/t | oz/t |
| Troy ounces per Tonne | ozt/t | ozt/t |
| Pounds per Tonne | lb/t | lb/t |
| Troy pounds per Tonne | lbt/t | lbt/t |
| British thermal units per Pound | Btu/lb | Btu/lb |
| Kilojoules per Kilogram | kJ/kg | kJ/kg |
| Megajoules per Kilogram | MJ/kg | MJ/kg |
Mass Units
The following units of mass are supported:
| Description | ID | Label |
|---|---|---|
| Milligrams | mg | mg |
| Grams | g | g |
| Carats | ct | ct |
| Kilograms | kg | kg |
| Tonnes | t | t |
| Kilotonnes | kt | kt |
| Megatonnes | Mt | Mt |
| Grains | gr | gr |
| Poundss | lb | lb |
| Ounce | oz | oz |
| Pennyweights | dwt | dwt |
| Short tons | shtn | sh tn |
| Long tons | ltn | l tn |
| Troy ounces | ozt | ozt |
| Troy pounds | lbt | lbt |
Cut Value
Enter a Cut value. If the value in the Block Model field is higher than the Cut value, the process uses the Cut value instead.
Forms
Click the Forms button to select and open a saved form set, or if a form set has been loaded, save the current form set.
By design, the Forms button is not available for loaded Vizex layers (i.e. when opening the form set properties of a layer in the Vizex Layer Display pane). In Vizex, the Forms button is only available for new forms opened via the Home tab or the Vizex tab, in the Layer group (or by double-clicking on a form type node in the Vizex Layer Types pane).
Save and Save As
Click the Save button to save the changes you have made to the form set. Click Save As to save your changes as a new form set. Save As will default to the first available form set number.
Reset
Click Reset to clear the form of all values and reset the form to its default state.
Reset Tab
For tabbed forms, select Reset Tab to clear the active tab of all values and reset the tab to its default state - without making any changes to other tabs in the dialog.
Undo and Redo
Click Undo (CTRL + Z) to undo recent changes in the form. After an Undo, click Redo (CTRL + Y) to restore the last change that was undone.
Collapse
Collapse (roll-up) the form to preview a chart, or preview the results of an operation in Vizex, or obtain input values from Vizex, the Property Window, the File Editor, or the Plot Editor.