Binary fields
Binary field types provide better numeric precision, smaller files, and faster, more efficient data processing.
Binary fields can only store numbers or NULL (no data) values and cannot handle numeric exceptions. If the application encounters any numeric exceptions during field conversion, it will convert characters to NULLs and will automatically multiply below detection (< x) values by 0.5.
Supported binary field types
The application supports the following binary field types:
| Type | Code | Size (bytes) | Range | Significant digits | |
|---|---|---|---|---|---|
| REAL | [DOUBLE] | R | 8 | 1.7E ± 308 | 15 digits |
| FLOAT | [SINGLE] | F | 4 | 3.4E ± 38 | 7 digits |
| LONG | [INTEGER] | L | 4 | ± 2,147,483,647 | |
| SHORT | [INTEGER] | S | 2 | ± 32,767 | |
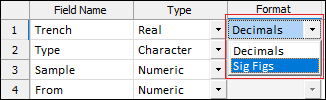
When choosing how Real numbers are formatted, you can specify the number of decimal places or the number of significant figures:
When modifying the structure of a file and adding a Real field, the field is populated with a Decimals format and blank decimals. Unless the decimal precision is explicitly set, a default precision, based on the data in that field, will be used.
For Real fields, the valid range of precision is -9 to 9 decimals (includes 0 decimals), then the default decimal precision. Negative decimals on a Real field are rounded to powers of 10.
For Float (single-precision) fields, the valid range of precision is 1 to 9, then the default decimal precision. FLOAT fields are now deprecated in File Create/Modify and are no longer recommended. FLOATS are converted to REALs (double precision), improving precision and avoiding numerical inconsistencies.
Long fields are integer fields with a range of ± 2,147,483,647. Long fields are best suited for a count, ID number, or record number field where the numeric values are integers that are expected to exceed 32,767.
A Short field is an integer with a range of ± 32,767. Use a Short field for numerical codes and other small integer numbers.
Choosing and using binary field types
The following guide will help you choose the best binary field type for your data:
- Use a REAL field for coordinates or data that includes decimal values and where precision is important (7 significant figures or fewer).
- Use a LONG field for a count, ID number, or record number field where the numeric values are integers that are expected to exceed 32,767.
- Use a SHORT field for numerical codes and other small integer numbers.
The choice of a REAL field will ensure that the field is large enough to hold the precision and numeric range of the data you intend to store.
Using binary fields to save space
In many situations a binary field will need less space than a traditional NUMERIC field to represent the same number. Here are some examples:
| Example | Width as NUMERIC (chars)1 | Binary type | Size as binary (bytes) | Size reduction |
|---|---|---|---|---|
|
Counter |
5 |
SHORT INTEGER |
2 |
60% |
|
UTM Coordinate |
11 (incl. 3 decimals) |
REAL |
8 |
27% |
1 A single character requires one byte of storage
From these examples it is clear that using binary fields instead of numeric fields may produce a much smaller file. However, the exact size reduction will depend on your data.
Using binary fields to improve precision
The number of DECIMALS you specify when you define a REAL field is for display only. REAL fields always store the full precision of their respective data types, no matter how many decimals you specify.
This means that the result of any calculation you perform in the application is also stored at its maximum precision. Here is a simple example that compares a NUMERIC field with a REAL field:
|
Calculation
|
NUMERIC Result (3 decimals) |
REAL Result (stored in file) |
REAL Result (3 decimals) |
|---|---|---|---|
|
cosine(69.7767561519) |
0.346 |
0.3456789... |
0.346 |
As you can see the NUMERIC result is the same as the REAL result displayed with three decimals. However, note the rounding error caused by limiting the decimals. If the NUMERIC result were used as the input to another calculation that error would carry forward, whereas the REAL result always uses the full precision in any subsequent calculations, no matter how few decimals are displayed.
To display the full precision of a REAL field, set its DECIMALS value to zero.
Whenever you edit the contents of a binary field in the File Editor, the application will store as many decimals as you enter but will display the number of decimals you specified in the file structure.
Converting Numeric fields
- Run basic min/max statistics on the data (on the Stats tab, in the Exploratory Data Analysis group, select Show Data Ranges) to determine the range and precision of the data.
- On the File tab, in the Actions group, select Modify File Structure and choose the desired file.
- For each NUMERIC field that requires conversion, change the TYPE from NUMERIC to REAL, LONG, or SHORT as needed to handle the range and precision of the data.
- Optionally, change the number of DECIMALS.
![]()
![]()
If the application encounters any numeric exceptions during the conversion it will perform the following actions:
| Converts from... | ... to |
|---|---|
|
Blank |
Blank |
|
Character |
Blank |
|
< x |
0.5 x |
Create a file with binary fields
- On the File tab, in the Data File group, click New.
- Enter a Name and set the new file’s Type.
- In the Structure Editor, enter a FIELD NAME and then move on to the TYPE field.
- Click the arrow in the TYPE field and choose the desired binary field type from the list.
- Enter the number of DECIMALS to be used for displaying the data. For full precision enter zero or leave the cell blank.
You can change the decimals of a REAL field at any time without affecting the data.
Change the displayed precision (decimals) of a binary field
- On the File tab, in the Edit Data group, select Modify File Structure and choose the desired file.
- Change the number of DECIMALS.
![]()
Convert a binary field-enabled file to text-only format
Occasionally, you may need to share a binary-enabled file with users of earlier versions of the application. To convert binary field-enabled files to the old text-only format:
- On the File tab, in the Actions group, select Convert | Convert to Text Format.
- Select the file to convert.
- Enter the output File name and set its Type.
- Optionally, enable Overwrite input file.
![]()
You can also run the stand-alone program file MicromineDatFileConvert.exe, which is located within the application installation folder.