Data Entry
![]()
You can set default values and automatic increments for fields in any of the files. Automatic incrementing helps to reduce data entry time and eliminate errors. When you need to add large numbers of drillholes, use a macro.
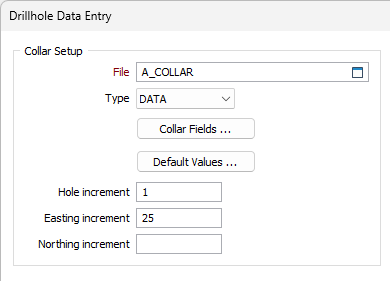
Collar Setup
File
Double-click (or click on the Select icon) to select the name of the Collar file. You can also click the Pick from Vizex button to collapse the form and interactively select a layer containing the file to be inserted and return to the form.
Collar Fields
Click the Collar Fields button and enter the names of the required fields in the collar file. You do not need to specify Azimuth and Inclination fields if this information is only stored in the Survey file.
Default Values
Click the Default Values button, then specify the field names and the default values for the required (Hole, Easting, Northing, Z) and optional (Azimuth & Inclination) fields in the file. These are the base values that will be incremented as the data is generated.
Hole, Easting & Northing Increments
Specify the increments that will be applied to the Hole ID, Easting and Northing values.
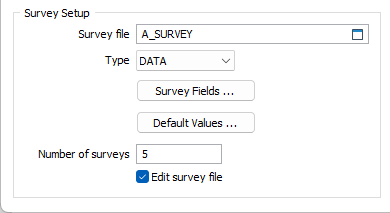
Survey Setup
File
Optionally, enter (or double-click to select) the name of the Survey file. You can also click the Pick from Vizex button to collapse the form and interactively select a layer containing the file to be inserted and return to the form.
Survey Fields
Click the Survey Fields button and enter the names of the required (Hole, Depth, Azimuth & Inclination) fields in the Survey file.
Default Values
Click the Default Values button, then specify the field names and the default values for the required (Hole, Easting, Northing, Z, Azimuth & Inclination) fields in the file. These are the base values that will be incremented as the data is generated.
Number of surveys
Specify the number of surveys in the file.
Edit Survey file
Select this option to open the Survey file for editing in the File Editor after the process is run.
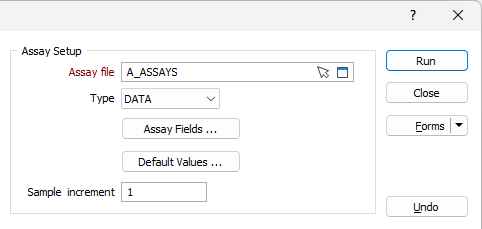
Assay Setup
File
Double-click (or click on the Select icon) to select the name of the Interval file. You can also click the Pick from Vizex button to collapse the form and interactively select a layer containing the file to be inserted and return to the form.
Assay Fields
Click the Assay Fields button and double-click in the input boxes to select the names of the required (Hole, From, To & Sample Number) fields in the Assay file.
Default Values
Click the Default Values button, then specify the field names and the default values for the required (Hole, From, To & Sample) fields in the file. These are the base values that will be incremented as the data is generated.
Sample Increment
Specify the increment that will be used to increment the sample values in the file.
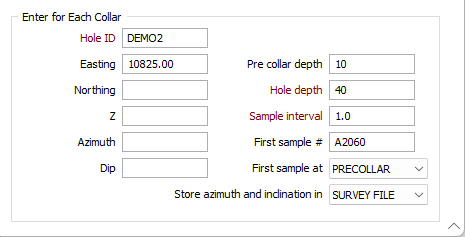
Enter for each collar
As an alternative to setting default values and automatic increments, you can enter specific start values for a particular group of holes. The entries you make here will override any default or automatic entries you have specified and is typically used to handle exceptions.
The start values you specify will be incremented for each hole.
Pre-collar Depth
A pre-collar is an interval of any length at the top of a drillhole, that may be treated differently than ordinary sample intervals. The pre-collar interval may or may not be sampled or logged.
Hole Depth
The depth of the hole including any pre-collar depth.
Sample Interval
The length of the interval at which sample values will be recorded.
First Sample #
A start number that will be incremented when numbering samples.
First sample at
You can choose the point from where the first hole is named by selecting either the COLLAR or the PRE-COLLAR option.
If you have entered a Pre-collar depth, the program will write one record from the start of the hole to the pre-collar depth value before writing individual sample records at the defined sample interval. If you do not define a pre-collar depth, the COLLAR or PRE-COLLAR settings have no effect.
If you choose COLLAR, sample numbers, default and increment values will be written to every record in the file. If you choose PRE-COLLAR, values will be written from the pre-collar depth, but not to the interval from the collar of the hole to the pre-collar depth.
Store azimuth and inclination in
Use the drop down to select whether to store the Azimuth and Inclination values in the Collar File, Survey File or Both Files.
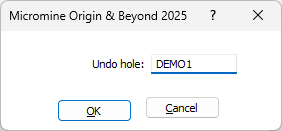
Undo
If you want to undo your changes, click the Undo button and nominate the hole you want to delete.
Forms
Click the Forms button to select and open a saved form set, or if a form set has been loaded, save the current form set.
Run
Click the Run button to write the hole data to the nominated files.