Buffered Jobs
Click Next to proceed to the Buffered Jobs screen.
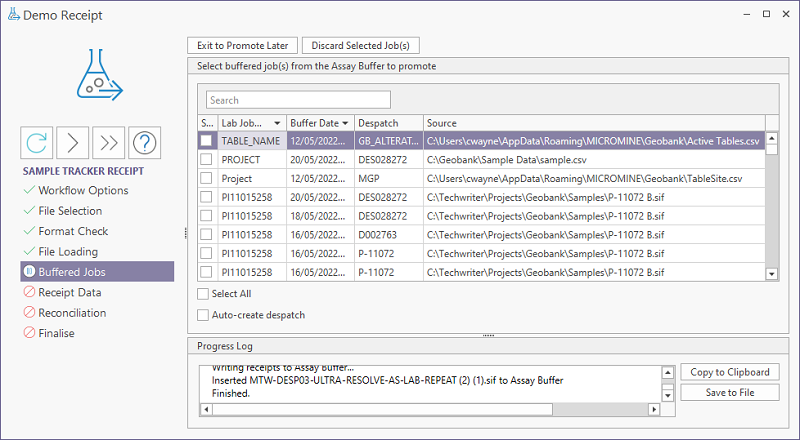
The Buffered Jobs screen displays a list of samples that have been imported to the Assay Buffer tables. You can select any or all of the listed jobs to promote to the main tables.
If more than one job is selected for promotion, the Receipt Data and Reconciliation steps will be performed in the background and the wizard will progress directly to the Finalise screen.
If you want to remove any jobs from the Assay Buffer, select them from the grid and click the Discard Selected Job(s) button
The Exit to Promote Later button will close the receipt wizard without promoting any of the jobs that have been loaded to the Assay Buffer. This provides an opportunity to check the metadata or QAQC or undertake ETL with the metadata using tools configured on your system. Jobs can be updated or corrected before promotion to the main tables.
Select All
The Select All option will select all of the jobs in the displayed grid.
Auto-create Despatch
If the samples in a receipt were not despatched to the lab using Sample Tracker’s despatch process and thus, there is no despatch associated with the receipt - or the despatch data is not in a suitable format or is not available prior to the receipt of the lab file - select this option to create a despatch based on the analysed samples details of the receipt.
This will create the despatch entry, populate the analyses received, and log all despatched samples and standards. If you select Auto-create despatch but a despatch already exists, the despatch will not be affected and the receipt will proceed.
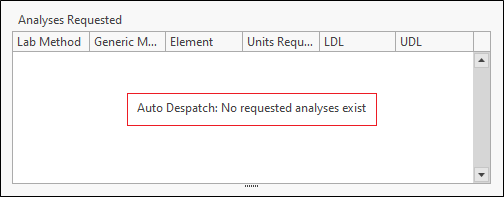
Note that the receipt will open with an empty 'Analyses Requested' pane on the Reconciliation screen. This is because a despatch was never created. A message in the pane clarifies why there are no analyses requested:
If you have selected more than one job to promoted, click Next to proceed to the Finalise screen.
Otherwise, click Next to proceed to the Receipt Data screen.