Reference Edit
The Reference Edit service is used to create, edit, and manage the reference data used by the Reporting service, other Pitram Portal services such as Drill and Blast and Materials Management, and client applications such as Data Acquisition and the Event Editor.
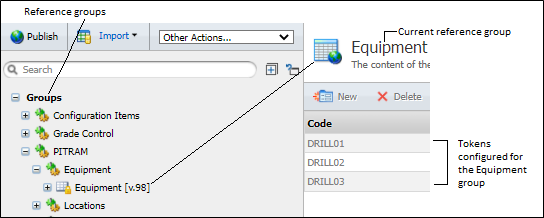
The reference groups and active lists that can be configured for Pitram are arranged by category in a navigation tree to the left of screen.

There are two main branches of the tree:
Groups | Configuration Items
Configuration items are the higher-level data entities that need to be configured first. Before you can define a Caterpillar truck, Truck1, for example, the following Truck attributes need to be configured:
- Function = Hauling.
- Model = Caterpillar 785D.
From this example we can see that reference groups exist in a hierarchy. An Equipment reference group, for example, will comprise other (Equipment Function, Equipment Model, Equipment Owner, etc.) reference groups.
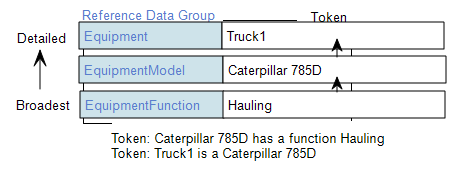
These reference groups essentially represent the attributes of the data entities that are operational at a particular site.
Groups | Pitram
The data entities that are operational on-site are configured under the Groups | Pitram node - for example, Komatsu trucks, KOM01, KOM02, etc.
Expand the nodes of the tree to view the groups and items that belong to each category. A Version control is displayed for each group.
When you select a category in the navigation tree, the groups that belong to the category are displayed under the category in the tree.
Publishing
After you have edited a reference group or an active list, click the Publish icon on the taskbar to publish those changes to the Pitram Portal server.
The Publish dialog will open and you can nominate whether to publish now or at a custom date and time.

Select the Now option, or set the Custom Date and Time, then click Publish.
Import
Click on the Import icon on the taskbar to import reference data via a CSV or XSLX file of data from another site. The reference groups you import will be added to the navigation tree. If reference groups of the same name exist, you will be prompted to overwrite or append the reference data.

Other Actions
The options provided on the Other Actions drop-down menu allow you to check in or check out all of the reference groups under the node you have you have selected. When you publish, import, or perform other actions, those actions will be applied in a top-down manner for the groups, items and active lists under the node that is currently selected in the navigation pane.

| Checkout all of the groups under the current node. |
| Checkin all of the groups under the current node. |
| Refresh - Makes sure that the displayed data is current. |
| Deploy Views. This option allows an administrator to Deploy Views the database views that are provided for reporting and data browsing. |
| Deploy Reference Data. This option allows an administrator to Deploy Reference Data that is currently configured. |
| Load Default Reference Data Load default data. |
| Load Default Waypoint Actions and Criteria Load the default Waypoint data. See Waypoints. |
When you select a group in the tree, the tokens configured for that group are displayed in the pane at the right.
Selecting a token in the pane at the right will open a details dialog for the record that is not editable. You can perform an action or modify the details of a group only when the data is 'checked out'.
With the table for a group displayed, click the Checkout button. The table is made editable.

New
You can add records to the table using the New button. Clicking the New button will open a dialog in which you can enter the details of the new record for the group - Equipment, Location etc.

Delete
The Delete button is used to delete selected checked-out records from the table. Select the corresponding check box for the records to be deleted and click Delete. You will be prompted to confirm the deletion.

Click Yes to continue and delete the selected records.
Template
A new template can be created using the Template Editor. When you click the Template button, the Template Editor will open.
The New button at the left will create a new template, to which you can assign a name and begin populating.

Information on creating templates is contained in Create a Template.
In the data table, if you select records using the corresponding check box at the left, you can use the Other Actions menu to perform an action against the selection.

| Undo Checkout - reverts all data to check in state, without saving any changes. |
| Print - opens a print-friendly view of the current table for printing to a configured printer. |
| Export - Opens the Export dialog which can be used to export the data in the current table to an Excel spreadsheet or a CSV file. |
The Edit icon at the left of each row of the data table is used to make changes to the selected record. The details will be displayed in a dialog from which changes can be made.

For more information, refer to the Editing reference data and Creating and Updating an Active List topics.
Check In
When changes have been made to a record in the table, with the record selected, click the Checkin button in the toolbar. This will retain the changes and check the record back in so that no further changes can be made until check out.
It is recommended that you Checkin and Checkout via the workspace toolbar, rather than using the Checkout All and Checkin All options above the navigation pane.