Footer
The Main Footer is positioned at the bottom of each page. It consists of an “empty” frame that extends across the width of the page. The height of the frame is defined in paper units (typically millimetres). Selecting the option to show a Border enables border colour and line thickness prompts.
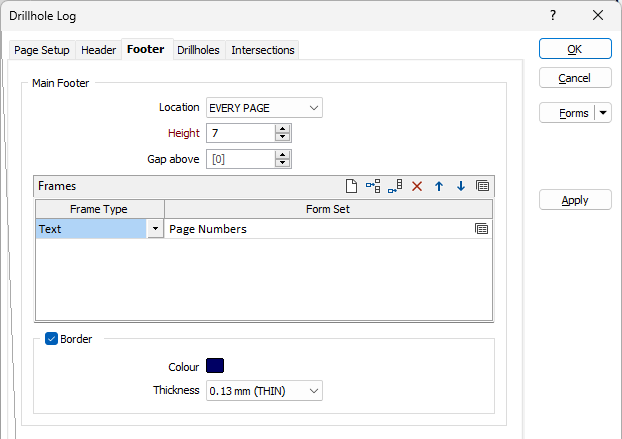
Location
A footer can be displayed for EVERY HOLE, on EVERY PAGE. If you prefer not to show a footer, select NONE.
Height
Specify the height of the Footer frame, measured in points.
When a spin control has focus, you can use the mouse wheel to increase or decrease the displayed value.
Gap below
Optionally specify a gap, measured in points, between the top of the footer and the bottom of the columns displayed in the Log.
Text and images
The Main
- The first column defines the frame type, Text or Image or Empty.
- The second column selects a form set that defines the content, position and size of the frame.
Initially there will not be any form sets. To define a form set:
- Select the frame type, in the first column, and then right click on the second column, and select New.
- You will be prompted for a form set name. Type in a suitable (descriptive) name and click OK.
A blank form will be displayed with two tabs. The content of the frame is defined on the first tab and the position and size of the frame is defined on the second tab.
It is important to give the frame some non-zero size and an approximate position. Leaving the initial default values means that the frame will not appear because it has no defined width and height. The actual size and position of the frame is not critical, as these values can be modified interactively later on.
The content for an Image frame is an image file. Typically this might be a company logo.
The Undo/Redo function is enabled for use with header and footer frames and captures the movement and resizing of frames.
Note: Making changes to the drillhole log via the form, will clear the undo stack. This ensures that where a frame referenced in the undo stack is removed, undo/redo operations will not affect frames no longer displayed.
Empty Frames
An Empty frame is typically used to control the border in a Header or Footer frame type. In the example below, you do not want a vertical line drawn between the two highlighted frames. An additional frame is required to control the border line work. While an empty TEXT frame could be used, an EMPTY frame defines the purpose more accurately.
![]()
Selection priority of a frame is based of the area of the frame. Empty frames will always have the lowest selection priority.
Substitutions
The content of a Text frame can be typed into a text box. As well as user-defined text, there are a number of pre-defined Substitutions. Use the buttons on the local toolbar to Manage the rows in the list.
Border
Select the check box to display a border.
Double-click on the icon to set the colour for the frame border. This input is disabled when a NULL fill colour is selected.
Select a line thickness value (in millimetres) for the border of the frame. THIN, MEDIUM, THICK, or a Custom thickness can be selected. This input is disabled when a NULL fill colour is selected.
Column Footers
In addition to the Main Footer, you can also display a footer at the bottom of each column.
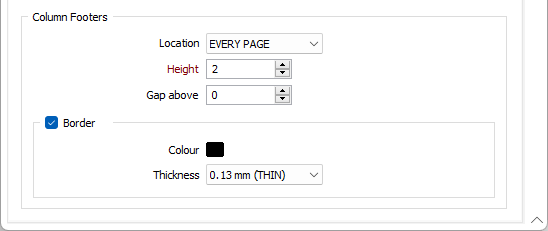
Location
A footer can be displayed for EVERY HOLE, on EVERY PAGE. If you prefer not to show a footer, select NONE.
Height
Specify the height of the Footer frame, measured in points.
When a spin control has focus, you can use the mouse wheel to increase or decrease the displayed value.
Gap below
Optionally specify a gap, measured in points, between the top of the footer and the bottom of the columns displayed in the Log.
Border
Select the check box to display a border.
Double-click on the icon to set the colour for the frame border. This input is disabled when a NULL fill colour is selected.
Select a line thickness value (in millimetres) for the border of the frame. THIN, MEDIUM, THICK, or a Custom thickness can be selected. This input is disabled when a NULL fill colour is selected.