New
![]()
This option is also available from the File Editor tab when a file is open. Multi-language content is supported. For more information, see: Unicode Support
To create a new file from scratch:
- Select the File | New menu option. The New File form is opened.
- Select a file type and enter (or select) the name of the file you want to create. If you select the name of an existing file, you will be prompted to overwrite it.
- Optionally give the file a title.
- To open the file for editing in the File Editor once it has been created, select the Auto open file for editing option.
- If the Use extended character set check box is checked at the time of creating a new file, the file will be created as a Unicode Text Format (UTF-8) file, which provides support for extended character sets and is ideal for multilingual workplaces.
Any files you create with extended characters, and any report files generated automatically with extended characters (typically mathematical symbols, superscripts and subscripts), cannot be read in earlier versions of the application.
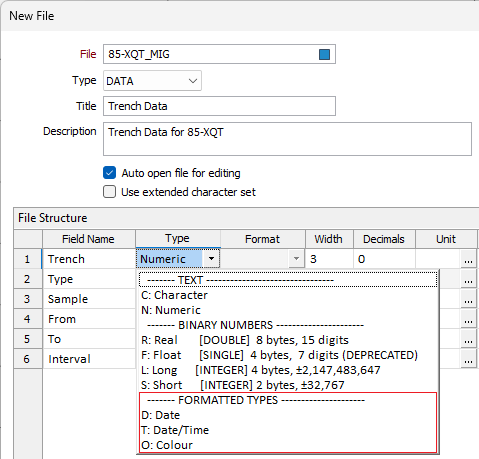
- Use the File Structure grid to create the structure of the new file.
- Text (Character, Numeric), Binary (Real, Float, Long, Short) and Formatted (Colour, Date, and Date Time) field types can be selected in the New File form:
-
A Description column, at the right-hand side of the grid, allows the purpose and the content of any field in the file to be described using a maximum of 255 characters.
- Click OK to create the new file.
Use the buttons on the local toolbar to Manage the rows in the list.
Pressing the Tab key in the last cell of the last row, creates new row.
To select a row, click on the row number at the left of the row.
Undo (CTRL + Z) and Redo (CTRL + Y) functionality is supported.

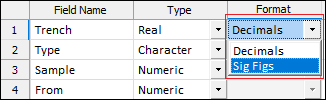
When choosing how binary numbers are formatted, you can specify the number of decimal places or the number of significant figures:
Modifying the structure of the file in a previous version will remove any descriptions you have added in the current version.
Forms
Use the drop-down button menu to save the changes you have made as a form set, load a form set, or reset the form as the default form set:
Manage
To save the parameters you have defined and re-use them in other functions, select Manage button to create a form set or load an existing form set.
Save
Click Save to save your changes as the default form set.
Save As
Click Save As to save your changes as a new form set.
Reset
Click Reset to clear the form of all values and reset the form to its default state.
Collapse
Click Collapse, where available, to minimise the form so that only the title bar is visible. To restore the form, press the Esc key.
You can also create a new Macro file via the File | New | New Macro or the Scripting | New Macro menu option. In this case the File Type is set to MACRO and cannot be changed.
To create a new New Lookup, select File New | New Lookup Table.