Import Location Grades
Location grades can be imported from two main sources:
- A text-based file listing the date/time, location, element and grade for each grade entry.
- A resource block model. Each location is associated with a "solid object" within the resource model. The importer will request a list of blocks which fall within this solid object. Information about the blocks is recorded as the “stocks” of the location. Movements from this location in the future, will deplete those stocks.
For more information about how the Resource Model Server is configured, refer to the Materials Management Configuration topic.
To import location grades:
- Select Import from the Materials Management menu.
- Select CSV or XLSX file as the data source.

The following prompts are displayed as you move through the Import wizard:
Presets & Existing Imports
Select the Last Import option to use the settings from the last import performed.
Import History
If you have previously imported data from a file, a list of previous imports is maintained for reference purposes. If the file still exits at the same location, you can click Next and navigate to the file. This allows you to quickly re-import data from a source file that has been updated.
File Structure
Use the Choose File... button provided to navigate to the location of a comma separated value (CSV) or Excel spreadsheet (XLSX) file containing the location grades you want to import. Each data row in the file must contain the date/time, location, element and grade, for each grade entry.
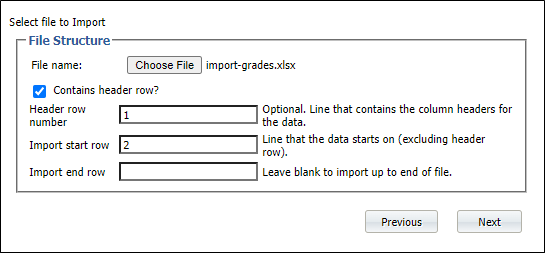
Contains header row & Import Start and End Rows
Specify whether the data file contains a header row containing field names. If the Contains header row option is selected, enter the row number on which the header data appears in the Header row number field. This will usually be row 1.
If you want to restrict the import to a subset of the data in the file, specify an Import start row and an Import end row. Click Next to continue.
Data Preview
A preview of the data in the comma separated file is displayed in a Data Preview. If the columns derived from the comma separated values in the file are not correct, you may need to begin the Import process again after manually correcting the file.

If the columns derived from the comma separated values in the file are correct, click Next to continue.
Data Mapping
In the Data Mapping pane, you can specify which columns in the file contain the mandatory fields required by the Import process. You can also import (or ignore) optional fields containing data for sub-locations and stocks associated with each location.
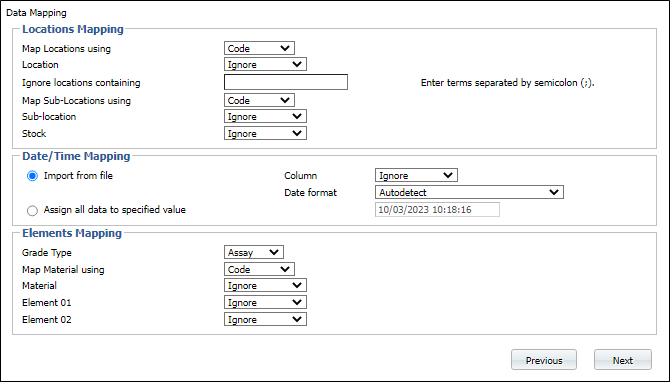
You must either assign a time and date to the data being imported or import date and time values from the input file.
For the grade values in the input file, specify the grade type and the column that contains the element grades.
If necessary, you can click the Previous button to preview the data file again. When you have mapped the columns to the required fields, click Next to continue.
Import Results
Finally, the results of the Import process are displayed. Errors and warnings are shown if the Import process is not successful.

You will need to refresh the Location Grades screen in order to view the grades you have imported.