Combine
![]()
Non-aligned block models (which have a different parent block origin and a different block size) can be combined.
Note: The Block Model | Reblock Model | Combine tool cannot be used for seam block models. To combine seam block models with XY centres aligned and sized the same, use the Combine Seam Block Models tool.
Input Block Model Files 1 and 2
Specify two block model files as inputs. The input block models may have different model extents. The order in which the input block models are specified (as Model 1 and Model 2) will affect how they are combined.
During processing, blocks from both block models are split into subblocks so that each subblock belongs to either:
- a block from Model 1
- a block from Model 2, or
- a block from both Model 1 and Model 2
For the latter case, block attributes are copied from Model 2. If there are unset attributes, attribute values are obtained from Model 1.
If there is a significant disparity between the two files in terms of sub-blocks, then the size of the output model may be significantly larger than the size of each input model.
Easting, Northing and Z fields
Specify Easting, Northing and Z coordinate fields for each file.
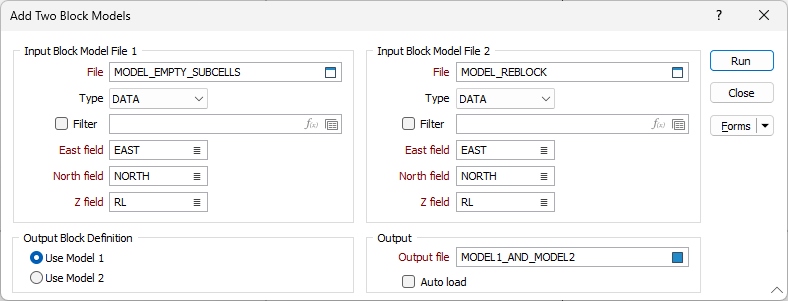
Output Block Definition
Select which input block model to use for the output block definition. For example, if Use Model 1 is selected, the output block definition will be taken from Model 1.
The toggle allows selecting the parent block size but does not change the grid alignment as that will always be automatically determined.
Output file
Double-click (or click on the Select icon) to select the name of the output file.
If the same field exists in both Model File A and Model File B, the values in Model B will be written to the output file. However, if field values are absent in Model File B, the values in Model A will be written to the output file.
Forms
Click the Forms button to select and open a saved form set, or if a form set has been loaded, save the current form set.
By design, the Forms button is not available for loaded Vizex layers (i.e. when opening the form set properties of a layer in the Vizex Layer Display pane). In Vizex, the Forms button is only available for new forms opened via the Home tab or the Vizex tab, in the Layer group (or by double-clicking on a form type node in the Vizex Layer Types pane).
Save and Save As
Click the Save button to save the changes you have made to the form set. Click Save As to save your changes as a new form set. Save As will default to the first available form set number.
Reset
Click Reset to clear the form of all values and reset the form to its default state.
Reset Tab
For tabbed forms, select Reset Tab to clear the active tab of all values and reset the tab to its default state - without making any changes to other tabs in the dialog.
Undo and Redo
Click Undo (CTRL + Z) to undo recent changes in the form. After an Undo, click Redo (CTRL + Y) to restore the last change that was undone.
Collapse
Collapse (roll-up) the form to preview a chart, or preview the results of an operation in Vizex, or obtain input values from Vizex, the Property Window, the File Editor, or the Plot Editor.
Run
Click the Run button to run the Combine process using the parameters you have defined.