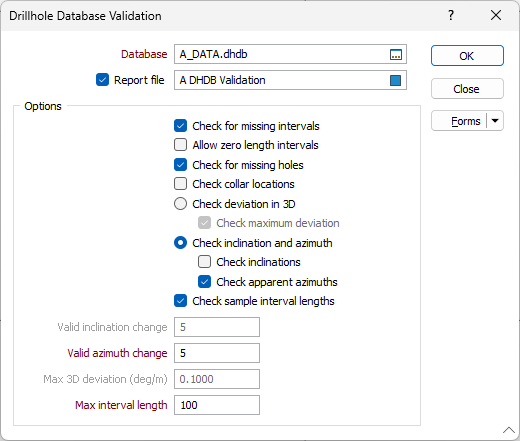
Validate Drillhole Database
![]()
Database
Double-click (F3) to select the name of the database containing the drillhole data to be validated.
Report File
Select the check box to enable the output of a report file containing the results of the validation process.
Optionally, double-click (or click on the Select icon) to select the name of the file where the results of the validation process will be written. If this field is left lank and the Report File is enabled, the application will automatically retrieve the report filepath based on the DHDB name and location.
Options
Check for missing intervals
Select this option if you want to:
- Check that the first FROM value in the Interval file = 0
- Check that the sample intervals are continuous in the Interval file
Allow zero length intervals
Select this option to allow zero length intervals. This may be a requirement during seam modelling, for example, when the thickness of a seam 'pinches' to zero.
Check for missing holes
A check is always made that the holes defined in a Survey file, Interval file or Event file are also defined in the Collar file.
If enabled, the "Check for missing holes" check box option will also check that holes in the Collar file are present in the Survey/Interval/Event file. Vertical holes, or holes with a single survey at the collar, do not need to be in the Survey file.
Check collar locations
Select this check box to check the locations of all collars as part of the validation.
Check deviation in 3D
Note that the Check deviation in 3D and Check inclination and azimuth options are mutually exclusive since they provide different ways to achieve the same outcome. When choosing between them, bear in mind that the Check inclinations and Check azimuths options are less sophisticated than the Check maximum deviation option, in terms of handling sub-vertical holes and variable survey spacings.
Select the Check maximum deviation option, to set a maximum allowable deviation (rate of change) in degrees per metre.
Check inclination and azimuth
Enabling Check inclinations also enables the Valid inclination change option. It applies the same checks to the consecutive inclination fields in the Survey file. If downhole surveys are closely spaced, a significant variation may indicate that an error has been made with one of the survey entries. Select Check inclinations then enter a valid inclination change in degrees.
Enabling Check apparent azimuths enables the Valid azimuth change option. It applies the same checks to the consecutive azimuth fields in the Survey file. Select Check apparent azimuths then enter a valid azimuth change in degrees.
A "Different Collar/Survey orientations" warning will be displayed if the collar orientation in the Collar file is different from the collar orientation in the Survey file.
A typical scenario might be when the geologist assigns a default collar orientation to the hole during drilling, but doesn't update the Collar file when the survey data is received. In this situation, the application will display the warning and only use the Survey file orientation.
Check sample interval lengths
Select the Check sample interval lengths option to check intervals against a specified maximum length and (optionally) ignore any sample intervals that don't have a value for the specified Grade field (See Allow zero length intervals above).
Valid inclination change
Select the Check inclinations option to set the magnitude of a Valid inclination change. Five degrees (5°) is usually an appropriate value. You will not be able to make an entry until you have selected the Check inclinations check box.
Valid apparent azimuth change
Select the Check apparent azimuths option to set the magnitude of a Valid azimuth change.
For a horizontal hole, the full value of the azimuth change is apparent. When a hole is vertical, the apparent azimuth change is always zero.
The dip is used to rescale the azimuth change to take into account the steepness of the hole.
Five degrees (5°) is usually an appropriate value. You will not be able to make an entry until you have selected the Check apparent azimuths check box.
Max 3D deviation
Select the Check deviation in 3D option, to set a maximum allowable deviation (rate of change) in degrees per metre. A good way to figure this out is to imagine how far you would allow a 100 m drillhole to deviate. If you would allow it to deviate by 5° then the max 3D deviation would be 5 divided by 100, or 0.05.
Max interval length
Select the Check sample interval lengths option to check intervals against a specified maximum length.
Interval and Event files are validated automatically when they are added to a Drillhole Database. Several basic checks are made:
- Records are sorted by HOLE ID and then FROM values.
- The holes in the Interval and Events files exist in the Drillhole Database.
- There are no overlapping intervals.
- There are no holes beyond the End of Hole depth.
OK
Finally, click OK to run the Database Validation process.
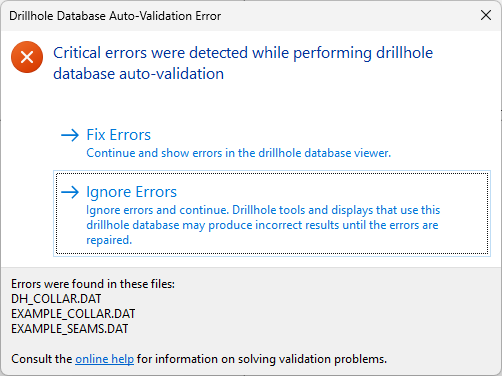
Note: When creating or editing a Drillhole Database, if you choose to ignore errors during auto-validation, holes where the hole depth is missing or is negative, are added to the database and flagged as invalid.
When displaying a Drillhole Trace in Vizex, holes which are invalid are displayed with a red cross at the collar and a warning icon is also added to the layer to show that the displayed data contains errors.
Forms
Click the Forms button to select and open a saved form set, or if a form set has been loaded, save the current form set.