DataGridView
The DataGridView control allows you to interact with and edit the rows and columns of a Dataset in a customisable grid. The DataGridView includes built-in column types and a template column for hosting custom content. The built-in row type includes a drop-down details section that you can use to display additional content below the cell values.
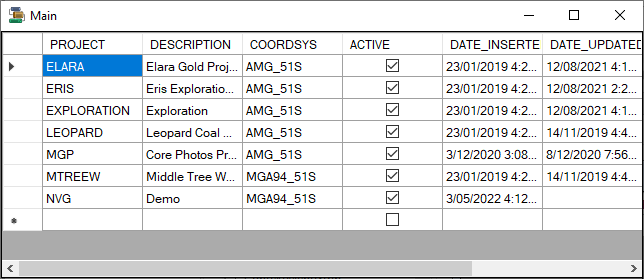
To display data in a DataGridView, you will need to create and configure a Connection, a DataSet, a Binding Source and a Table. Information on configuring the components is contained in Working with Data.
Properties
The key properties for the DataGridView control include:
-
DataMember. Specifies a specific column or list in the data source to which the DataGridView is bound.
-
DataSource. Specifies the data source for the DataGridView from the DataSets for your project.
Events
Events can be configured to determine the behaviour of the DataGridView control using the properties in the Events pane. For example, an action can be triggered on the creation of a new data column using the ColumnAdded Action property.
For information on configuring events and other components of the design using a script, see: Working with Scripts.
Adding a DataGridView
When you drag a DataGridView control to a form in the Flow Designer, the default size and properties will be applied. You can also click the DataGridView control and use the cross cursor to draw the size control you require. You can use the control properties to set the Data Source to be displayed in the grid; as well as Edit and Add Columns and specify the editing capability of the grid view for the user.

Click the Edit Columns... option in the control properties to open the Edit Columns form.
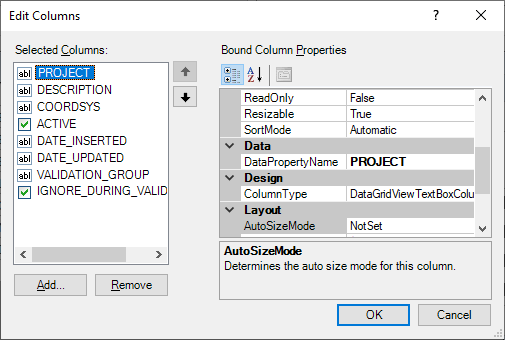
The Edit Columns form displays the selected columns for the grid from the Data Source. To add more columns, click the Add button. This will open the Add Column form.
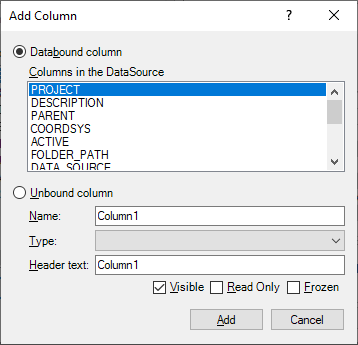
Select the Databound column option to add a column from the data source. Alternatively, select the Unbound column option and enter details for Name, Type and Header Text.
The check boxes at the bottom of the form determine whether the selected column is Visible, Read Only or Frozen (fixed or locked while scrolling through the data).
When you have configured your column, click the Add button. Click Close to return to the form.
Information on the properties and events for the DataGridView control can be viewed at the link to Microsoft® Documentation.