Stockpiles
Overview
Stockpiles are points in space that keep an inventory of the reserves dumped to and reclaimed from their location. Each material remains discrete and does not mix with the others in the stockpile.

Stockpiles step overview
Adding Stockpiles
Stockpiles must be represented by a node in Haul Infinity.

Stockpiles Nodes in Haul Infinity
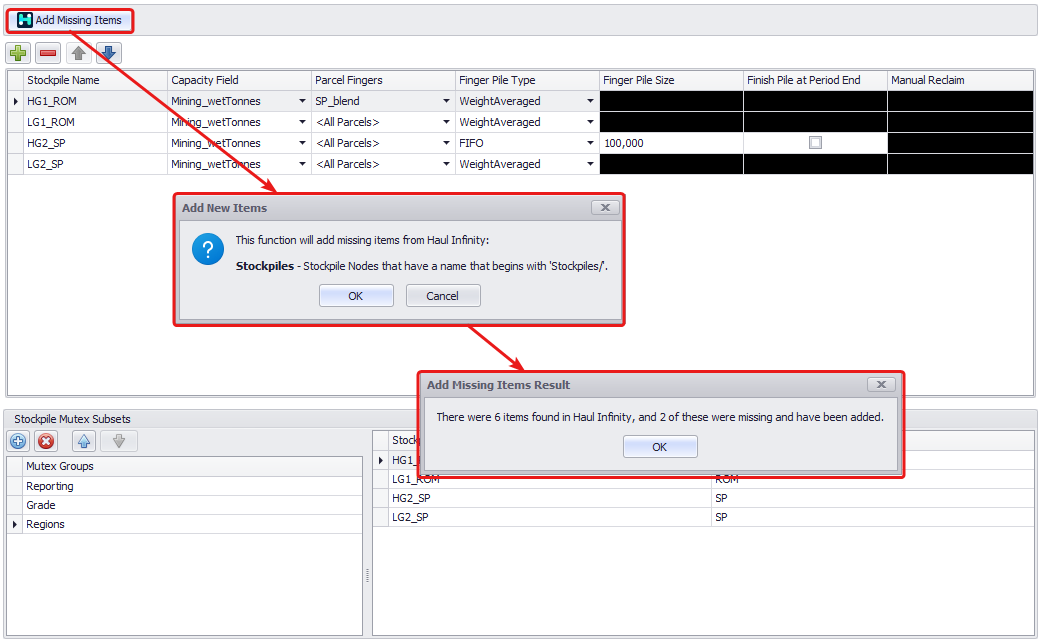
In ATS, stockpiles can be added using the Plus icon on the toolbar or be imported directly from Haul Infinity.
|
Option |
Description |
Example |
|---|---|---|
|
Adding Stockpiles manually |
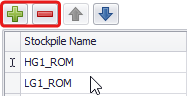
To add and remove stockpiles manually use the green plus and red minus buttons located in the top toolbar. The names in the Stockpile Name column must follow this convention:
|
|
|
Adding Stockpiles from Haul Infinity |
You can add all or missing stockpiles from Haul Infinity. For this, use the Add Missing Items button located in the top toolbar. Note, that this tool will only find items with a name that begins with “Stockpiles/”. |
|
Capacity Field
The schedule calendar contains a capacity row for each stockpile. The capacity field is the unit of measurement of stockpile size, such as volume or tonnes.

Selecting capacity field for each stockpile added to the project
Parcel Fingers
In the Parcel Fingers column choose how material types are binned in the stockpile.

Select <All Parcels> or preconfigured parcels group
Default <All Parcels>
With the default <All Parcels> selected, each material type is binned separately within the stockpile. For example, payloads of High Grade are all merged in the High-Grade pile, and payloads of Low Grade are all combined in the Low-Grade pile. When reclaiming from a parcel in the stockpile, the grades will be the weighted average of the total binned tonnes of that parcel.

Parcels are merged and stored in piles according to their Parcel type
Other Parcel Fingers
If scheduling in Optimise Products mode, the Optimiser can selectively reclaim parcel bins within a stockpile. For example, in a period where you are targeting higher grade material, the Optimiser may target the HG piles and leave the LG material behind. In reality, parcels sent to a stockpile will be blended into a homogenous pile, making it difficult to target and reclaim a specific parcel type. For more precise modelling (as may be required in short term plans), Mutex Parcel Subsets specified in Setup > Reserve Database > Parcel Subsets can be used.

Mutex Subsets can be used to blend stockpile material into a homogenous pile
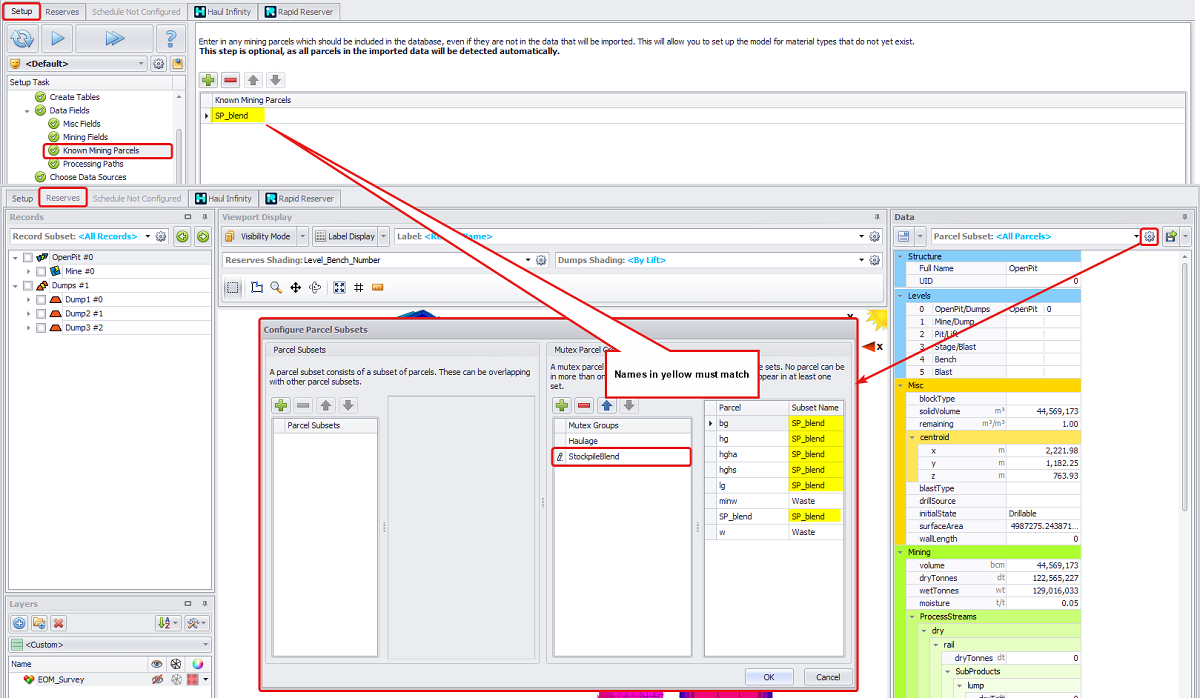
Step 1. Creating a new parcel to represent the blend of Stockpile material
Parcels can only be merged into another (already) existing parcel. Generating a new parcel to represent the blended stockpile material is recommended. To do this, tick the Specify Known Parcels option in the Configuration Options step.

Setup > Configuration Options > Specify Known Parcels
In Setup > Reserve Database > Data Fields > Known Mining Parcels, specify the parcel to represent the stockpile material.

Setup > Reserve Database > Data Fields > > Known Mining Parcels
Step 2. Creating Mutex Parcel group
Use Setup > Reserve Database > Parcel Subsets to generate the Mutex Parcel Group to be used in conjunction with the stockpiles. You can create a new Mutex Group (for example, “StockpileBlend”) and assign the relevant parcels to the created Known Mining Parcel. See: Mutex Parcel Subsets
Step 3. Selecting Mutex Group as Parcel Finger
Select the created Mutex group from the drop-down list in the Parcel Fingers column.

Apply the created Mutex group as a filter for relevant stockpiles
Important Note
When creating Mutex Parcel Groups make sure that names of parcels in the Subset Name column match exactly the names of Known Mining Parcels, otherwise you’ll get an error message that will prevent you from proceeding further with the setup. More details see in the Error Message section below.
Finger Pile Types
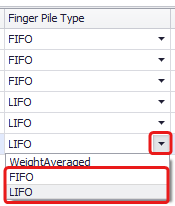
In the Finger Pile Types column, choose whether to build and reclaim stockpiles in discrete fingers.

Select applicable finger type from dropdown
The types of stockpiling depend on the mode in which planning is performed (constraining trucks or optimising by product). See the explanation in the table below.
|
Project Mode |
Constrain on Trucks |
Optimise Products |
|---|---|---|
|
Finger Pile Type |
Projects in Constrain on Trucks mode may choose to load First In First Out (FIFO) or Last In First Out (LIFO) logic. In Tactical Scheduler, FIFO and LIFO refer to the reclaim sequence of the piles within the stockpile fingers. |
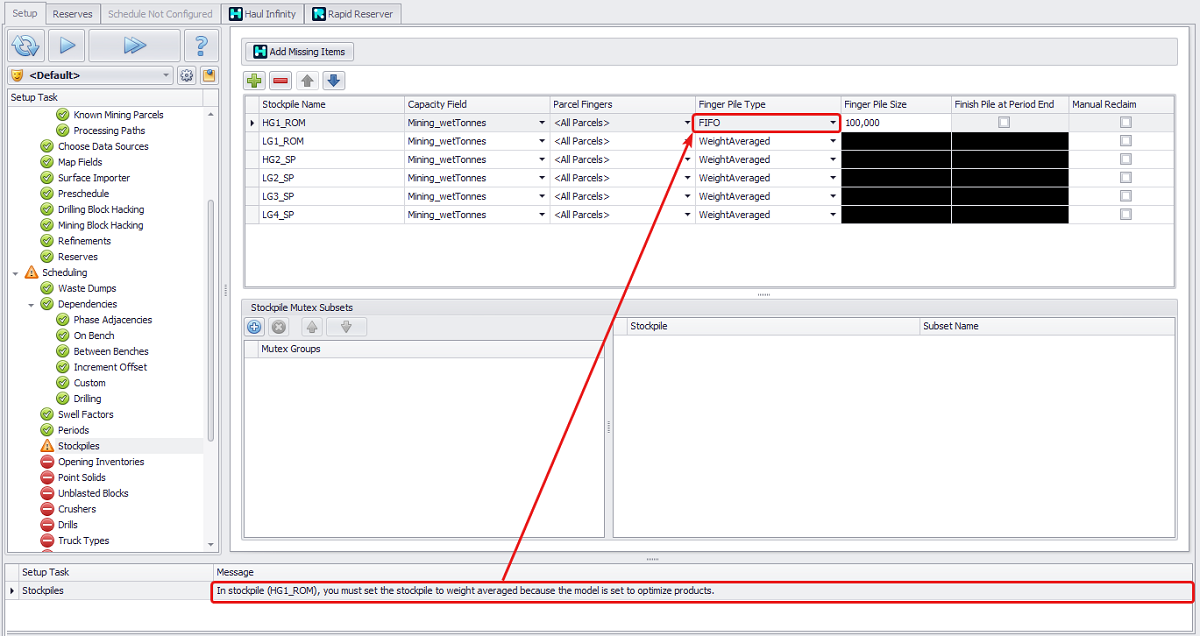
Projects in Optimise Products mode must always use Weight Averaged piles. Otherwise, you’ll get an error message preventing you from proceeding further through the setup without a correction. “In stockpile <(HG1_ROM)>, you must set the stockpile to weight average because the model is set to optimize products.” To fix, either select “WeightAveraged” finger pile type, or change the project mode to the “Constrain on trucks”, if required to use FIFO or LIFO stockpiling logic. |
|
Example |
|
|
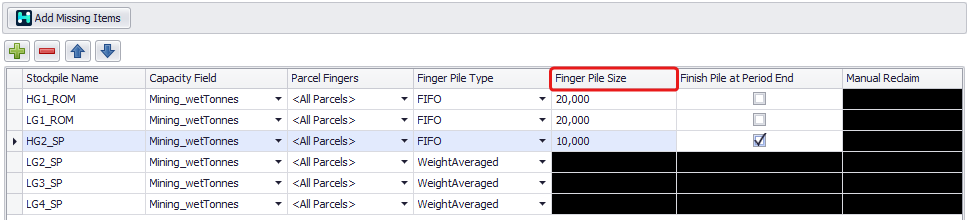
Finger Pile Size
In the Finger Pile Size column, enter sizes of each pile, following the instructions below.
|
Description |
Example |
|---|---|
|
|
|
The example on the right shows a setup for a stockpile which has fingers for all parcels. Each parcel finger is comprised of piles with a capacity equivalent to the value defined under the Finger Pile Size column. Pile number 3 in both the MG finger and the HG2 finger has not yet reached the 20,000t threshold, and therefore can't be reclaimed. If "LIFO" was selected in the Finger Pile Type column, this would cause there to be no reclaiming of HG2 or MG material. |
|
|
The same logic applies if a Mutex Subset is chosen as the Parcel Finger Type. In the example, there is one finger comprising of material type “SP BLEND”. Within that finger, there are multiple piles, each having a capacity equivalent to the value defined under the Finger Pile Size column. If a pile has not met the threshold, it cannot be reclaimed. |
|
|
Through FIFO and LIFO, it is possible to force a stockpile which comprises of a single material type to be fully built before it can be reclaimed. This can be achieved by setting the Finger Pile Size to the capacity of the stockpile. |
|


Finish Pile at Period End
Enabling the Finish Pile at Period End option allows piles which have not been fully built, to be reclaimed during the next period.
|
Explanation |
Example |
|---|---|
|
If we consider that setup of ROM_2 which has the Finish Pile at Period End option enabled, it can be observed that material is reclaimed off the stockpile before a 40,000t pile has been constructed. When using this option, the quantity reclaimed cannot exceed the closing balance of the previous period. This is why in period 3, only 3,631 tonnes of material is fed to the crusher despite there being 18,605 tonnes at the end of the period. |
|


Manual Reclaim
Enable the Manual Reclaim flag, if you want to manually reclaim the stockpile selected.

Flag stockpiles to be reclaimed manually
Since in the Constrain on Trucks mode all of the stockpiles reclaiming is manual, this section in the Stockpiles step appears blacked out, and available only in the Optimise Products +mode.
Flagging Manual Reclaim for some stockpiles adds “Reclaim Target” line in the Calendar.

Extra row “Reclaim Target” added to stockpiles flagged for Manual Reclaim
Reclaiming stockpiles manually also prevents sending material to the destination crusher specified in the Destination Logic step.
If you get an optimisation error when running the Schedule with a specified Reclaim Target refer to the example in the following section.
Optimisation Error
If you flag a stockpile to be Manually Reclaimed in the Stockpiles step, and then assign it a Reclaim Target in the Calendar, you may get an Optimisation error.
“A 'Manual Reclaim' stockpile is a source in a destination rule that has a crusher feed destination assignment. This is not allowed.“

Reclaim Target causing Optimisation error
To fix, review whether it’s required to manually reclaim the specified stockpile, as well as its Destination rule, and leave Reclaim Target set to “0” in the Calendar.

Leave Reclaim Target set to zero for manually reclaimed stockpiles
Stockpiles Mutex Subsets
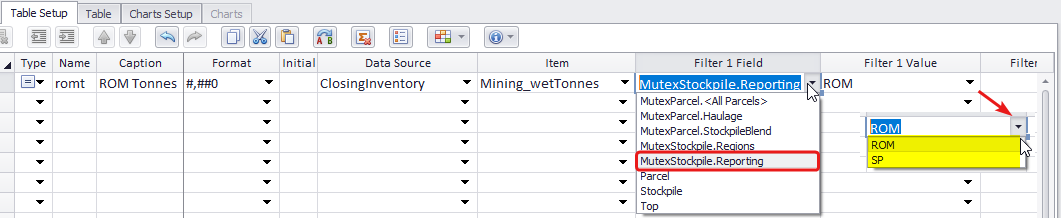
In the Stockpiles Mutex Subsets panel, assign your stockpiles into different groups to make reporting simpler.
Created in this panel, Mutex groups can be referenced further in the scheduling, when a filter in the Chrono report.
|
Example |
Some projects can have multiple ROM stockpiles. You may need to report total tonnes on "ROM" or “LT” for example. |
|---|---|
|
Setting |
Create Mutex Subset to be used for reporting and assign Subset Name for each of the stockpiles.
|
|
Usage in Reporting |
Now in the Schedule > Reporting tab you can filter by this Mutex Subset. MutexStockpile.Reporting = "ROM", which had been set to include all ROM stockpiles.
|

Error message
If names of parcels in the created Mutex Subset don’t match with the names of known mining parcels, you’ll get an error message, preventing you from proceeding further in the setup.
“One of the stockpiles uses mutex parcel subset <(StockpileBlend)>, which cannot be used because the following parcels are not mapped to parcel names which already exist in the model: <SP_blend-Blend, w-Waste, bg-Blend, lg-Blend, minw-Waste, hghs-Blend, hgha-Blend, hg-Blend>”.

Error message preventing you from proceeding further in the setup
|
Reason |
Remedy |
|---|---|
|
Names of Subset parcels are not mapped correctly and don’t match names of existing parcels |
Review parcels naming and mapping in Setup > Reserve Database > Data Fields > Known Mining Parcels and Setup > Reserve Database > Parcel Subsets > Mutex Parcel Groups.
Mapped names must fully match names specified in the Known Mining Parcels. Mismatching names, for example “Blend” instead of “SP_Blend”, will result in an error, since “Blend” doesn’t exist as a parcel name to map other parcels into. |
|
Tip |
Despite the fact that all parcels in the imported data are detected automatically, you can specify all existing in your project parcels in the Known Mining Parcels step. It will help to avoid remapping parcels each time after updating reserves naming.
|
 If you are working with the unembedded Rapid Reserver and have numerous parcels, to make sure that existing parcels names are correct, you can export Mining Database to CSV and remove duplicates for the Parcel column. It will leave you with a list of existing parcels to copy and paste in the